How to fill in your RLE1 form
A step-by-step guide explaining how to fill in your RLE1 form and what to draw on your map(s).
Read this section together with updated guidance about using the RLE1 form electronically and submitting it by email, published on the RLE1 form and guidance page on GOV.UK.
You only need to fill in the parts of the form which are relevant to you, but you need to return the whole RLE1 form to us.
Please remember:
- not to use correction fluid
- you need to enter an effective date in Part D for all requests
- you must not change any of the wording in Part F
- it is your responsibility to make sure the information you give on this form is accurate.
Fill in your SBI and Name of beneficiary (or business name) and, if possible, the main County Parish Holding (CPH) number. You also need to say whether any land included on the RLE1 form will be used to apply for or claim under a Rural Development Programme for England (RDPE) or domestic agri-environment or woodland scheme. (Please note the wording on the RLE1 form only states RDPE schemes but also includes domestic schemes).
If you want to use land to claim BPS at the same time as an agri-environment or woodland scheme applicant wants to use it, then it needs to remain linked to your SBI at the same time. To do this, write ‘Dual use – maintain link to existing SBI’ on the front page of the RLE1 form. Or, if you are requesting a change to your digital maps, put ‘RLE1 Land Change’ and your SBI in the email subject heading. Make sure you also enter ‘(Keep link)’ after the business name in section B2.
You no longer have to fill in CPH numbers on the RLE1 form. However, please remember that there are Defra rules on the allocation of CPHs and British Cattle Movement Service (BCMS) links to land parcels for animal movements and disease control purposes.
If you do not have an appropriate CPH to use, call 03000 200 301 to get a new one.
Fill in Part B if you want to:
- transfer BPS entitlements or land
- remove land
You need to fill in a separate RLE1 form for each type of transfer or removal
For example, one form for transfer by lease, one form for transfer by sale and another form for removing a parcel no longer part of the occupied land. You must also use separate RLE1 forms for land and BPS entitlements transfers.
You do not need to fill in Parts B and C if you only want to register new fields, make changes to permanent non-agricultural areas or features or make permanent boundary changes to your holding.
B1 – How are you disposing of your BPS entitlements or land?
Put an ‘X’ in one box only to tell us which type of transfer you want to make. Inheritance can apply to land or BPS entitlements.
To remove land when your holding type is shown correctly as ‘tenant’ in the Rural Payments service or it correctly shows less than 100% of the land parcel as owned you need to put an ‘X’ in the ‘Sale/gift of land’ box.
B2 – Details of the business you are transferring BPS entitlements or land to
Fill in the SBI and name of the beneficiary or business you are transferring the BPS entitlements or land to. You need to give us these details or your transfer may be rejected.
To remove land when your holding type is shown correctly as ‘tenant’ in the Rural Payments service or it correctly shows less than 100% of the land parcel as owned by you, use the SBI 200116651. The business name for this SBI is ‘Land removed from your holding’.
If the business receiving the BPS entitlements or land does not have an SBI, they should register using the Rural Payments service to get one. You need to get their SBI from them before you send your RLE1 form to us (except for inheritance, mergers or scissions where we are still assessing a new business).
The SBI is not needed in B2 if:
- you’re giving up BPS entitlements
- you’re only transferring land out of agricultural production (for example, land that has been sold for residential use).
B3a – CPH number of the farmer receiving the land
You no longer need to fill in CPH numbers on the RLE1 form, but it may be helpful.
B3b – Effective date of transfer
Fill in the date you want the transfer to take place. We must have this information for all transfer types.
If you are transferring land to an agri-environment or woodland scheme applicant, fill in the ‘effective date of transfer’ as the date the parcel was legally transferred.
B3c – Lease start date
Only fill in a date if the transfer is a lease or sub-lease. Give the date your lease or sub-lease agreement starts.
B4 – Lease end date
Only fill in this date if the transfer is a lease or sub-lease. Give the date when the lease or sub-lease agreement ends. You need to give a lease end date.
B5/B6 – Merger or Scission
Only fill in these questions if your transfer is as a result of a merger or scission. If not, ignore these questions.
Put an ‘X’ in either the Merger or Scission box if your transfer is as a result of a business change. If you’ve filled in B5, go to B6.
You should also put an ‘X’ in one box to confirm whether you’ve updated your registered business details in the Rural Payments service or filled in and sent us a ‘separate business questionnaire’. You need to do one of these things before we can make the transfer. Until then, we’ll put your RLE1 form on hold.
Fill in Part C if you want to transfer or give up BPS entitlements.
You can check the details of your BPS entitlements in the Rural Payments service.
You can only transfer BPS entitlements that you hold on the day you send the RLE1 form to us.
C1 – Number of entitlements held
For each region you want to transfer BPS entitlements from, enter the number of BPS entitlements you hold in that entitlement region, to 2 decimal places.
This is the number of BPS entitlements that you hold, not the number that you are transferring.
C2 – Number of entitlements to transfer/or surrender
Fill in the number of BPS entitlements to transfer/give up in each entitlement region.
Put an X in ‘All’ if you want to transfer/give up all your BPS entitlements in that region. Leave both boxes blank if you do not want to transfer/give up any BPS entitlements in that region.
What to draw on your sketch map
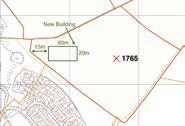
To register a land parcel to your holding (whether it has been mapped before or not), mark the boundary using a fine-tipped colour pen and mark the correct Ordnance Survey (OS) sheet and National Grid (NG) field number if you know it.
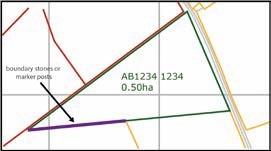
If the boundary or part of it, is marked by boundary stones or marker posts you need to show this clearly on your map. Use a different colour pen to draw the boundary that is marked by boundary stones or marker posts. Label this boundary clearly on your map to show it is marked by boundary stones or marker posts. This will reduce the risk of parcels being merged in error in the future.
Write the land parcel number clearly on the map. If you do not know it, you can estimate it. When we register the land parcel to your holding, the land parcel reference number may not be the same as the estimated number. For more information about how to estimate a land parcel reference number read ‘Annex 2 - How to estimate a land parcel reference number’.
It will help us to register the boundary and measure the area correctly if you give us measurements of the boundary from a clearly defined point, such as a corner along an existing boundary, and where it lies in relation to other boundaries.
You do not need to give details of the person you’ve transferred the field from when adding a land parcel to your holding.
To add a land parcel correctly, fill in the following columns on the RLE1 form, Part D: Field transfers and boundary changes as follows.
D4 – Action Code
Fill in the action code ‘N’.
D5 – Effective date of change
Fill in the effective date of change, which is the date when you started (or will start) claiming on the land parcel. If you intend to apply for an agri-environment or woodland scheme agreement, give the ‘effective date of change’ as the date you took legal responsibility for the land parcel. If the date you took legal responsibility was 1 January, fill in the effective date of change as 31 December (the day before).
D6 – New OS map sheet reference and NG number
Fill in the OS map sheet reference and the NG number of the land parcel(s) you are adding.
D7 – Total field size in hectares
Fill in the total land parcel area in hectares, to 4 decimal places – your best estimate.
D9 – CPH for the land parcel
You no longer need to fill in CPH numbers on the RLE1 form, but it may be helpful.
What to draw on your sketch map
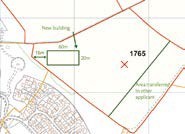
If you want to remove a land parcel, put a cross through the land parcel and write clearly on the map. If you are transferring (selling or leasing) the land to another agricultural holding or if you are taking the land out of agricultural use (for example, as building land or for the construction of a road), write this on the map.
To transfer or remove a land parcel, fill in the ‘Part D: Field transfers and boundary changes’ columns on the RLE1 form as follows.
D1 – Existing OS map sheet reference and NG number
Fill in the OS map sheet reference and the NG number of the land parcel(s) you are removing or transferring.
D2 – Total field size in hectares
Fill in the total land parcel area in hectares, to 4 decimal places.
D4 – Action Code
Leave this blank if you are transferring the land to another farmer or to the SBI ‘Land removed from your holding’. Fill in the action code ‘B’ if you are transferring the land out of agricultural use.
D5 – Effective date of change
Fill in the effective date of change, which is the date when you’ll transfer (sell or lease) the land parcel.
If you are removing land parcels because:
- your holding type is ‘tenant’ in the Rural Payments service, or
- the Rural Payments service shows less than 100% of a land parcel as owned
you need to fill in the ‘effective date of change’ as 01/01/2022.
If the land parcel will be used to apply for an agri-environment or woodland scheme, give the ‘effective date of change’ as the date the agri-environment or woodland scheme applicant will take/took legal responsibility for the land parcel.
D6 – New OS map sheet reference and NG number
If you are transferring a land parcel and the size/shape of the land parcel is changing, fill in the estimated new OS map sheet reference and NG number of the land parcel. For more information about how to estimate a land parcel reference number read ‘Annex 2 - How to estimate a land parcel reference number’.
If you are transferring a land parcel and the size/shape is not changing, there is no need to fill in this column.
D7 – Total field size in hectares
If you are transferring a land parcel and the total field size will change, fill in the new estimated area for the land parcel involved, to 4 decimal places. If you are transferring a land parcel and the total field size will not change, there is no need to fill in this column.
D8 – Transfer this field
If you are removing this land parcel and it is being transferred to another person or business (as detailed in part B2), put an ‘X’ in the ‘Transfer this field’ column. If you are removing this land parcel and it is not a transfer, leave this column blank.
D9 – CPH for the land parcel
You no longer need to fill in CPH numbers on the RLE1 form, but it may be helpful.
What to draw on your sketch map
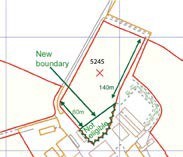
Cross through the incorrect boundary line and mark the new boundary using a fine tipped colour pen, showing that this is the correct permanent land parcel boundary. Write on the map what type of permanent boundary it is. If the boundary or part of it is marked by boundary stones or marker posts, you need to show this clearly on your map. Use a different colour pen to draw the boundary that is marked by boundary stones or marker posts.
Label this boundary clearly on your map to show it is marked by boundary stones or marker posts. This will reduce the risk of parcels being merged in error in the future.
If you are reducing the size of the land parcel, write on the map to show whether the area that you are removing should be part of another land parcel, given a new land parcel number for its own area, or should not be registered at all as it is not an eligible area.
If you want to change a shared boundary or the boundary of a shared land parcel, please speak with the other land user to make sure that the information you give to us is agreed and consistent.
If the new boundary is not showing on our map or the OS map you are using, it would help us to register the boundary and measure the area correctly if you give us measurements of the new boundary from a clearly defined point, such as a corner along an existing boundary and where it lies in relation to other boundaries.
To record a permanent boundary change to a land parcel correctly, fill in the following columns on the RLE1 form, Part D: Field transfers and boundary changes.
D1 – Existing OS map sheet reference and NG number
Fill in the OS map sheet reference and the NG number of the land parcel for which you are changing the boundary.
D2 – Total field size in hectares
Fill in the old land parcel area, to 4 decimal places.
D4 – Action code
Fill in the action code ‘B’ for a boundary change.
D5 – Effective date of change
Fill in the effective date of change, which is the date when you changed (or will change) the boundary. If you intend to split or alter a parcel shape to claim Rural Development Programme funding or domestic agri-environment or woodland scheme, you need to check the terms and conditions of your agreement as well as any agreement specific guidance including:
- Guidance on agri-environment agreements (Countryside Stewardship, Environmental Stewardship) and the Basic Payment Scheme on GOV.UK
- Forestry Commission guidance ON42 on GOV.UK
If you make changes after your agreement start date, your agreement will need to be reviewed and updated to reflect the changes.
D6 – New OS map sheet reference and NG number
Fill in the estimated new OS map sheet reference and NG number of the land parcel after the change. These may be the same as the old ones, but you should still give them to us. When we update the land parcel in your digital map, the land parcel number may not be the same as the estimated number.
For more information about how to estimate a land parcel reference number read ‘Annex 2 - How to estimate a land parcel reference number’.
D7 – Total field size in hectares
Fill in the new estimated land parcel area after the boundary change, to 4 decimal places – your best estimate.
What to draw on your sketch map
Cross through the previous boundary line using a fine tipped colour pen. Mark on the map the new NG number. You can only merge land parcels when:
- the boundary between the land parcels has been permanently removed
- both land parcels have the same region classification, for example, you cannot merge parcels that are split by a Less Favoured Area line or a Registered Common boundary.
To merge land parcels, fill in the following columns on the RLE1 form, Part D: Field transfers and boundary changes as follows.
D1 – Existing OS map sheet reference and NG number
Fill in the OS map sheet reference and the NG number for each of the land parcels you are combining.
D2 – Total field size in hectares
Fill in the areas of each old land parcel, to 4 decimal places.
D3 – Group
Use the group column to identify all of the land parcels that you are combining. Give your own two digit number, for example, 01, 02 or 03, to act as a group code.
Give the same group code to each land parcel you are combining.
D4 – Action Code
Fill in the action code ‘C’ for combining land parcels.
D5 – Effective date of change
Fill in the effective date of change, which is the date you merged (or will merge) the land parcels.
If you intend to merge parcels to claim Rural Development Programme funding or domestic agri-environment or woodland schemes, you need to check the terms and conditions of your agreement as well as any agreement specific guidance, to make sure you can make this change and what you need to do. If you make changes after your agreement start date, your agreement will need to be reviewed and updated to reflect the changes.
D6 – New OS map sheet reference and NG number
Fill in the estimated new OS map sheet reference and NG number of the land parcel once it is merged. When we update the land parcel in your digital map, the land parcel reference number may not be the same as the estimated number. For more information about how to estimate a land parcel reference number read ‘Annex 2 - How to estimate a land parcel reference number’.
D7 – Total field size in hectares
Fill in the new estimated area for the merged land parcel, to 4 decimal places – your best estimate.

What to draw on your sketch map
Mark the new boundary using a fine tipped colour pen. Write on the map what type of permanent boundary it is. If the boundary or part of it is marked by boundary stones or marker posts, you need to show this clearly on your map. Use a different colour pen to draw the boundary that is marked by boundary stones or marker posts. Label this boundary clearly on your map to show it is marked by boundary stones or marker posts. This will reduce the risk of parcels being merged in error in the future.
You should only split land parcels if there’s a permanent boundary within the perimeter boundary of the land parcel shown on the map.
Do not mark boundaries if the land parcel has been split on a temporary basis, for example, using an electric fence or between 2 or more crops.
If the new boundary is not shown on our map or the OS map you are using, it would help us to register the boundary and measure the area correctly, if you give us measurements of the new boundary from a clearly defined point, such as a corner along an existing field boundary and where it lies in relation to other boundaries.
To split a land parcel, fill in the following columns on the RLE1 form, Part D: Field transfers and boundary changes as follows.
D1 – Existing OS map sheet reference and NG number
Fill in the OS map sheet reference and the NG number of the land parcel you are dividing.
D2 – Total field size in hectares
Fill in the area of the old land parcel, to 4 decimal places.
D3 – Group
Use the group column to identify all of the land parcels you are dividing. Give your own two digit number, for example, 01, 02 or 03 to act as a group code.
Give the same group code to each land parcel you are dividing.
D4 – Action Code
Fill in the action code ‘D’ for dividing land parcels.
D5 – Effective date of change
Fill in this date for each land parcel, this is the date when you split (or will split) the land parcel.
If you intend to split a parcel to claim Rural Development Programme funding or domestic agri-environment or woodland scheme , you need to check the terms and conditions of your agreement as well as any agreement specific guidance, to make sure you can make this change and what you need to do. If you make changes after your agreement start date, your agreement will need to be reviewed and updated to reflect the changes.
D6 – New OS map sheet reference and NG number
Fill in the estimated new OS map sheet references and NG numbers of the land parcels once they have been divided. When we update the land parcel in your digital map, the land parcel reference number may not be the same as the estimated number. For more information about how to estimate a land parcel reference number read ‘Annex 2 - How to estimate a land parcel reference number’.
D7 – Total field size in hectares
Fill in the new estimated areas for the new split land parcels, to 4 decimal places – your best estimate.
What to draw on your sketch map
Mark the boundary of the feature using a fine tipped colour pen and write clearly on the map what type of feature it is. Where possible, write the land use code from Annex 1 (this will help us record it correctly).
If you need to add an area such as a building or farmyard, so that you can apply for Countryside Stewardship options or capital items, you must add it in the same way as any other land parcel. The whole area should be marked on the map as a single land parcel. You cannot mark a building or part of a yard as an individual land parcel. It should be shown as a separate land cover in the larger farmyard area or surrounding land parcel. It can only be split up if the boundaries you mark on the map show permanent, physical boundaries in the area. Read ‘Permanent land parcel boundaries’ in this guidance for the definition and details of permanent boundaries.
Find out more about BPS permanent non-agricultural areas or features in the ‘How to apply’ guidance booklets for the Basic Payment Scheme on GOV.UK.
Also read Annex 1: List of permanent non-agricultural areas and features.
To add a feature to the land parcel correctly, fill in the following columns on the RLE1 form, Part D: Field transfers and boundary changes.
D1 – Existing OS map sheet reference and NG number
Fill in the OS map sheet reference and the NG number of the land parcel(s) to which you are adding the feature.
D2 – Total field size in hectares
Fill in the total land parcel area in hectares, to 4 decimal places.
D4 – Action Code
Fill in the action code ‘I’ for a feature.
D5 – Effective date of change
Fill in the effective date of change, which is the date when the change took place or will take place.
If you have, or are applying for, an agri-environment or woodland scheme agreement you need to read the relevant guidance:
- Guidance on agri-environment agreements (Countryside Stewardship, Environmental Stewardship) and the Basic Payment Scheme on GOV.UK
- Forestry Commission guidance ON42 on GOV.UK
These will tell you what date to use for the ‘effective date of change’ on the RLE1 form as this may not be the date the actual change was made.
You need to check the terms and conditions of your agreement as well as any agreement specific guidance, to make sure you can make this change and what you need to do. If you make changes after your agreement start date, your agreement will need to be reviewed and updated to reflect the changes.
What to draw on your sketch map
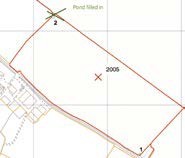
If you want to remove a permanent non-agricultural area or feature from your maps, put a cross through the feature and write clearly on the map that you want to remove it. Where possible, write the new land use code (this will help us record it correctly). You can find the land use codes on GOV.UK.
Find out more about BPS permanent non-agricultural areas or features in the latest BPS rules.
If you have an agri-environment or woodland scheme agreement you need to check the terms and conditions of your agreement as well as any agreement specific guidance, to make sure you can make this change and what you need to do. If you make changes after your agreement start date, your agreement will need to be reviewed and updated to reflect the changes.
To remove the feature from the land parcel correctly, fill in the following columns on the RLE1 form, Part D: Field transfers and boundary changes.
D1 – Existing OS map sheet reference and NG number
Fill in the OS map sheet reference and the NG number of the land parcel(s) you are removing the feature from.
D2 – Total field size in hectares
Fill in the total land parcel area in hectares, to 4 decimal places.
D4 – Action Code
Fill in the action code ‘I’ for a feature.
D5 – Effective date of change
Fill in the effective date of change, which is the date when the change took place or will take place.
If the feature never existed or the date of the change is unknown, fill in the ‘effective date of change’ as 01/01/2022.
If you have, or are applying for, an agri-environment or woodland scheme agreement you need to read the relevant guidance:
- Guidance on agri-environment agreements (Countryside Stewardship, Environmental Stewardship) and the Basic Payment Scheme on GOV.UK
- Forestry Commission guidance ON42 on GOV.UK
These will tell you what date to use for the ‘effective date of change’ on the RLE1 form as this may not be the date the actual change was made.
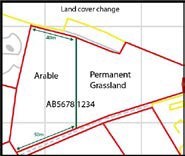
What to draw on your sketch map
Write ‘Land cover change’ at the top of your sketch map. Clearly label the land parcel with the new land cover (arable land, permanent grassland, permanent crops or non-agricultural). If the land cover is non-agricultural, write the land use code from Annex 1 (this will help us record it correctly).
If there’s more than one land cover in the land parcel you need to clearly mark the areas of each land cover using a fine tipped colour pen. It would help us to register the different areas within the land parcel correctly, if you give us the measurements of the areas from a clearly defined point, such as a corner along an existing boundary and where it lies in relation to other boundaries. Label each area on your map to clearly show the new land cover.
If you have a narrow strip of land (a sliver) between a non-agricultural area such as a track or watercourse, and the boundary of the land parcel, you cannot change the land cover of the sliver to arable land. This is because it is not possible to cultivate these areas.
To record a change of land cover for a land parcel correctly, fill in the following columns on the RLE1 form, Part D: Field transfers and boundary changes.
D1 – Existing OS map sheet reference and NG number
Fill in the OS map sheet reference and the NG number of the land parcel for which you are changing the land cover.
D2 – Total field size in hectares
Fill in the total land parcel area in hectares, to 4 decimal places.
D4 – Action Code
Fill in the action code ‘I’.
D5 – Effective date of change
Fill in the effective date of change, which is the date when you changed (or will change) the land cover.
If you have, or are applying for, an agri-environment or woodland scheme agreement you need to read the relevant guidance:
- Guidance on agri-environment agreements (Countryside Stewardship, Environmental Stewardship) and the Basic Payment Scheme on GOV.UK
- Forestry Commission guidance ON42 on GOV.UK
These will tell you what date to use for the ‘effective date of change’ on the RLE1 form as this may not be the date the actual change was made.

How to check your digital maps for hedges
Check your digital maps in the Rural Payments service. Make sure you’ve clicked the hedges icon so you can check which boundaries are shown with hedges. You only need to add hedges if you cannot see them on your digital maps and you are using them for:
- a Countryside Stewardship application – only options BE3 (Management of hedgerows), BN5 (Hedgerow laying) and BN6 (Hedgerow coppicing)
- a Countryside Stewardship claim – only option BE3
Read the latest scheme rules for more information about including hedges in your claim(s). If you need to add hedges to your digital maps, print a copy of the relevant map(s) with the hedges visible and follow the instructions below.
What to draw on your sketch map
Mark the boundary of the hedge using a fine tipped colour pen and write clearly on the map if this is a hedge. You also need to clearly state the length of the hedge.
To add a hedge to a land parcel correctly, fill in the following columns on the RLE1 form, Part D: Field transfers and boundary changes.
D1 – Existing OS map sheet reference and NG number
Fill in the OS map sheet reference and the NG number of the land parcel(s) to which you are adding the hedge.
D2 – Total field size in hectares
Fill in the total land parcel area in hectares, to 4 decimal places
D4 – Action Code
Fill in the action code ‘B’ for the boundary feature change.
D5 – Effective date of change
Fill in the effective date of change as 1 January 2022 or, if later, the date when the change took place or will take place.
What to draw on your sketch map
If you want to make several changes to one land parcel, mark the new boundaries and other features you want to change in the land parcel, following the information earlier in this section.
To record all changes correctly, fill in the following columns on the RLE1 form, Part D: Field transfers and boundary changes.
D1 – Existing OS map sheet reference and NG number
Fill in the OS map sheet reference and the NG number of the land parcel(s) you want to change.
D2 – Total field size in hectares
Fill in the total land parcel area in hectares, to 4 decimal places.
D3 – Group
If you want us to make several changes to one land parcel use the group column to show the change is part of a number (group) of changes to be made on the land parcel. Give your own two digit number, for example, 01, 02 or 03 to act as a group code. Use the same group code for each change to that land parcel.
D4 – Action Code
Fill in the relevant action code, for example ‘C’ or ‘D’ or ‘I’ or ‘B’.
D5 – Effective date of change
Fill in the effective date of change, which is the date when the change took place or will take place. If the feature never existed or the date of the change is unknown, fill in the ‘effective date of change’ as 01/01/2022.
If you have, or are applying for, an agri-environment or woodland scheme agreement you need to read the relevant guidance:
- Guidance on agri-environment agreements (Countryside Stewardship, Environmental Stewardship) and the Basic Payment Scheme on GOV.UK
- Forestry Commission guidance ON42 on GOV.UK
These will tell you what date to use for the ‘effective date of change’ on the RLE1 form as this may not be the date the actual change was made.
You need to check the terms and conditions of your agreement as well as any agreement specific guidance, to make sure you can make this change and what you need to do. If you make changes after your agreement start date, your agreement will need to be reviewed and updated to reflect the changes.
D6 – New OS map sheet reference and NG number
Fill in the estimated new OS sheet references and NG numbers of any new land parcel(s). When we update the land parcel(s) in your digital map, the land parcel reference number(s) may not be the same as the estimated number(s).
For more information about how to estimate a land parcel reference number read ‘Annex 2 - How to estimate a land parcel reference number’.
D7 – Total field size in hectares
Fill in the new estimated areas for the new split land parcels, to 4 decimal places – your best estimate.
D8 – Transfer this field
If you are removing/adding a land parcel and it is being transferred to another person or business, put an ‘X’ in the Transfer this field column. If you are removing/adding a land parcel and it is not a transfer, leave this column blank.
D9 – CPH for the land parcel
You no longer need to fill in CPH numbers on the RLE1 form, but it may be helpful.
If you are sending supporting documents with your RLE1 form, we need to know what you’ve included. If you are not sending any supporting documents, please ignore Part E.
The following maps are acceptable supporting documents:
- RPA maps
- Natural England Farm Environment Record map
- OS/professionally drawn maps
Keep a copy of documents you send to us
We cannot return documents to you and we strongly recommend that you keep a copy of your completed RLE1 form for reference, as well as copies of any maps and supporting documents that you are sending with the RLE1 form.
You must read the declaration and responsibilities carefully before signing the RLE1 form.
If you are sending us a paper RLE1 form, remember to:
- use capital letters
- sign and date the RLE1 form
- make sure that you have the correct permission level to sign the RLE1 form. See the ‘Permissions’ table for the list of appropriate permission levels
- complete in your own name - not the name of the business
- give your customer reference number (CRN) if you have one or, explain your relationship to the beneficiary.
We will reject your RLE1 if you cross out or deface the declaration and responsibilities in Part F.
If you are sending us an electronically completed RLE1 form, we do not need a written signature. Fill in the signature box electronically by typing your name. You must have the correct permission level to submit the RLE1 form. Read about correct permission levels in the ‘Permissions’ table in this guide.