Sparkling Water
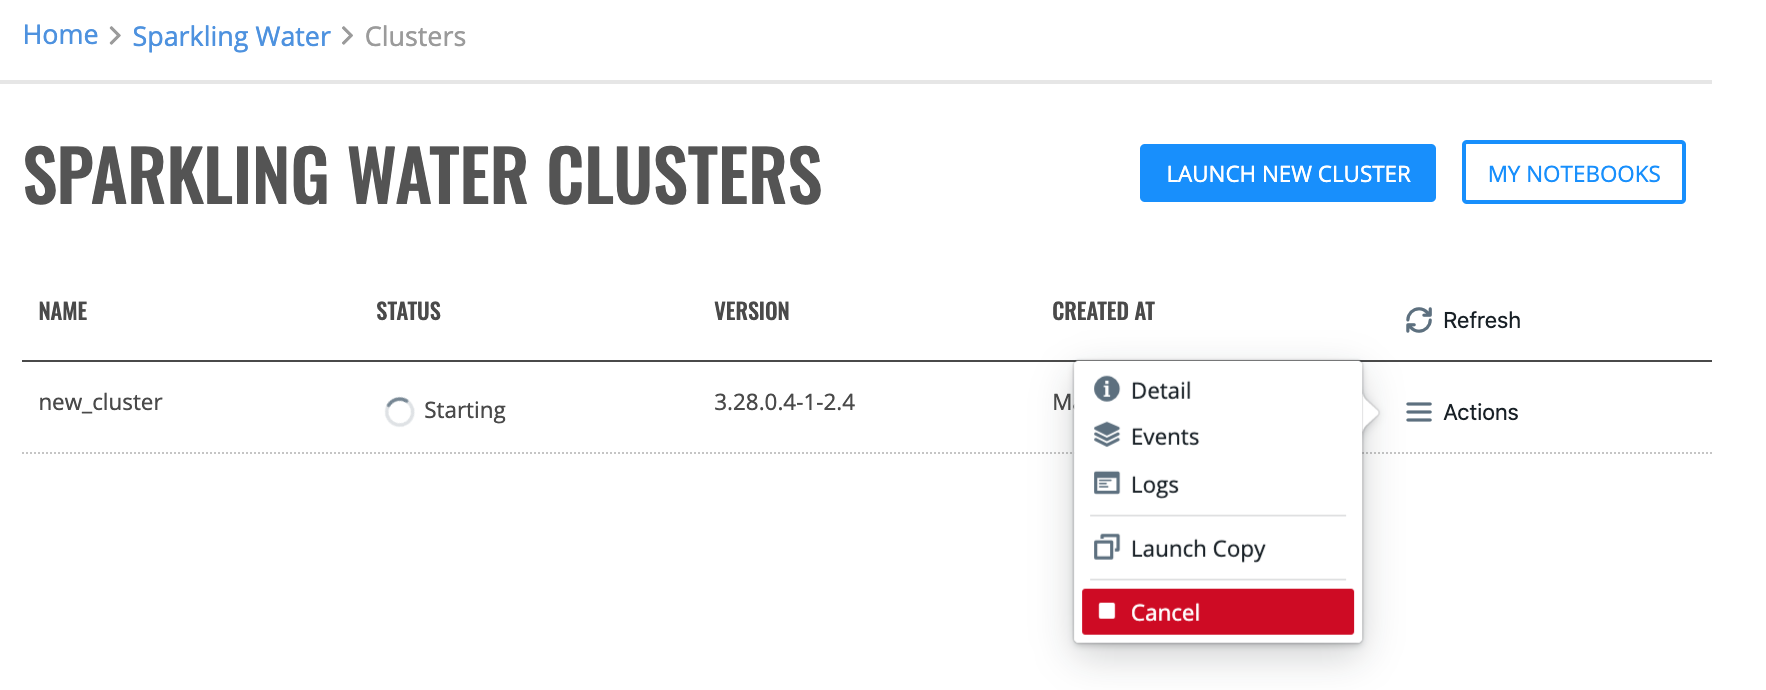
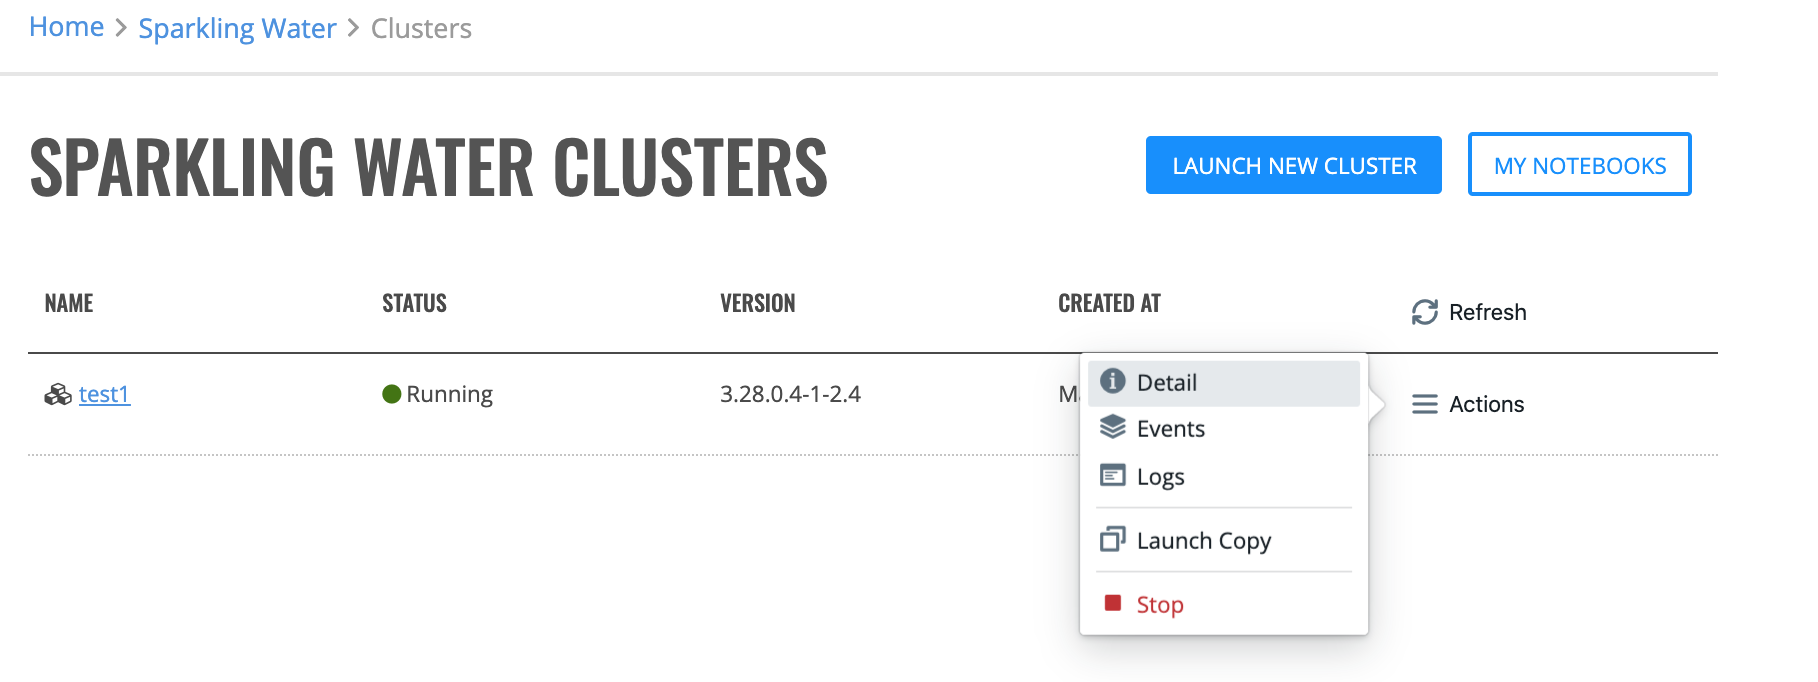
The Sparkling Water page shows clusters created by the current user, the state of the cluster, the cluster type, and the cluster creation date. From this page, you can launch a new cluster, view details of a cluster, or delete a cluster. You can also click the cluster name beside a “Started” cluster to access H2O Flow. (See Using Enterprise Steam with H2O Flow.)
Note: When Enterprise Steam is started for the first time, no clusters will appear in the UI.

Launch a New Sparkling Water - Internal Backend Cluster
In the Enterprise Steam UI, navigate to the Sparkling Water page and select Launch New Cluster.
Select Sparkling Water - Internal Backend from the Cluster Type dropdown menu.
Select a Cluster Profile from the dropdown menu to use when setting up the new cluster. Cluster profiles are configured by the Admin on the Configurations page and provide the allowed min and max values for each options in a cluster profile.
Specify values for the options below. Once added, other Enterprise Steam users will be able to connect to this cluster.
Cluster Name: Specify a name for this cluster.
Sparkling Water Version: For new Sparkling Water clusters, specify the Sparkling Water version to use.
Python Environment: Specify the Python environment to use. Additional environments can be added on the Python Environments page.
Size of Your Dataset [GB]: Enter the size of the dataset on disk, and Enterprise Steam will set the cluster parameters accordingly. You can override these settings in the ADVANCED PARAMETERS section below.
Using XGBoost: Select if the XGBoost algorithm is going to be used.
Maximum Idle Time [HRS]: Specify the maximum idle time of the Sparkling Water cluster. The cluster will shut down if it is idle for longer than the maximum idle time. Leave this blank to turn off this setting and allow the cluster to remain idle for an unlimited amount of time.
Maximum Uptime [HRS]: Set the duration after which the cluster automatically shuts down. Leave this blank to turn off this setting and allow the cluster to remain up for an unlimited amount of time.
YARN Queue: (Optional) If your cluster contains queues for allocating cluster resources, specify a queue for this cluster. Note that the YARN queue cannot contain spaces. Leave this empty to use the default YARN queue.
Specify the following additional advanced options.
Number of Executors: Specify the number of of cores per executors.
Memory per Executors [GB]: Specify the amount of memory allocated to a single Spark executor.
Executor Cores: Specify the number of cores per executor.
Extra Memory [%]: Specify the amount of executor memory per node.
H2O Threads per Node: Specify the number of threads (CPUs) to use in the cluster (0 indicates to use all available threads).
Startup Timeout [SEC]: Specify the startup timeout. The cluster will terminate if it cannot start within this time.
Spark Properties: This shows a list of additional Spark properties for the cluster. This is maintained by Admins from the Profiles table.
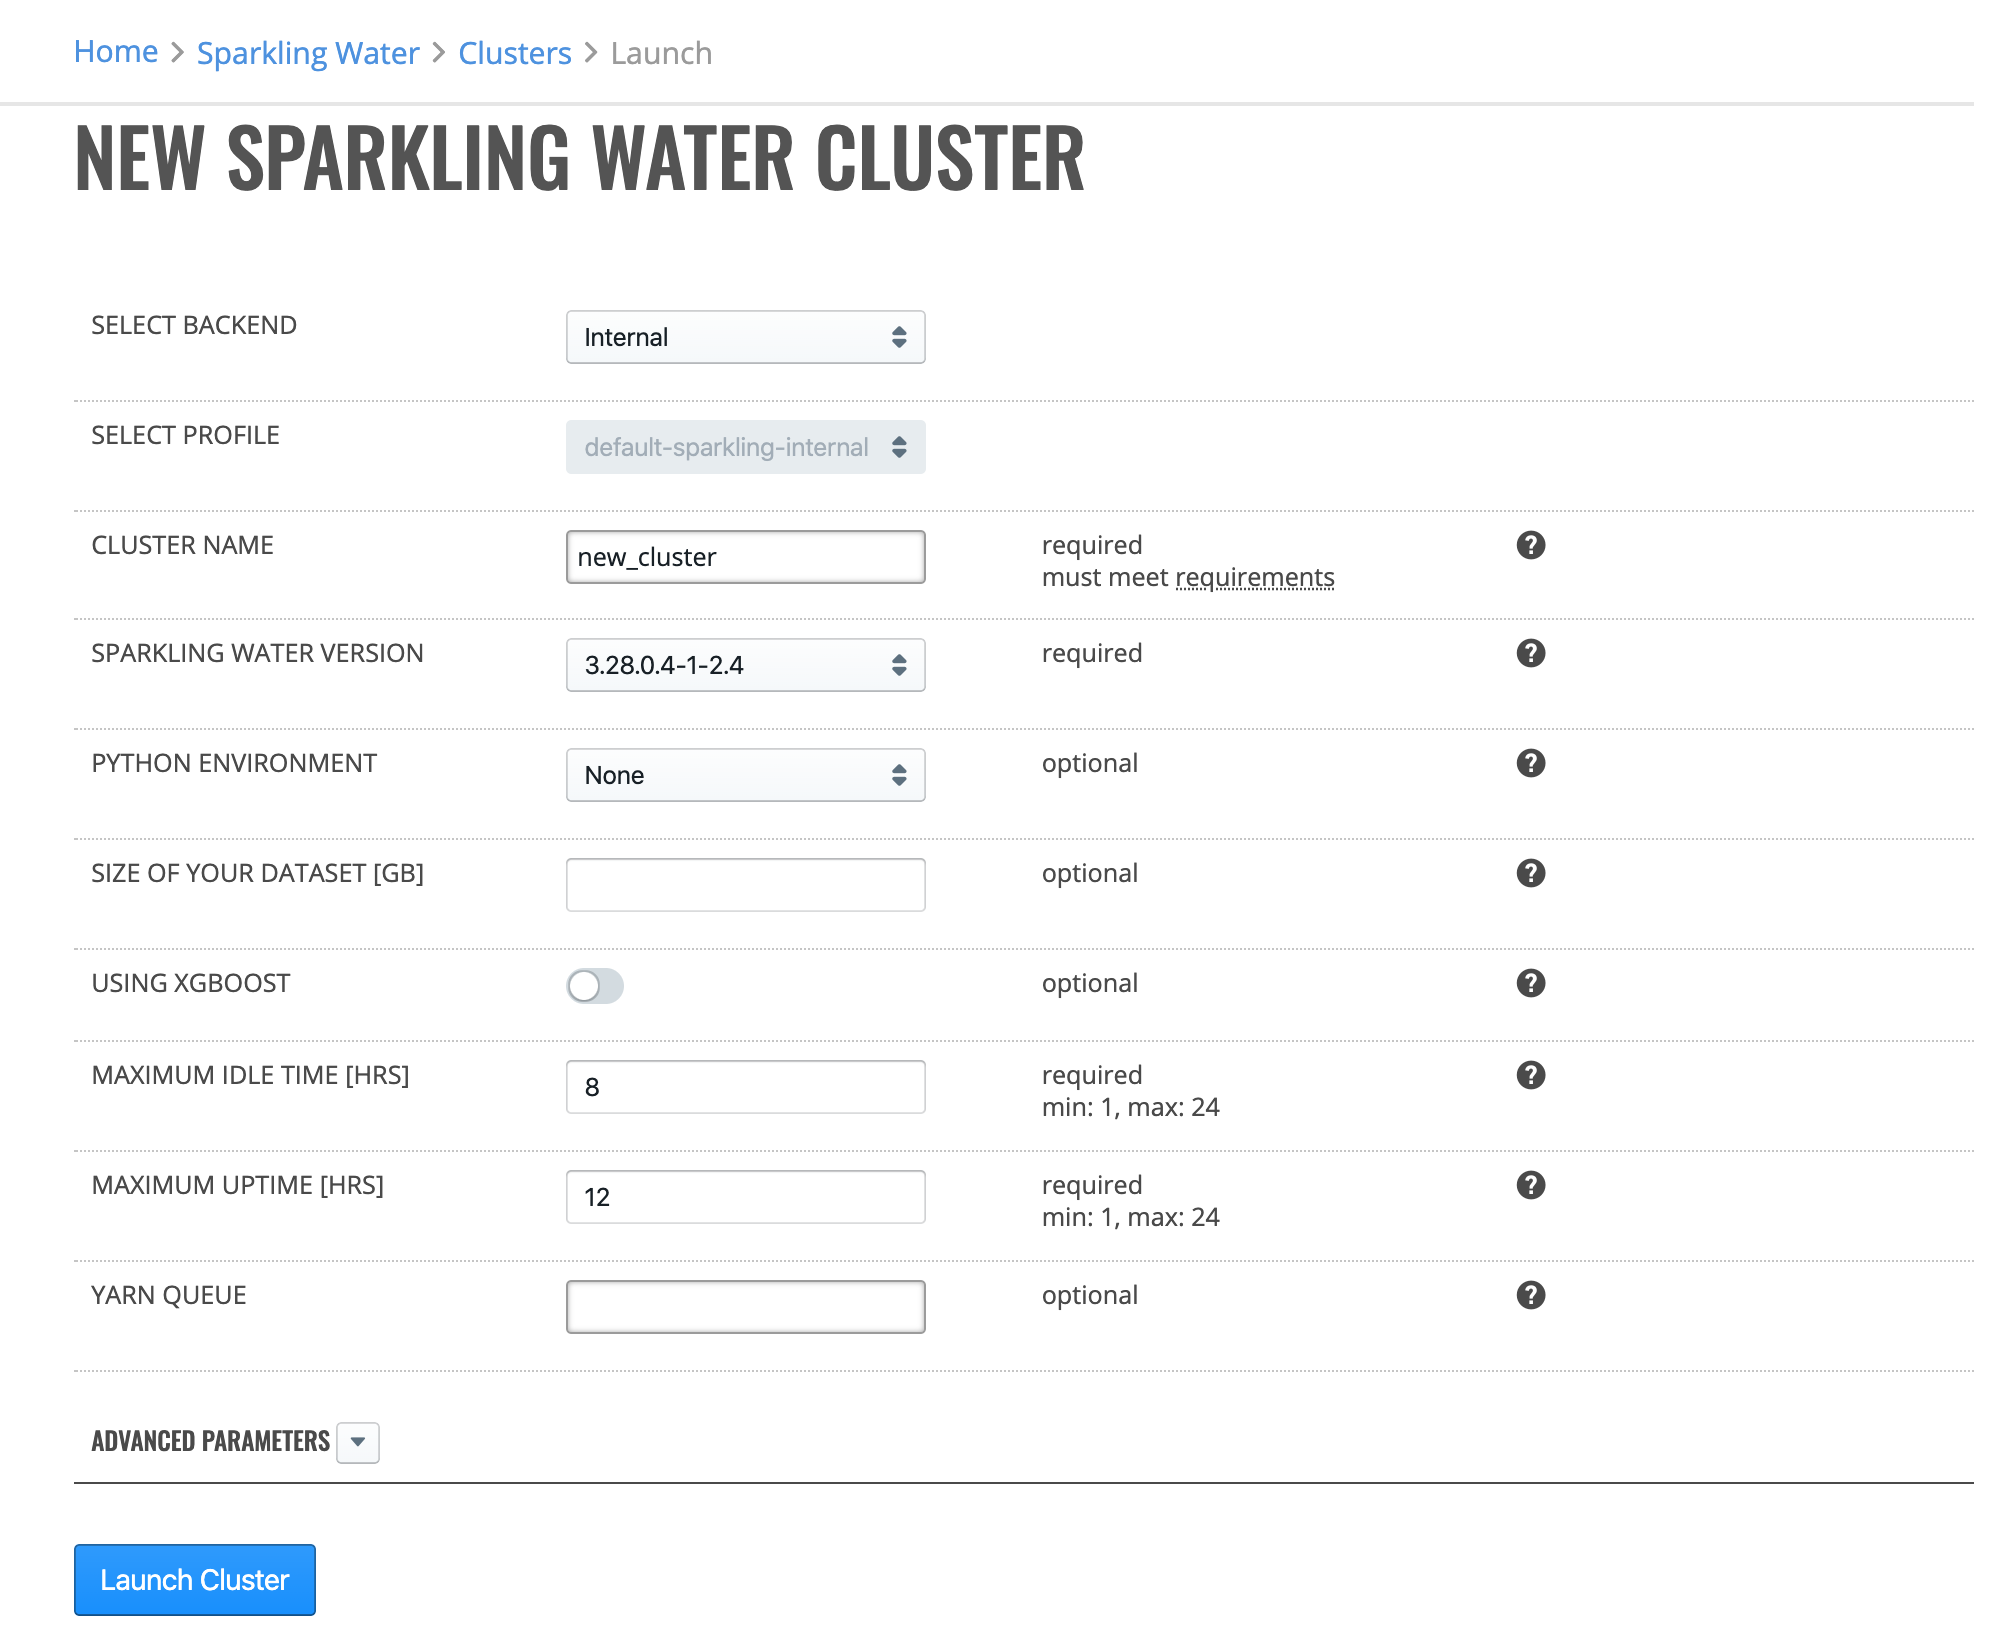
Click the Launch New Cluster button to start the new cluster.
Upon successful completion, the cluster will appear on the Sparkling Water page.
Launch a New Sparkling Water - External Backend Cluster
In the Enterprise Steam UI, navigate to the Sparkling Water page and select Launch New Cluster.
Select Sparkling Water - External Backend from the Cluster Type dropdown menu.
Select a Cluster Profile from the dropdown menu to use when setting up the new cluster. Cluster profiles are configured by the Admin on the Configurations page and provide the allowed min and max values for each options in a cluster profile.
Specify values for the options below. Once added, other Enterprise Steam users will be able to connect to this cluster.
Cluster Name: Specify a name for this cluster.
Sparkling Water Version: For new Sparkling Water clusters, specify the Sparkling Water version to use.
Python Environment: Specify the Python environment to use. Additional environments can be added on the Python Environments page.
Size of Your Dataset [GB]: Enter the size of the dataset on disk, and Enterprise Steam will set the cluster parameters accordingly. You can override these settings in the ADVANCED PARAMETERS section below.
Using XGBoost: Select if the XGBoost algorithm is going to be used.
Maximum Idle Time [HRS]: Specify the maximum idle time of the Sparkling Water cluster. The cluster will shut down if it is idle for longer than the maximum idle time. Leave this blank to turn off this setting and allow the cluster to remain idle for an unlimited amount of time.
Maximum Uptime [HRS]: Set the duration after which the cluster automatically shuts down. Leave this blank to turn off this setting and allow the cluster to remain up for an unlimited amount of time.
YARN Queue: (Optional) If your cluster contains queues for allocating cluster resources, specify a queue for this cluster. Note that the YARN queue cannot contain spaces. Leave this empty to use the default YARN queue.
Specify the following additional advanced options.
Number of Executors: Specify the number of of cores per executors.
Memory per Executors [GB]: Specify the amount of memory allocated to a single Spark executor.
Executor Cores: Specify the number of cores per executor.
Extra Memory [%]: Specify the amount of executor memory per node.
Number of H2O Nodes: Specify the number of H2O nodes.
Memory per H2O Node [GB]: Specify the amount of memory to allocate to H2O per node.
H2O Threads per Node: Specify the number of threads (CPUs) to use in the cluster (0 indicates to use all available threads).
Startup Timeout [SEC]: Specify the startup timeout. The cluster will terminate if it cannot start within this time.
Spark Properties: This shows a list of additional Spark properties for the cluster. This is maintained on by Admins from the Profiles table.
Click the Launch New Cluster button to start the new cluster.
Upon successful completion, the cluster will appear on the Sparkling Water page.
Cancel a Cluster
To cancel a “Starting” cluster, click the Actions > Cancel option. Confirm the cancellation of the “Starting” cluster by clicking the Yes, Stop button.
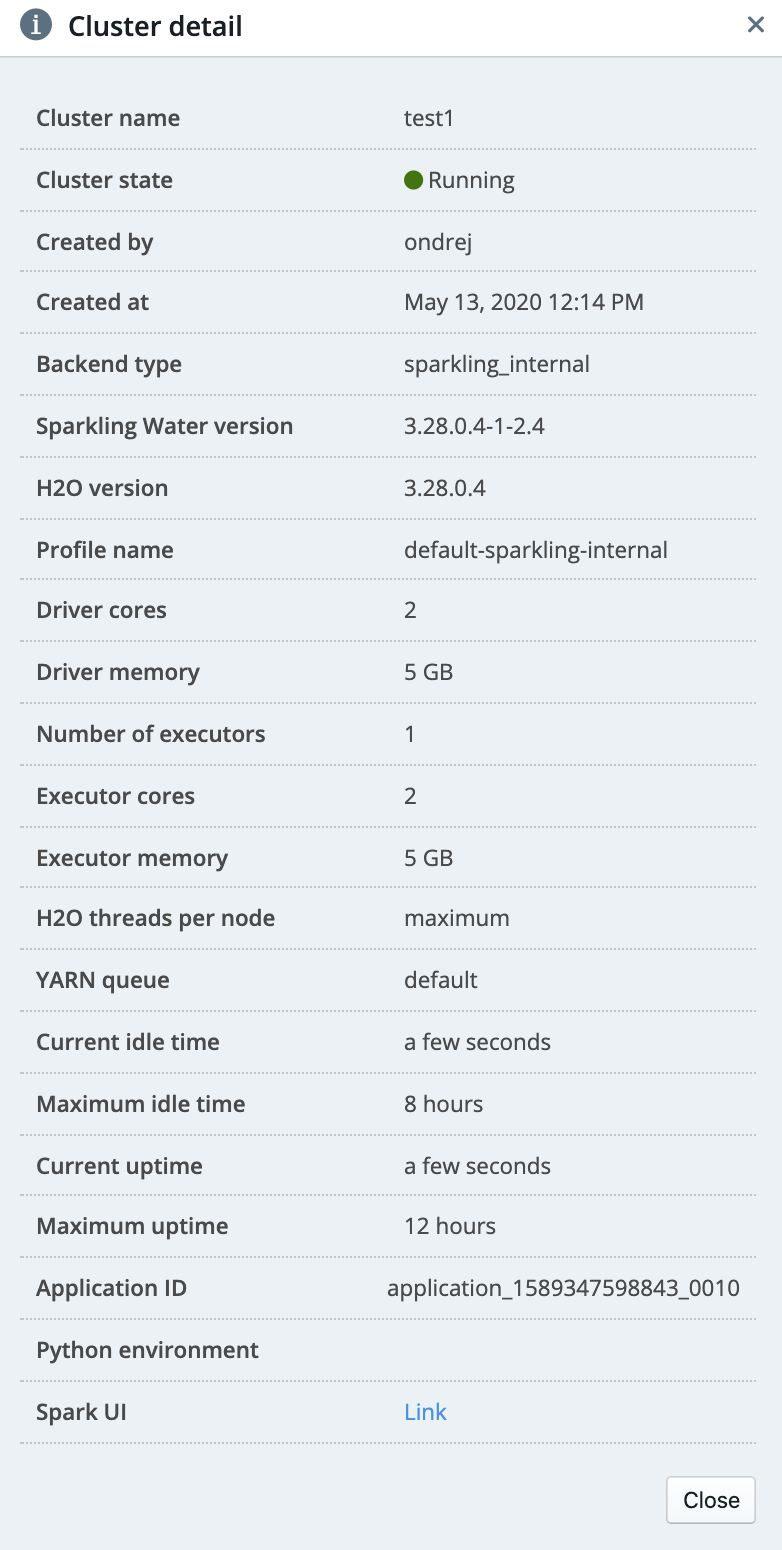
Cluster Details
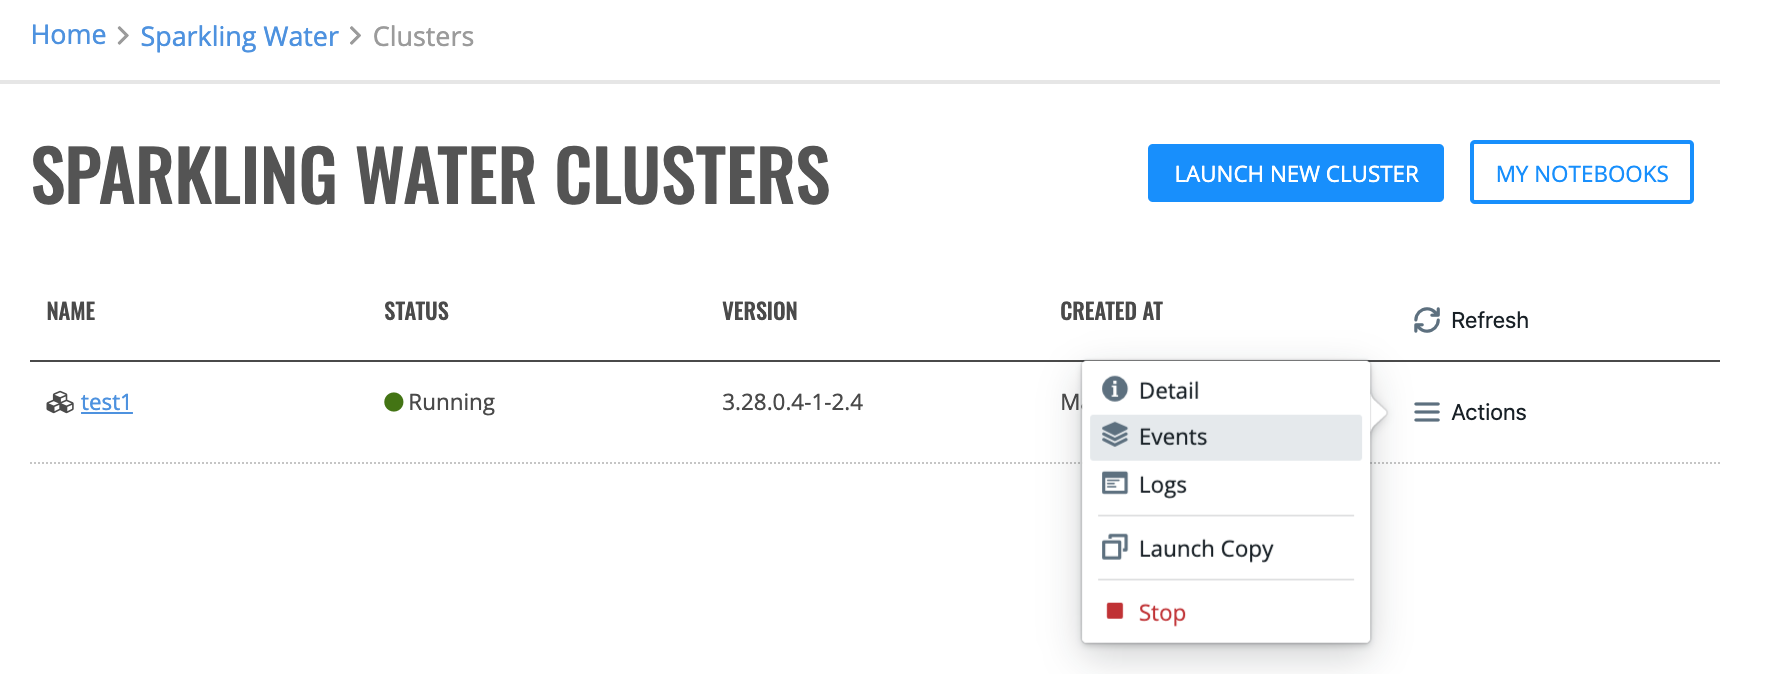
To view the details of a “Running” or “Stopping” cluster, click the Actions > Detail option.
The cluster detail displays the following information:
Cluster Events
To view the events of a “Running” or “Stopped” cluster, click the Actions > Events option.
Viewing Steam Logs
You can download plain text or archived logs for your running Enterprise Steam cluster directly from the UI. Click the Actions > Logs option and then specify whether to download the logs in plain text or archived format.
Note: YARN logs are not available when the cluster is running.

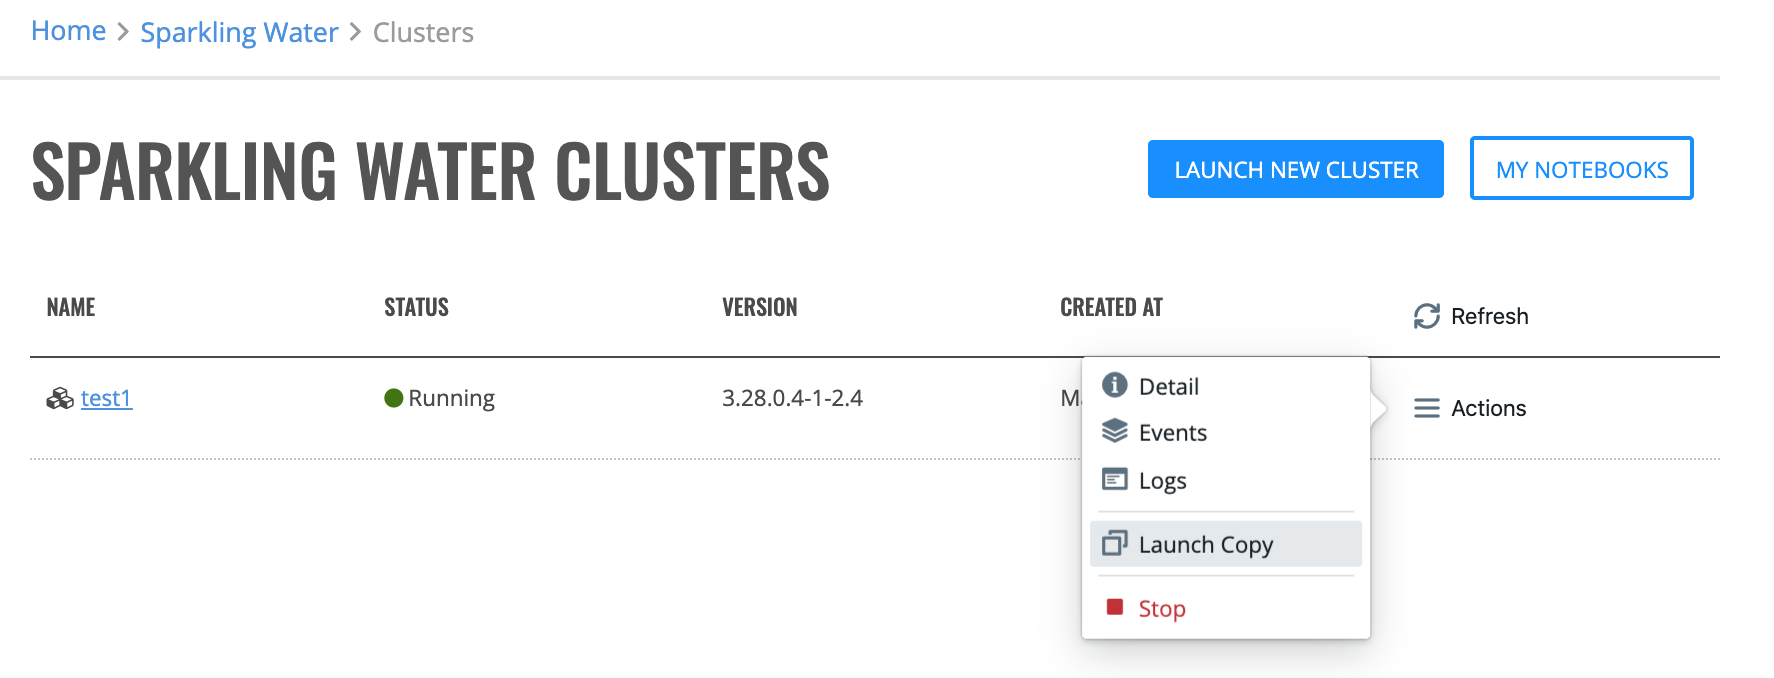
Launch a Copy of a Cluster
You can launch a copy of a cluster by clicking the Actions > Launch Copy option. You must give the cluster a name before you can launch it.
Refer to the previous Launch a New Sparkling Water - Internal Backend Cluster and Launch a New Sparkling Water - External Backend Cluster sections for a list of cluster launch parameters.
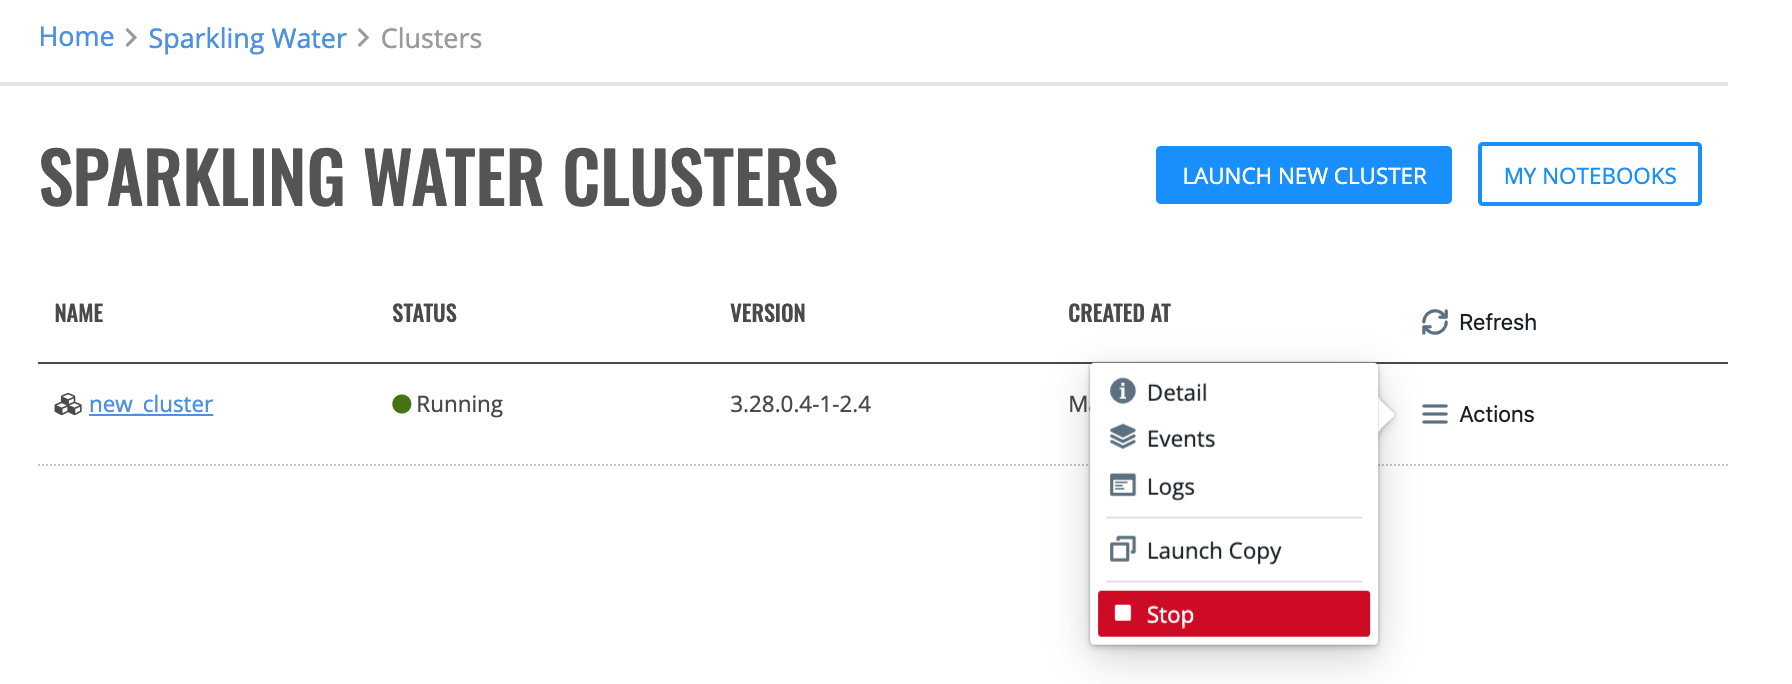
Stopping Clusters
To stop a “Running” cluster, click the Actions > Stop option. When the confirmation window appears, click the Yes, Stop button to stop the cluster.
Deleting Clusters
The process for deleting clusters varies depending on the current state of the cluster. Clusters must be in a “Stopped” state before deleting.
To delete, click the Actions > Delete option beside the cluster that you want to delete, then confirm the request.

Notebooks
Enterprise Steam allows you to upload and run PySparkling and RSparking Jupyter Notebooks from within the cluster. More information about Jupyter Notebooks is available here: https://jupyter.org/.
Requirements for RSparkling Jupyter Notebooks
The Hadoop cluster must have R installed along with devtools and sparklyr libraries.
In Steam you must have an H2O engine uploaded as well as Sparkling Water engine that was built for the same H2O version. The supported minimum Sparkling Water versions for this feature include:
2.1.53
2.2.39
2.3.28
2.4.10
Launching Notebooks
In the Enterprise Steam UI, navigate to the Clusters page and click the My Notebooks button in the upper-right corner to view available notebooks.
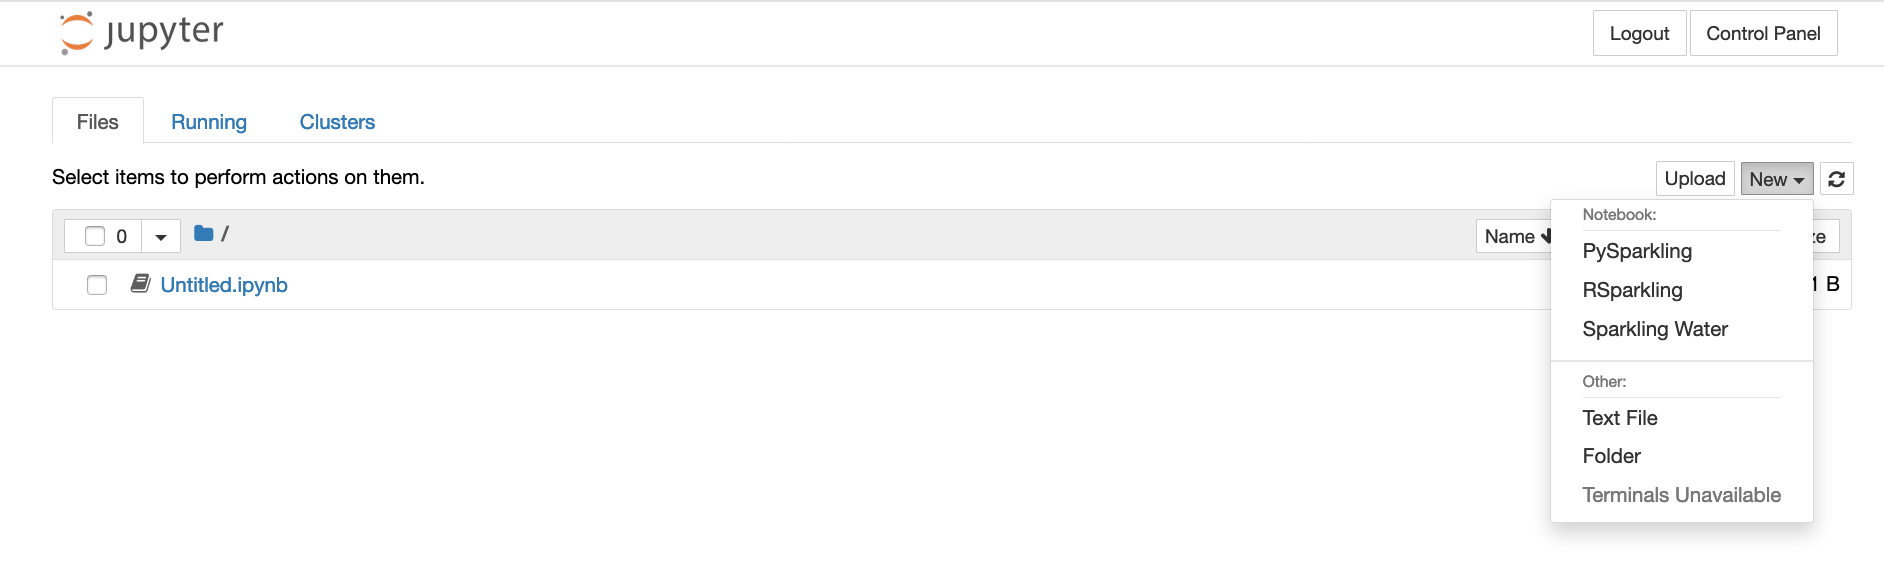
Creating New Notebooks
On the Jupyter Notebook Files tab, click New dropdown and select the type of notebook or other file that you want to create. Then create and save the new notebook.
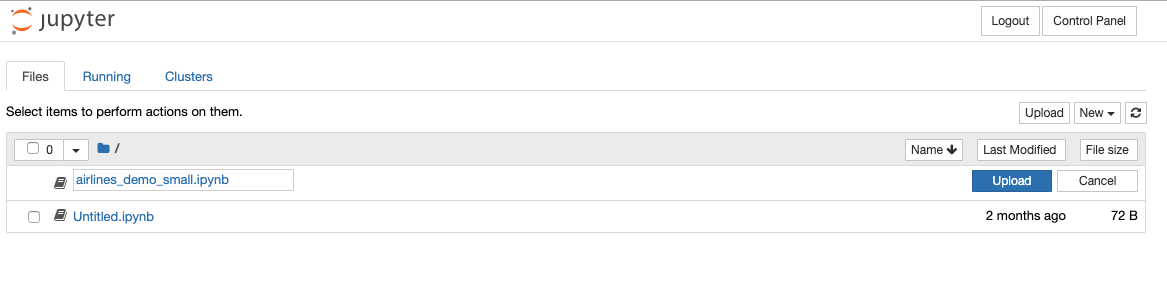
Adding Notebooks
On the Jupyter Notebook Files tab, click the Upload button.
Browse to the location on your local machine where your notebooks is stored.
Click Upload to complete the notebook upload process.