Setting Up an I/O Module |
  
|
Setting Up an I/O Module |
|
Nx Witness handles I/O devices as it does cameras, with some specific functionality adaptations. Like all other devices, I/O modules are discovered automatically or with the user's help and then displayed in the Resource Tree.
However, to start working with an I/O Module it is necessary to obtain and configure an I/O Module License (otherwise the "Module is disabled" message will be displayed). After the license is activated, the module will be displayed with the available inputs and outputs.
Only Owners, Administrators, and custom users with "Edit camera settings" permission can configure I/O Modules. Owners, Administrators, Advanced Viewers, and custom users with "User Input" permission can view IO Module input and outputs in layout.
I/O modules require the following setup steps
1.Right-click on the device in the Resource Tree and go to I/O Module Settings.
2.Go to the I/O ports tab and enter the following parameters:
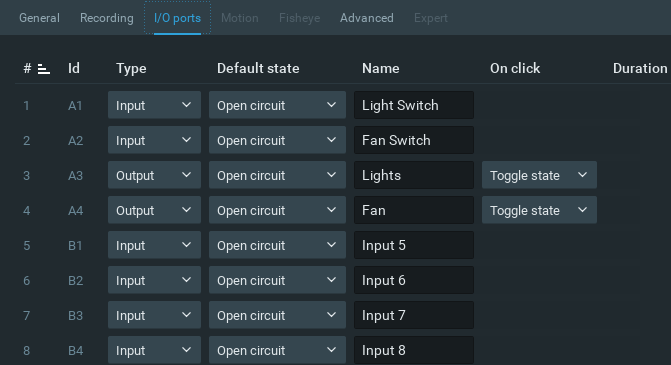
•Type – Input or Output
•Default State – Open circuit or Grounded (depending on I/O Module)
•Name of the port.
•On click (output only) – Select the desired action to occur on button click.
oImpulse (requires Duration) – The length of time the signal will be generated (in milliseconds). Clicking the button changes the port state to Duration time.
oToggle state – Clicking the button changes the port state until clicking the button again.
•Duration – Time in milliseconds.
After the I/O module is configured, you will see Input ports on the left and Output ports on the right. The state of each port can be seen. The I/O module will be displayed as shown below:
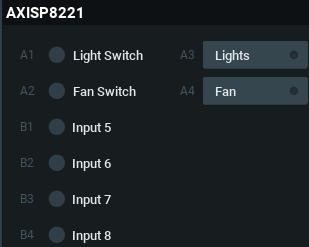
If you are using multiple Inputs and Outputs from the device we recommend checking the "Enable tile interface" in the lower left hand corner of the dialog. This will generate a responsive tiled interface for the I/O in the Viewing Grid that will allow you to see the state of the ports and trigger them.
The following actions can be performed with an I/O Module:
•Record Audio from I/O Module – (only if a microphone is connected). See "Recording Modes" for details.
•Playback Audio Archive Recorded from I/O Module (only if a microphone was connected during recording). This is similar to viewing archive from cameras (see "Navigating through Archive and Live").
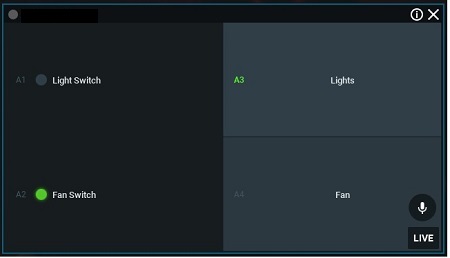
•View Inputs State – Information regarding the inputs state of the device depending on the settings you configured. For example, when the circuit is grounded, the appropriate sensor turns green. Alternatively, you can also set the sensor to turn green when the circuit is open.
•Trigger Output – For this purpose click the corresponding button (A3 and A4 in the image above). The output signal is sent for the amount of time specified in the Pulse Time setting unless the output is manually turned on/off.
•Create Rules – using the device's input and output ports as described in Input Signal on Device and Device Output.