Table of Contents
Table of ContentsInstallationDownload The ThemeSystem RequirementsTheme InstallationFew common issues when installing the themeInstall Required PluginSVG Support Plugin (Recommended)Configure Necessary Plugin SettingsCartsy AlgoliaGoogle MapSocial LoginImport Demo DataPermalink SetupTheme SettingsSettings OptionsGeneral Settings:Header Settings:Blog Settings:WC_General Settings:WC_Product Single Settings:Social Settings:Typography Settings:Color Settings:Footer Settings:Copyright Settings:How to enable recently viewed productHow to remove out of stock product from the homepage?How to use Native SearchDisplay out of stock products on the homepageCustomize timer for toastGutenberg BlocksCartsy LayoutProduct LayoutChange Default Product PageShop Page LayoutMenuCreate MenuPage SettingsPluginsCartsy HelperCartsy AlgoliaFireMobile - WordPress & WooCommerce firebaseWhy FirebaseInstallationQuick StartShortcodeShortcode ParamerterRecaptchaCustomizationCompatible Plugin ListChild ThemeFAQHow to update theme?How to use child theme?How to optimize my site?After deactivating and reactivating the theme my site is broken nothing is showing properly. How to fix?Google Map doesn't work on my contact information page?Change logsV1.2.1V1.2V1.1v1.0Thank You
Installation
Download The Theme
Purchase Cartsy theme and download the packages from the https://member.redq.io/. Unzip the package and you should get a cartsy.zip file inside the main zip file.
System Requirements
- PHP version 7 or greater
- MySQL version 5.6 or greater
- Recommended memory_limit is no less than 64M
- Upload_max_filesize should be no less than 64M
Theme Installation
- Goto to
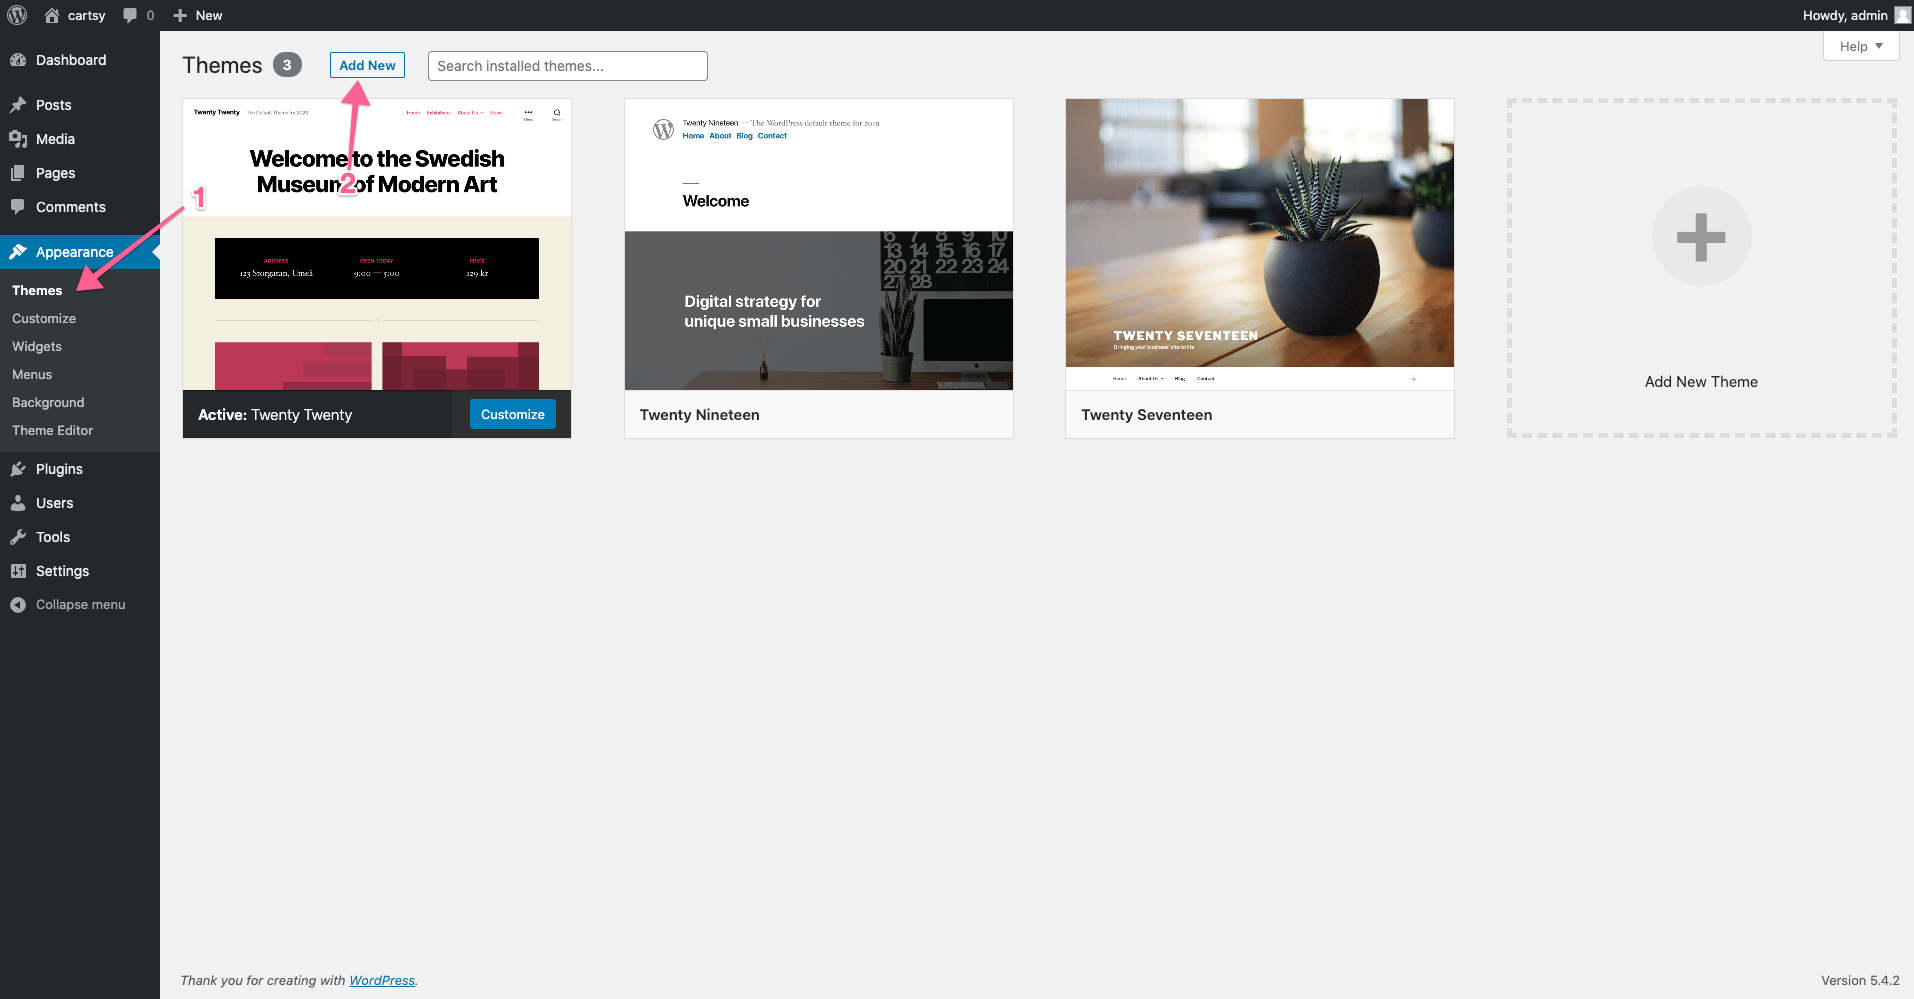
Appearance->Themesin your WordPress admin dashboard. - Click
Add newat the top of the page. - Click
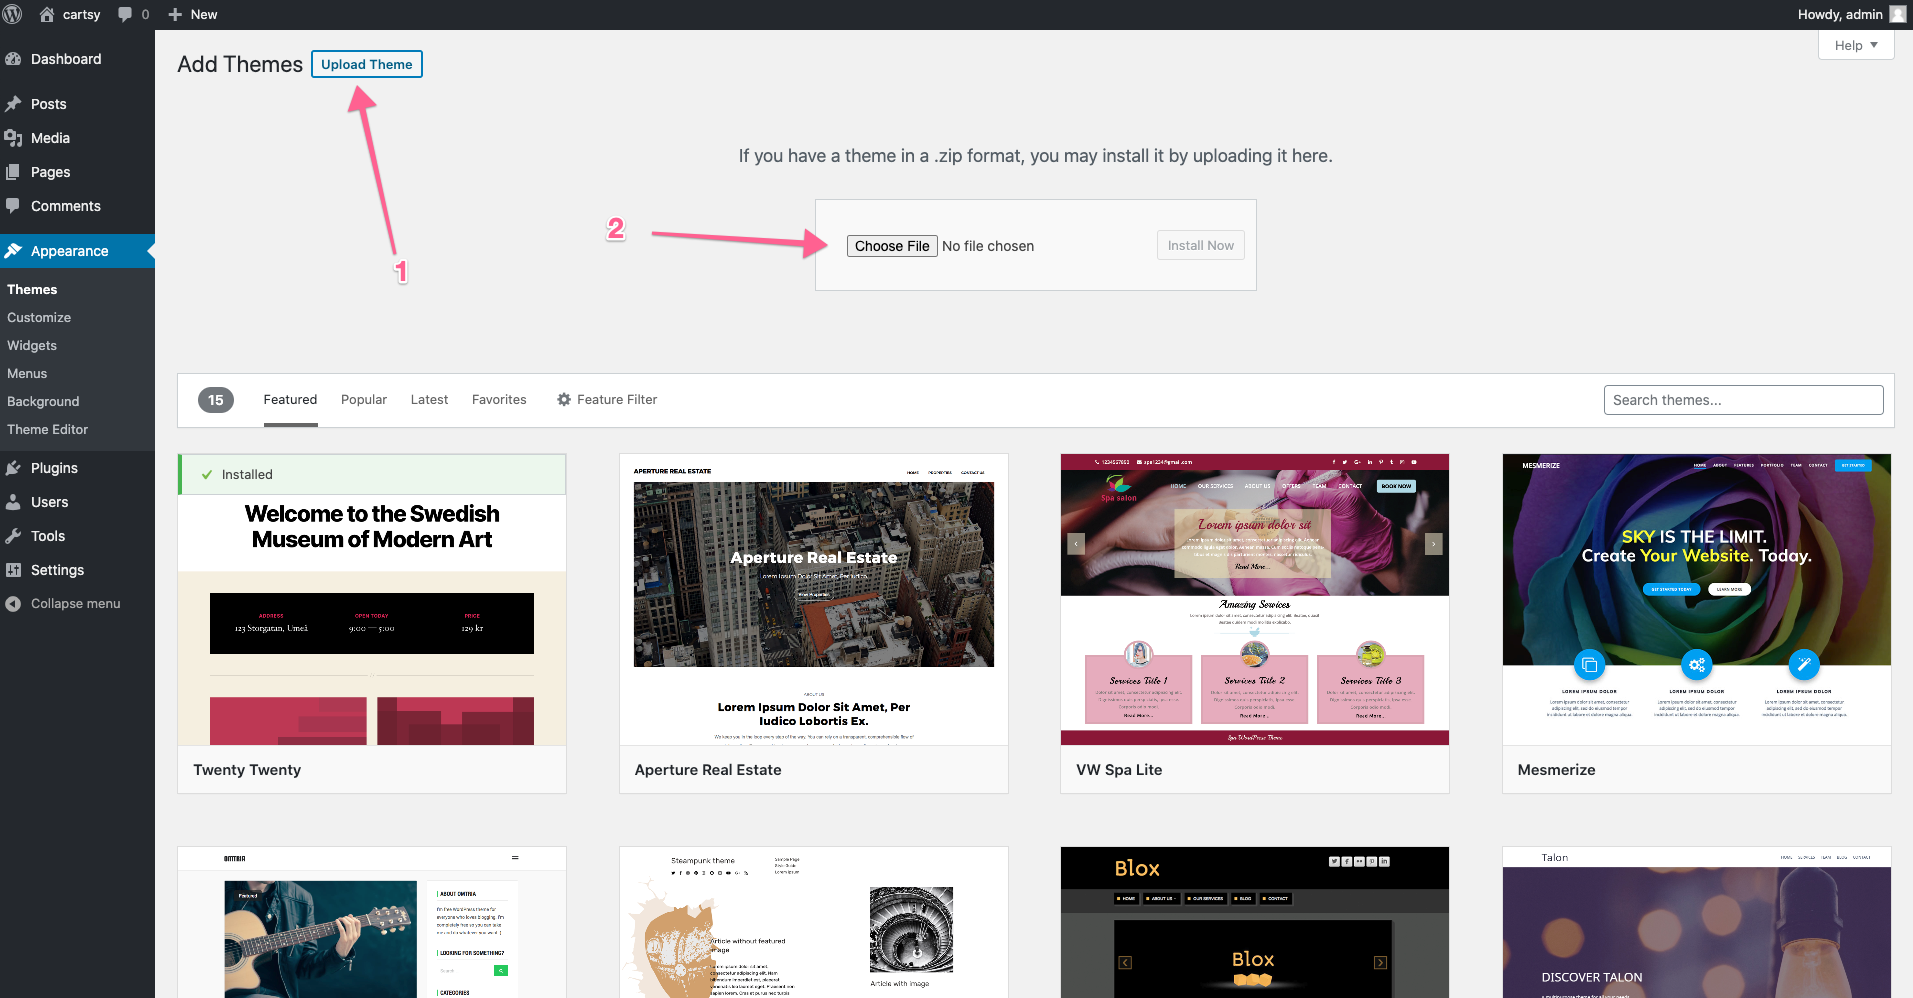
Upload Theme - Choose
cartsy.zipand click Install Now
For better understanding the installation process please follow the below video url
Few common issues when installing the theme
a. The “Broken theme and/or stylesheets missing” error is most common when you install or activate a new theme.
Solution: If you get an error saying that the stylesheet is missing, then you have uploaded the wrong zip folder. Please check that you are uploading the cartsy.zip. You have to unzip the package file that you download from RedQ to find this.
b. Problems with uploading via WP admin panel due Upload limit.
Solution: You may check your file upload limit on Your Media Uploader page in WordPress. Depending upon the web hosting company and the conditions of the service they provide it may vary. The most common is about 8 MB which is more or less enough. But uploading some media files like audio and video may become a problem with for example 2 MB upload limit.
We decided to share some tips about how to extend your maximum file upload size in WordPress
Through functions.php file:
You may add the below mentioned code in the functions.php file of your theme
@ini_set( 'upload_max_size' , '64M' );@ini_set( 'post_max_size', '64M');@ini_set( 'max_execution_time', '300' );
Through PHP.INI file:
If you cannot see the php.ini file in your directory create the new one with below mentioned code and upload it to your root folder on your web server.
If you can see the php.ini file then change parameters or add :
xxxxxxxxxxupload_max_filesize = 64Mpost_max_size = 64Mmax_execution_time = 300
In case that tip does not work with 64MB, try it with 10MB.
Through .htaccess method:
You may try modifying the existing .htaccess file in the root directory or creating a new one.
Add the following code in the existing or new .htacess file:
xxxxxxxxxxphp_value upload_max_filesize 64Mphp_value post_max_size 64Mphp_value max_execution_time 300php_value max_input_time 300
If you still face any issues, please don't forget to contact with our support channel. https://member.redq.io/
Install Required Plugin
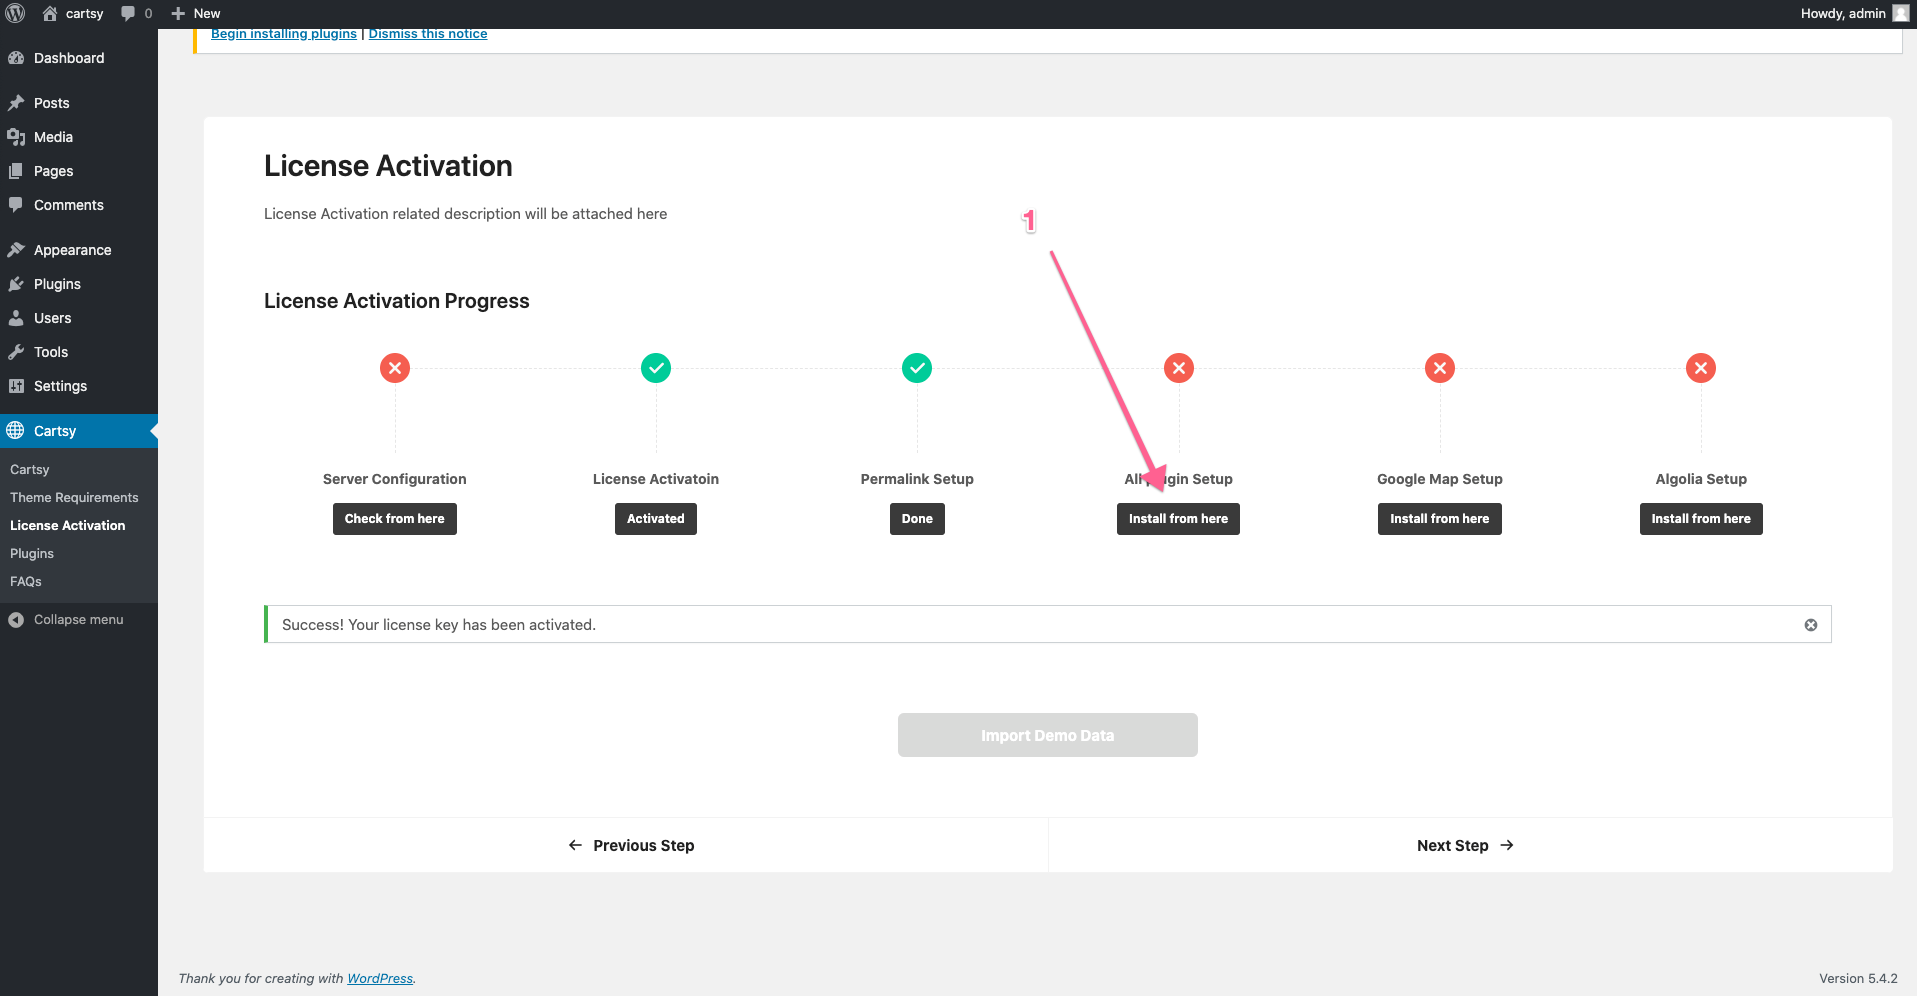
After installing the theme, you will be redirected to the welcome theme page. On the page, you've to submit your license key on that page.
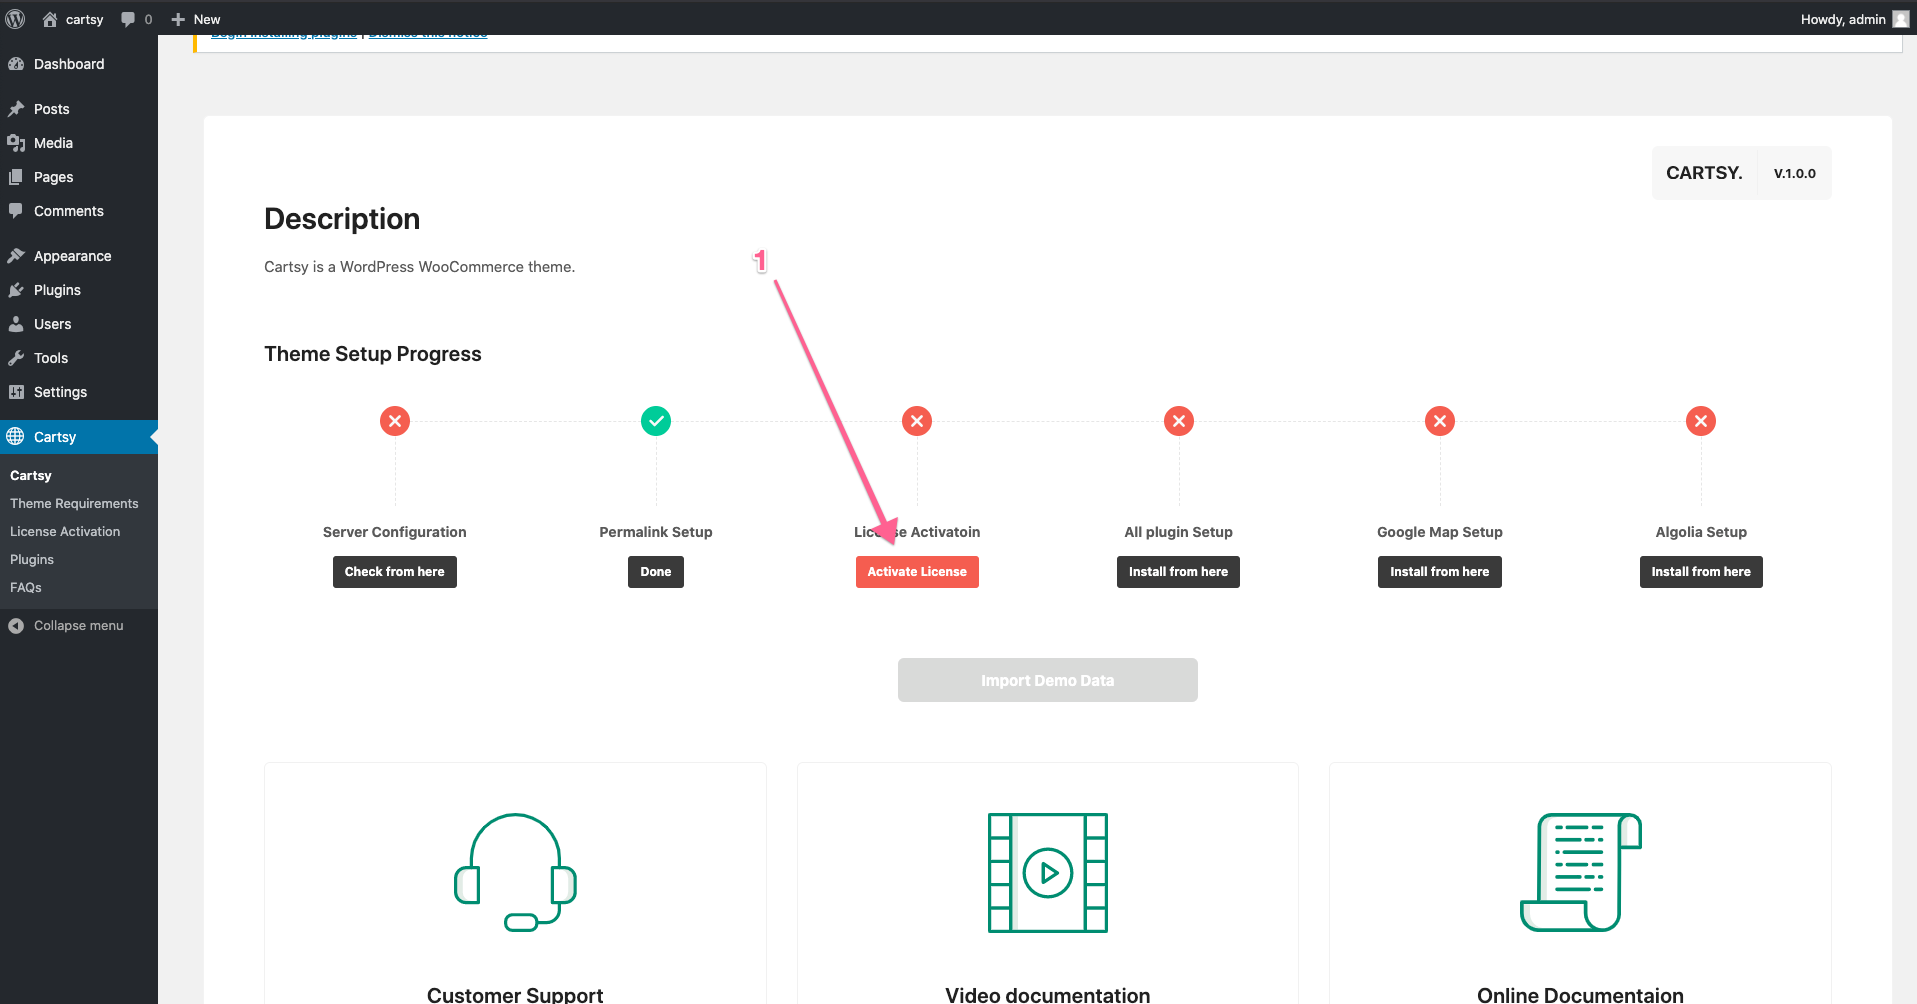
After Add license key you'll get a success message on that welcome page.
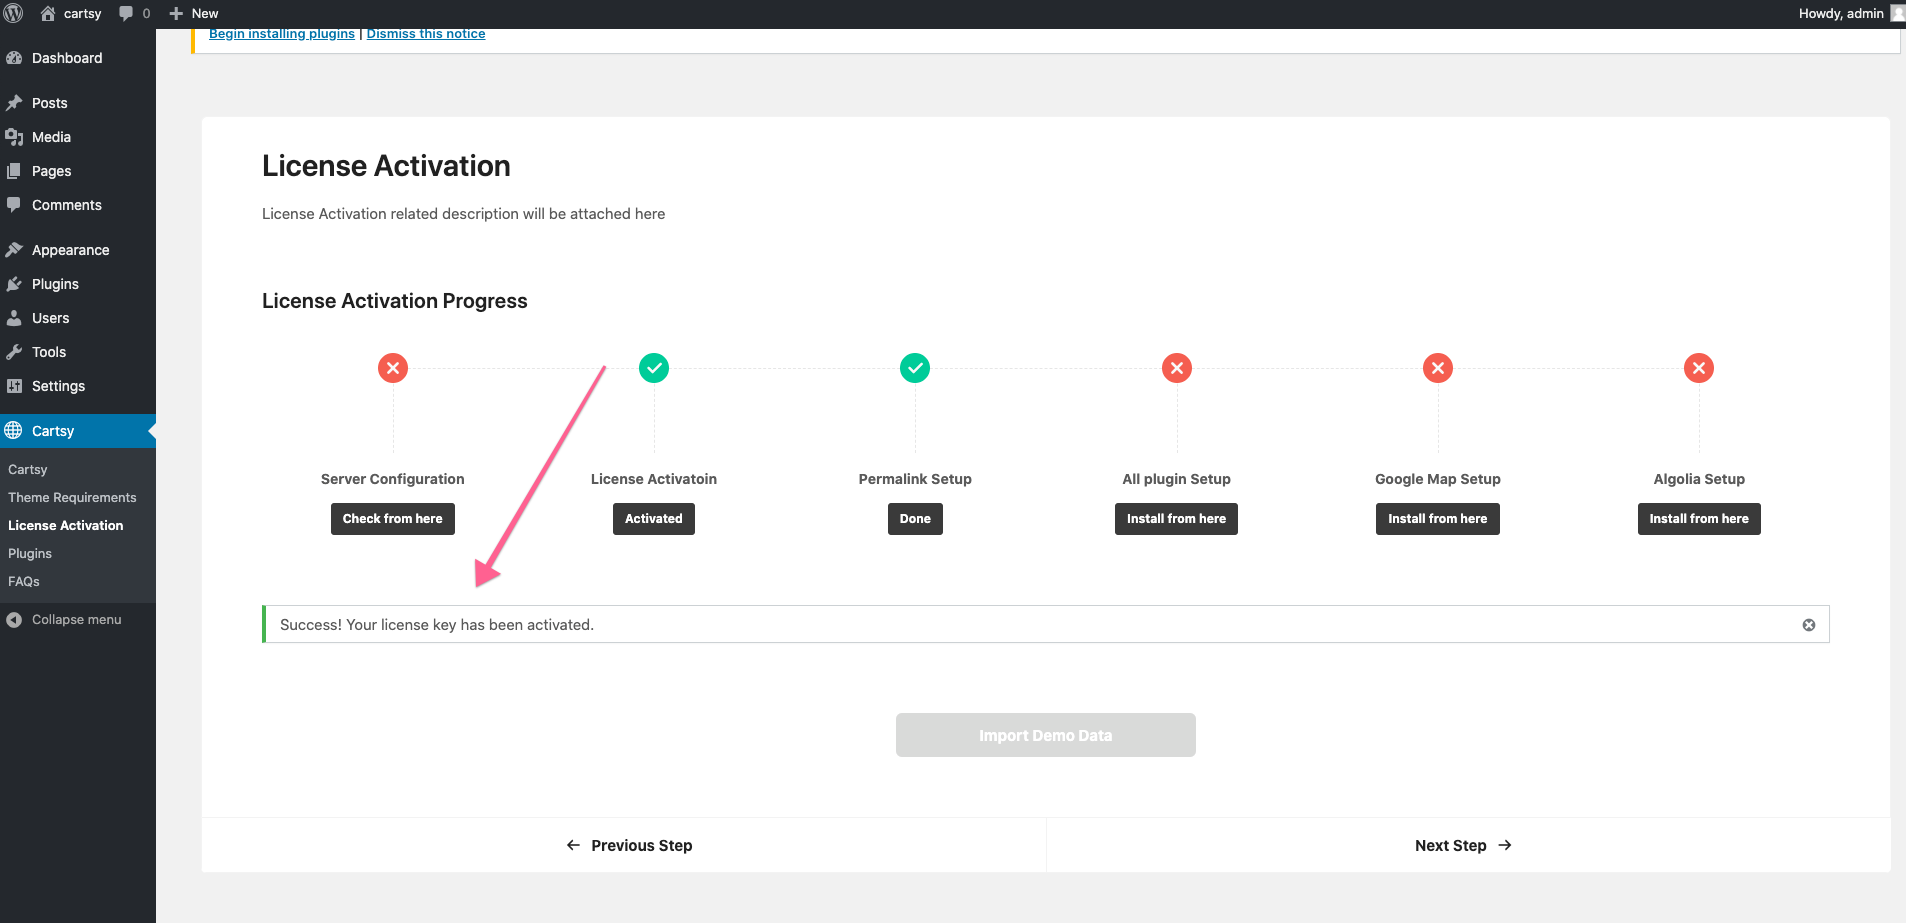
Now click on All plugin Setup and you will be redirected to below page
From this page, you can install all the plugins, or you can do the bulk install.
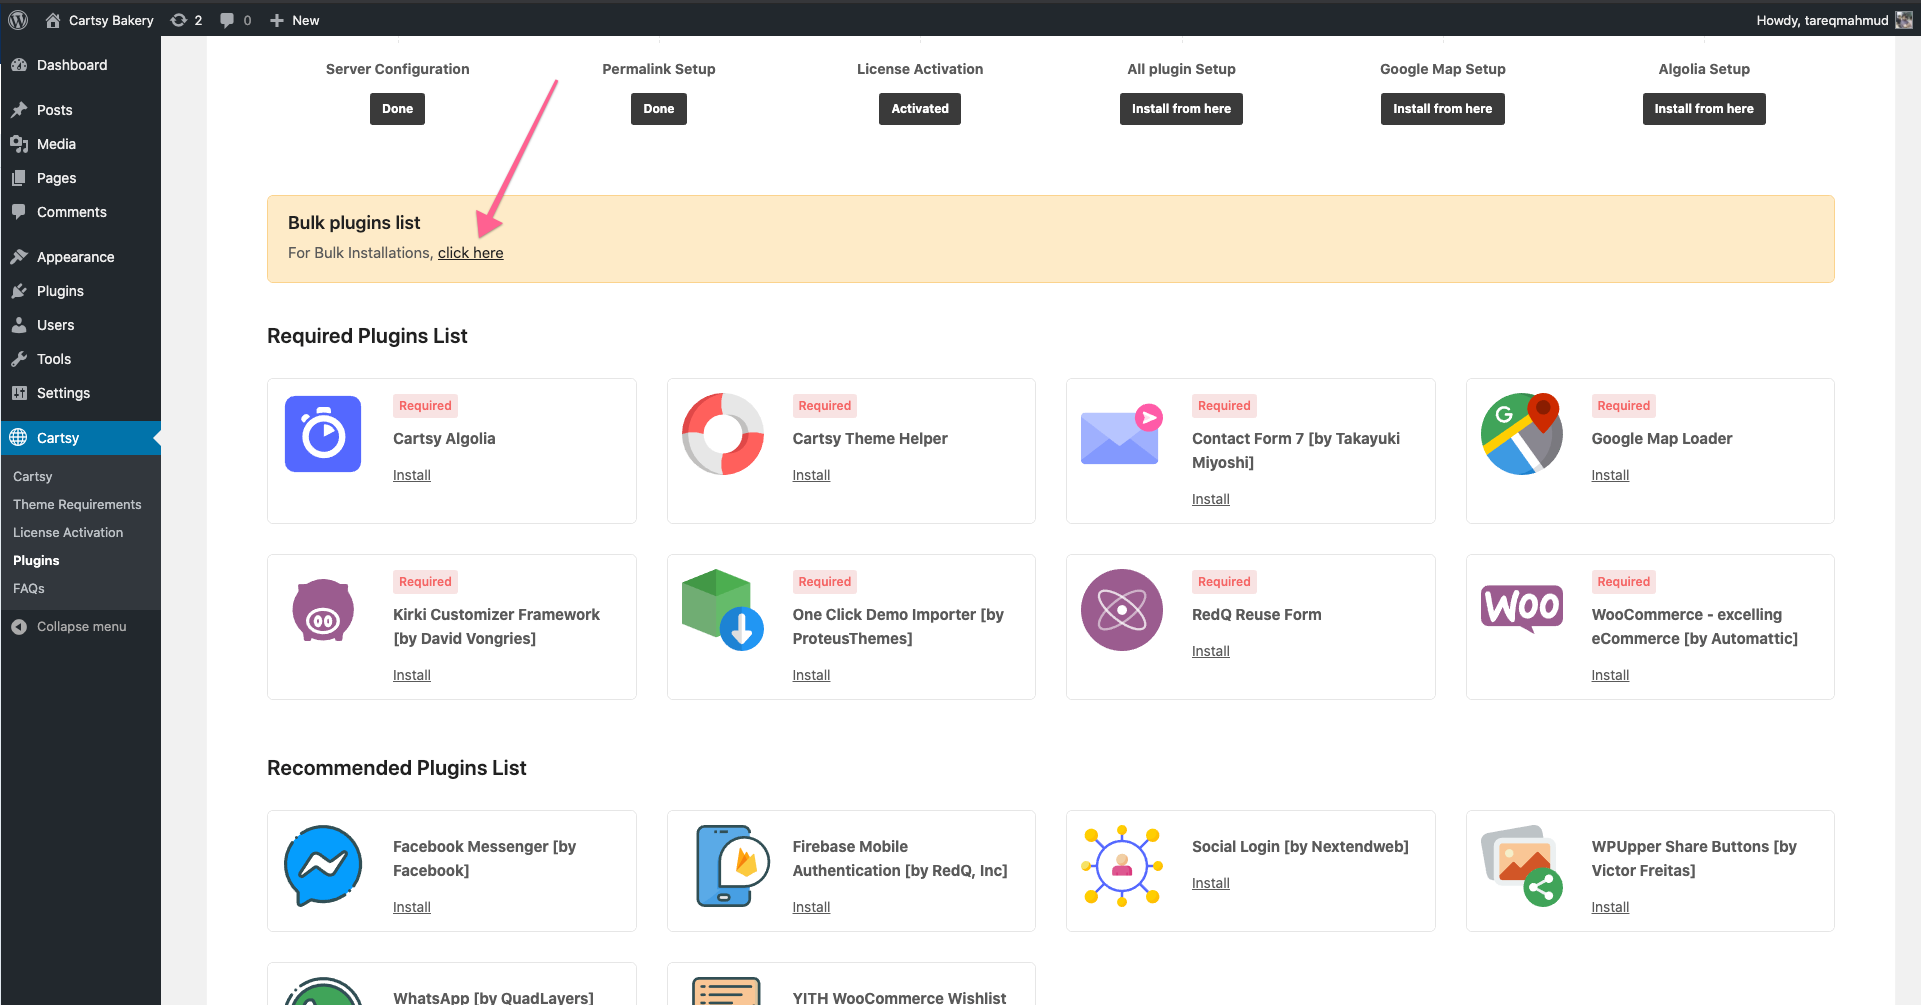
After clicked the bulk installation, you'll redirect a plugin installation page.
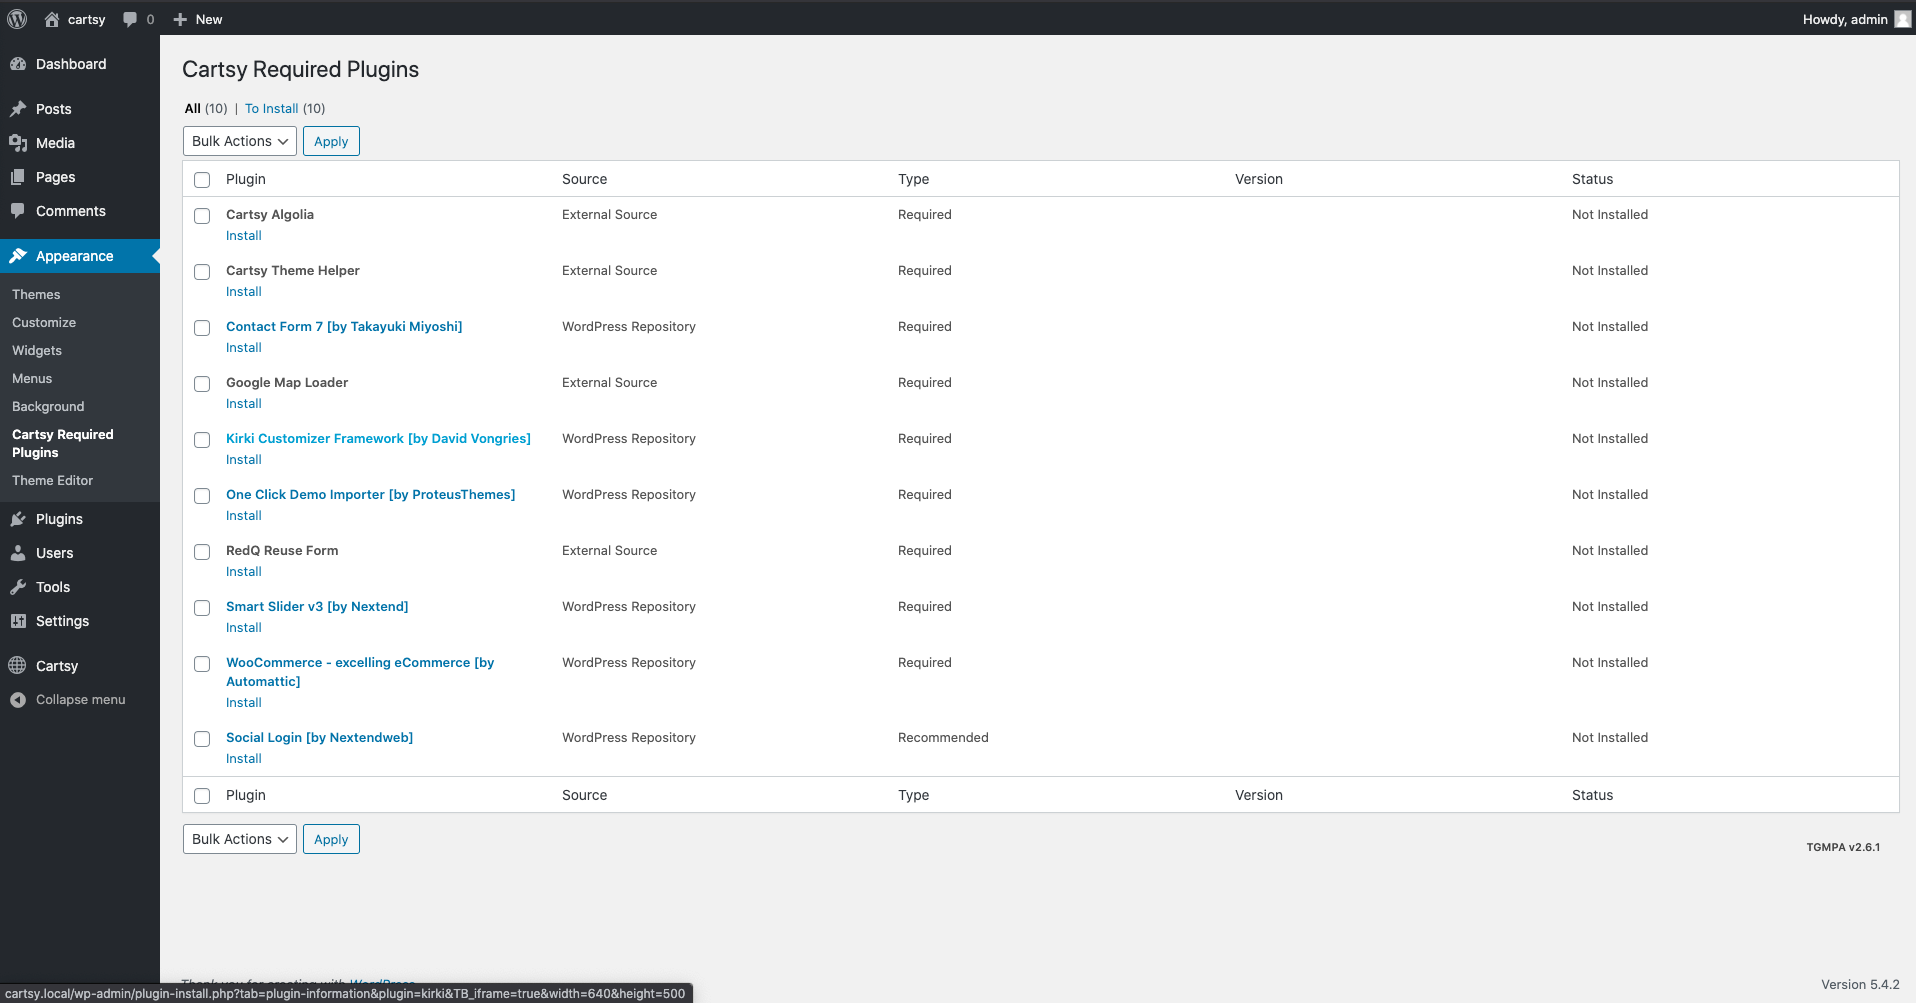
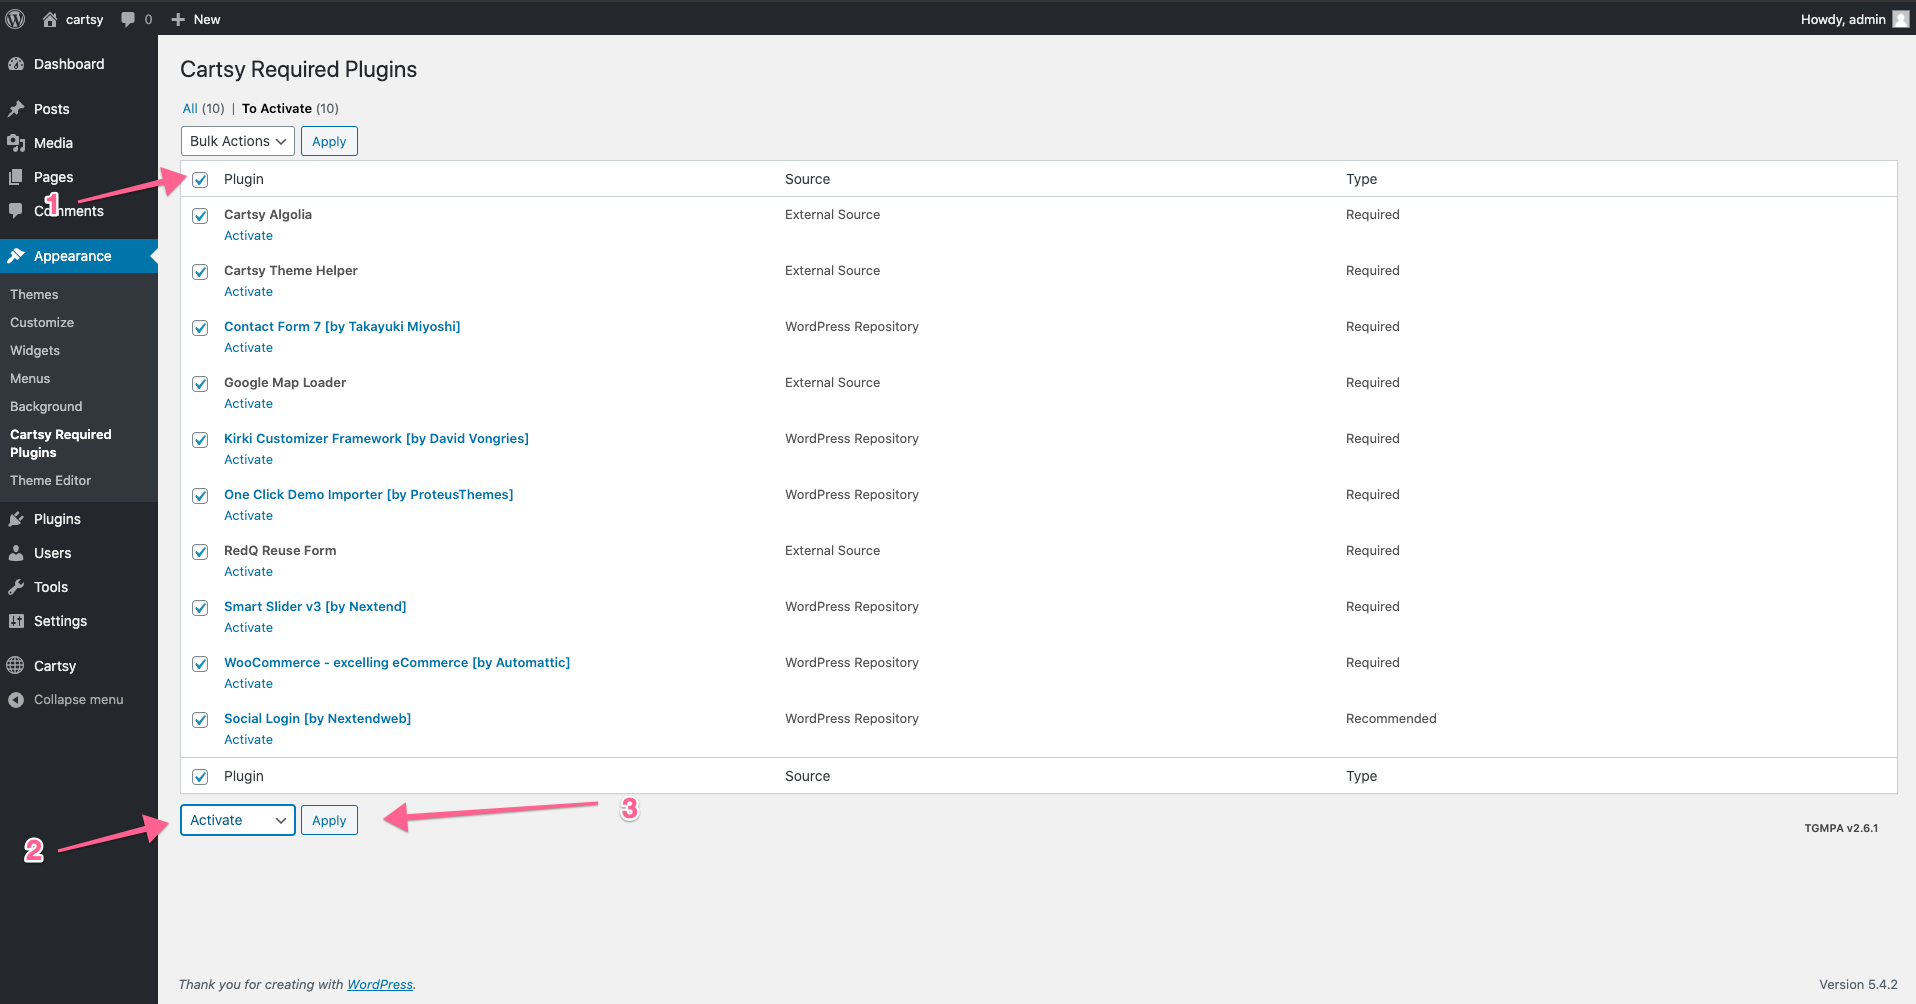
Now select all plugin and install them. It might take some time as the plugin will be downloaded first and then will be installed. After installing all the plugin goto plugin list like above and select all plugin then activate
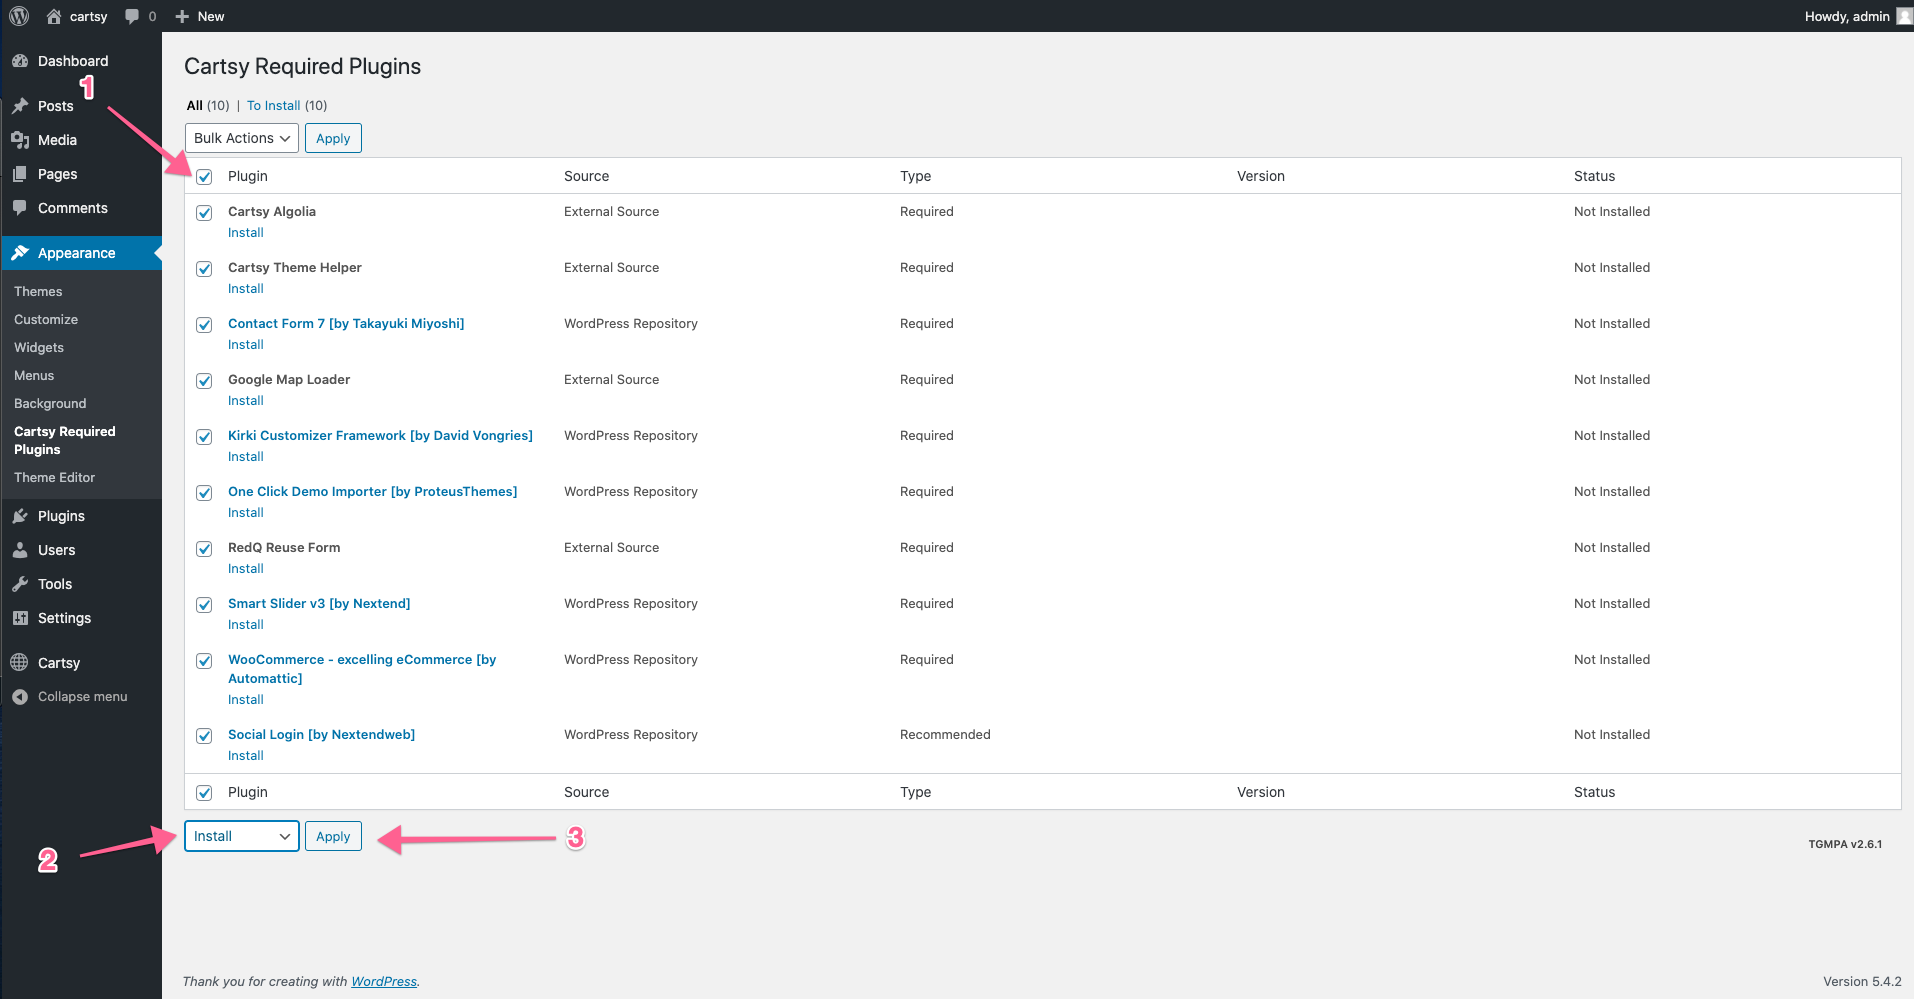
After installing all the plugin, make sure you activate all the plugins.
SVG Support Plugin (Recommended)
To handle the SVG icon, you need an optional plugin. Without this plugin, all the uploaded SVG or imported SVG will be broken. For that, it is recommended to install a plugin to handle the SVG icon. We recommend the SVG support plugin. Before import demo data, please install SVG Support plugin first
https://wordpress.org/plugins/svg-support/
Congrats you have successfully installed all the required plugins. Now follow the next step Plugin Configuration.
Configure Necessary Plugin Settings
After installing all the plugins you will be needed to configure few plugin.
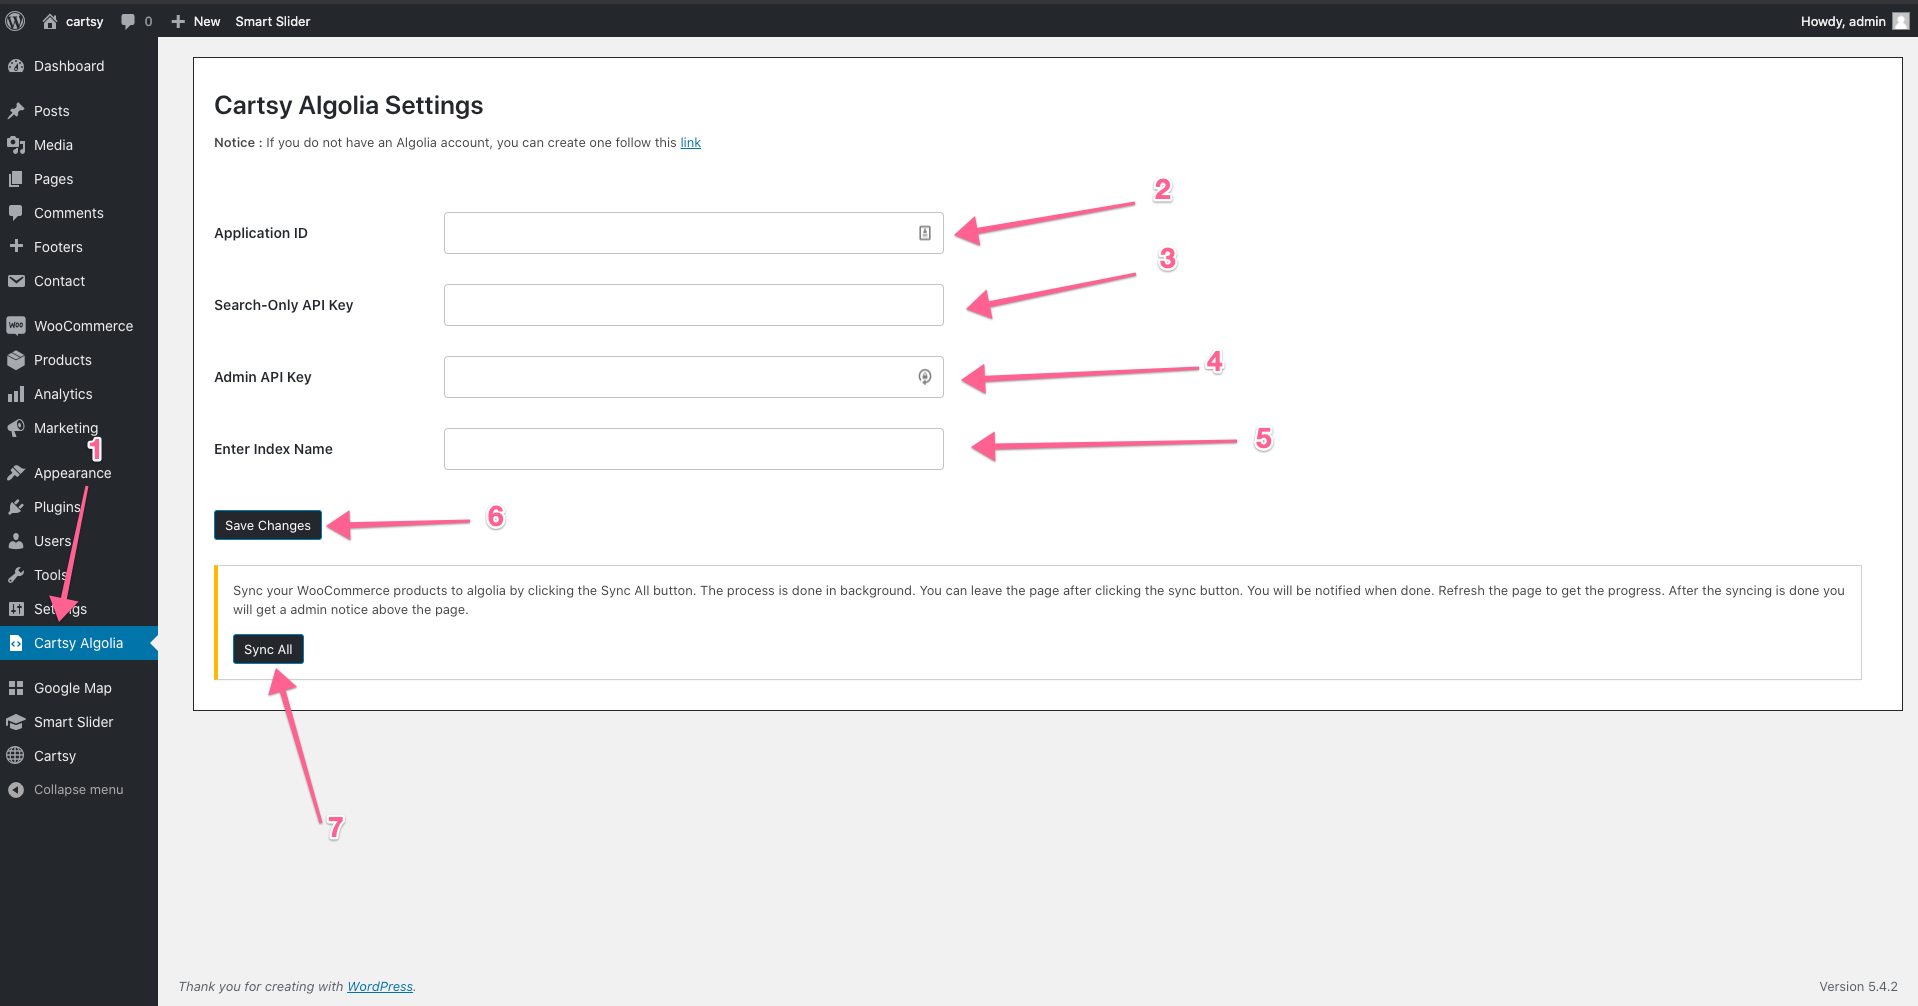
Cartsy Algolia
We have used Algolia in our theme for faster searching of products. The default WordPress search is quite slow compare to Algolia searching. With Algolia searching, you'll get an application like search feature on your website.
You will get the credentials of the other fields from the algolia dashboard. You can get algolia api keys from here
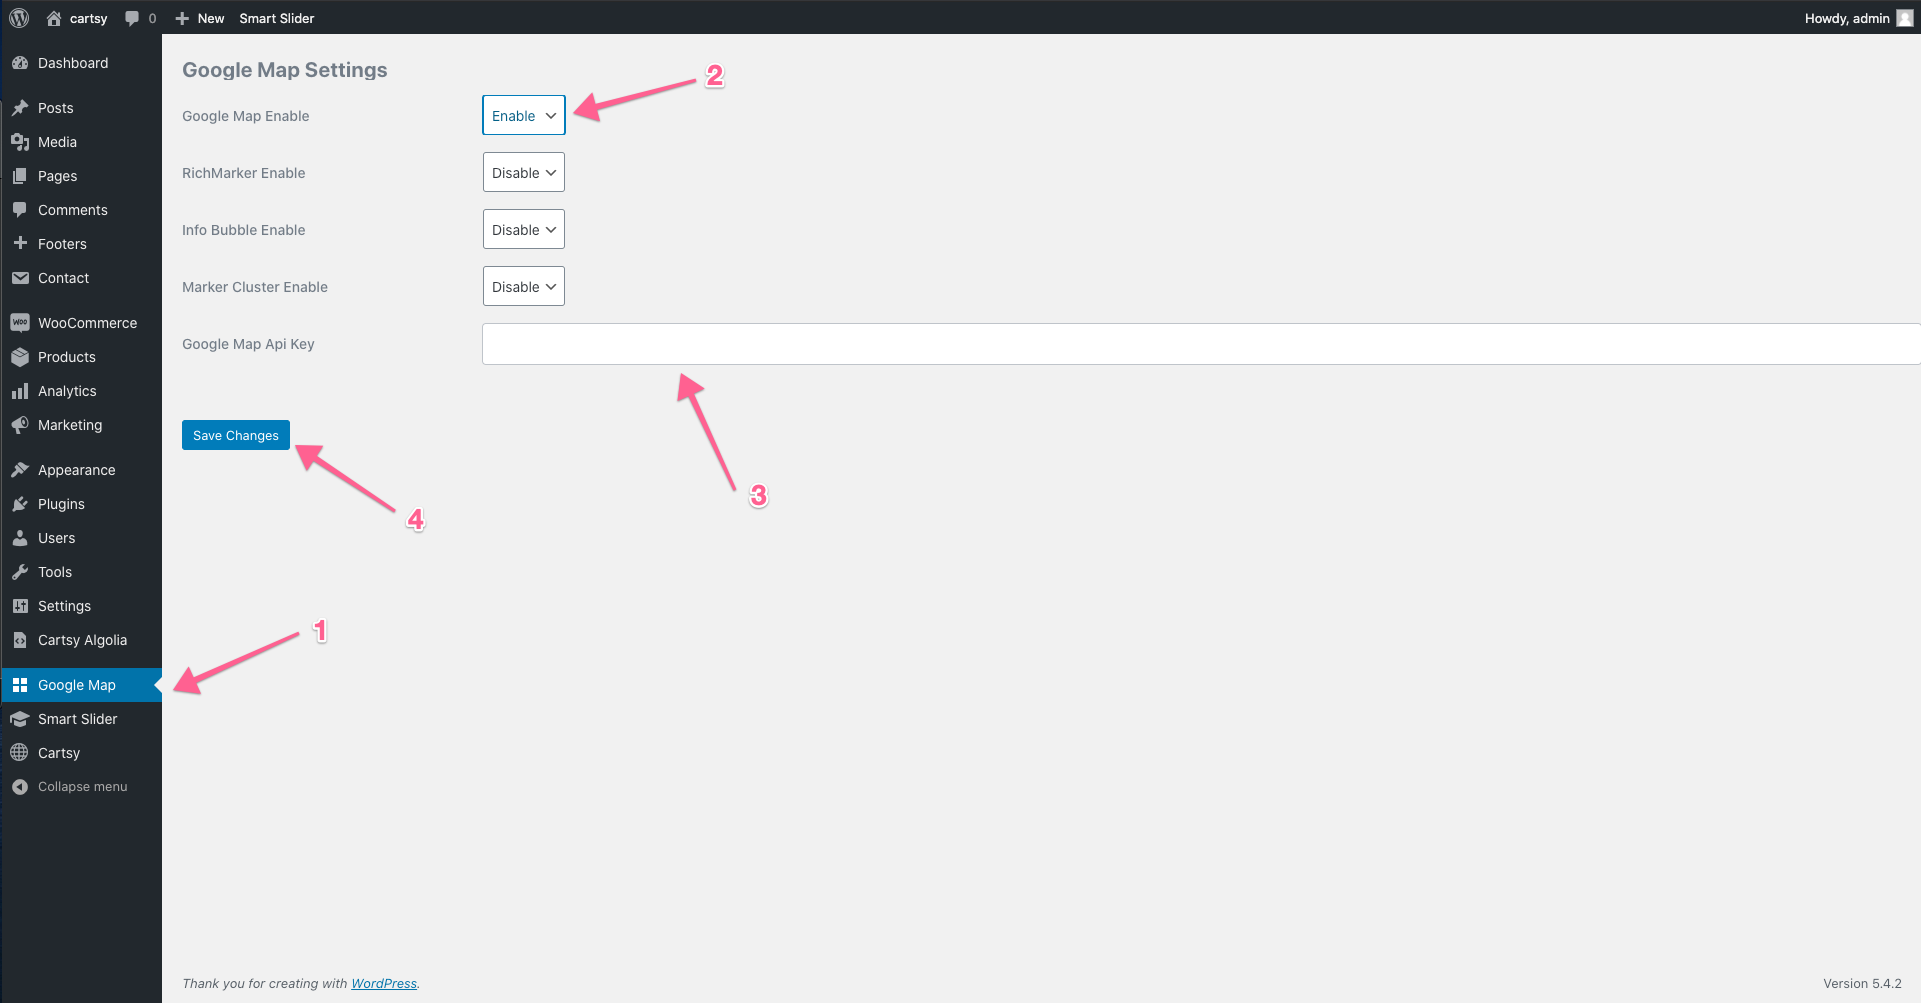
Google Map
If you want to show google map on your website or contact form, you've to configure google map first.
Social Login
On the cartsy theme, you can enable social login. To enable social login, you've to configure it first. To do that at first go to
Settings -> Nextend Social Login
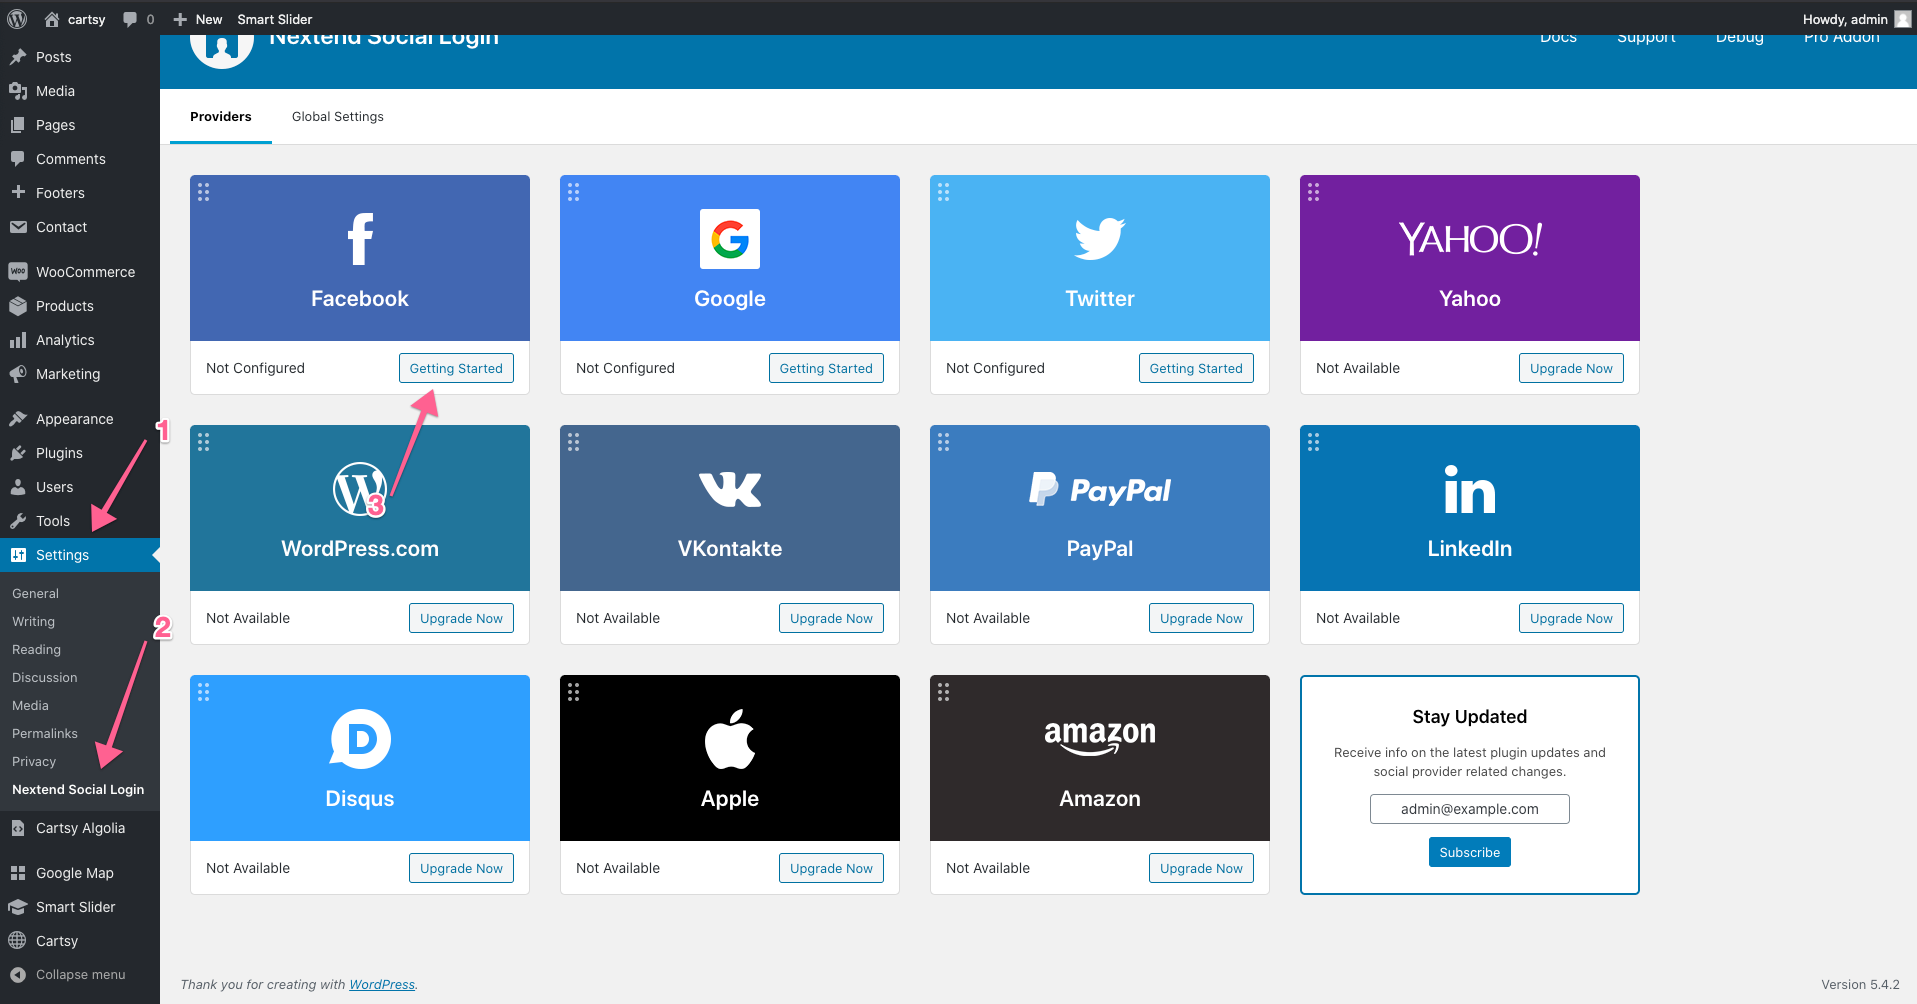
From that page click, Getting Started. After clicking Getting Started, you'll get all the options to configure.

Import Demo Data
Before importing demo data, make sure you have completed the above step. If you follow all the above steps, then all checkboxes will be green. If one step remaining to green, then you can't import demo data, so make sure you completed the above step.
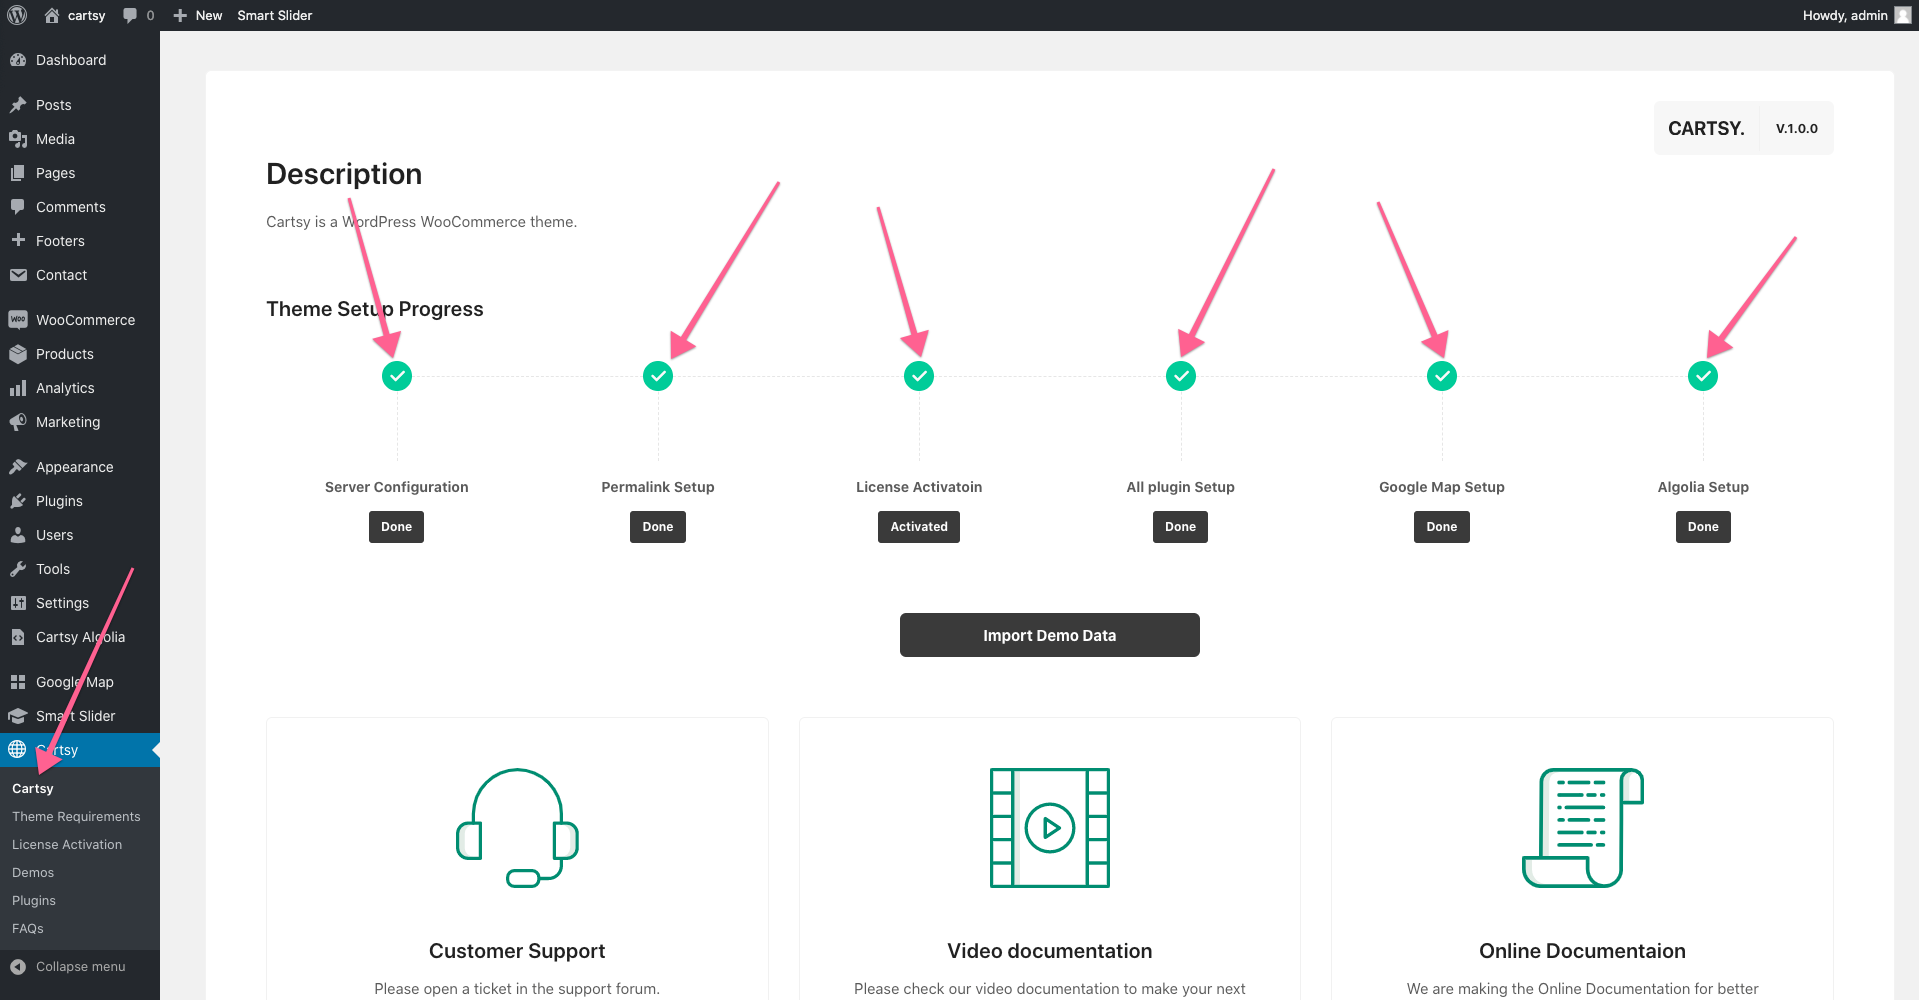
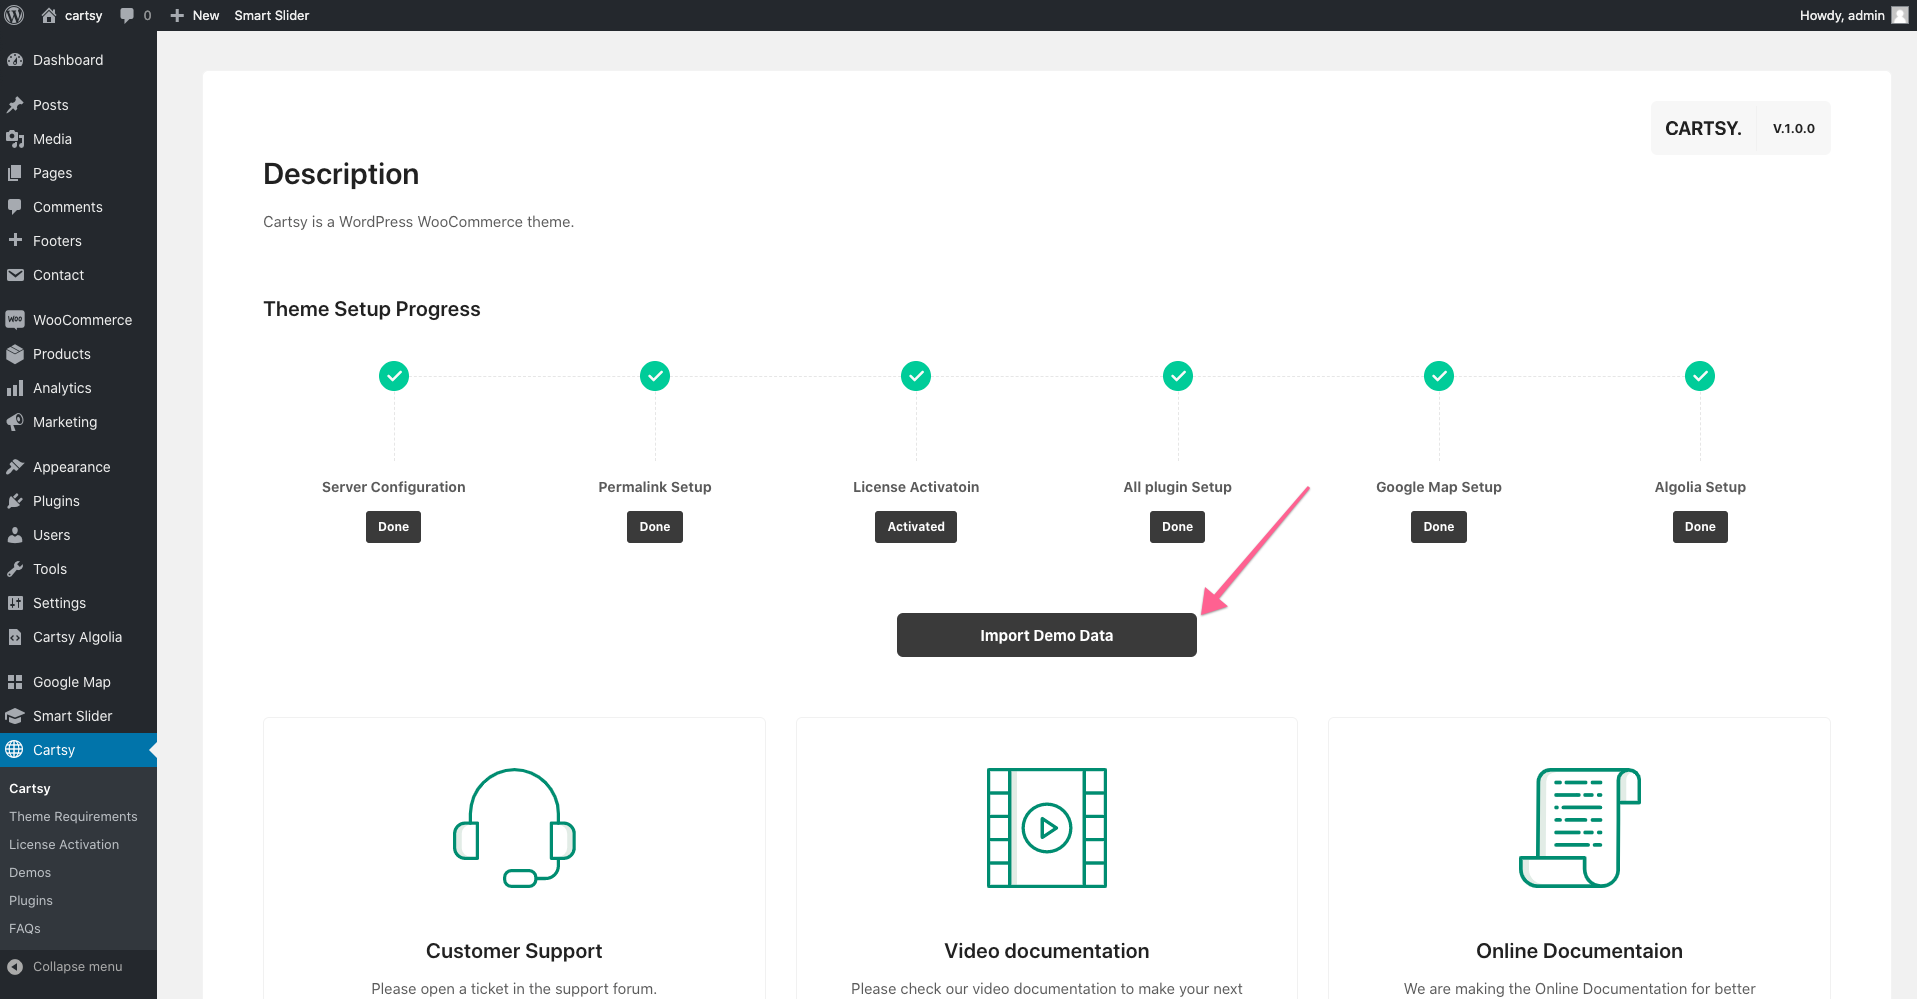
Now Click Import Demo Data Button
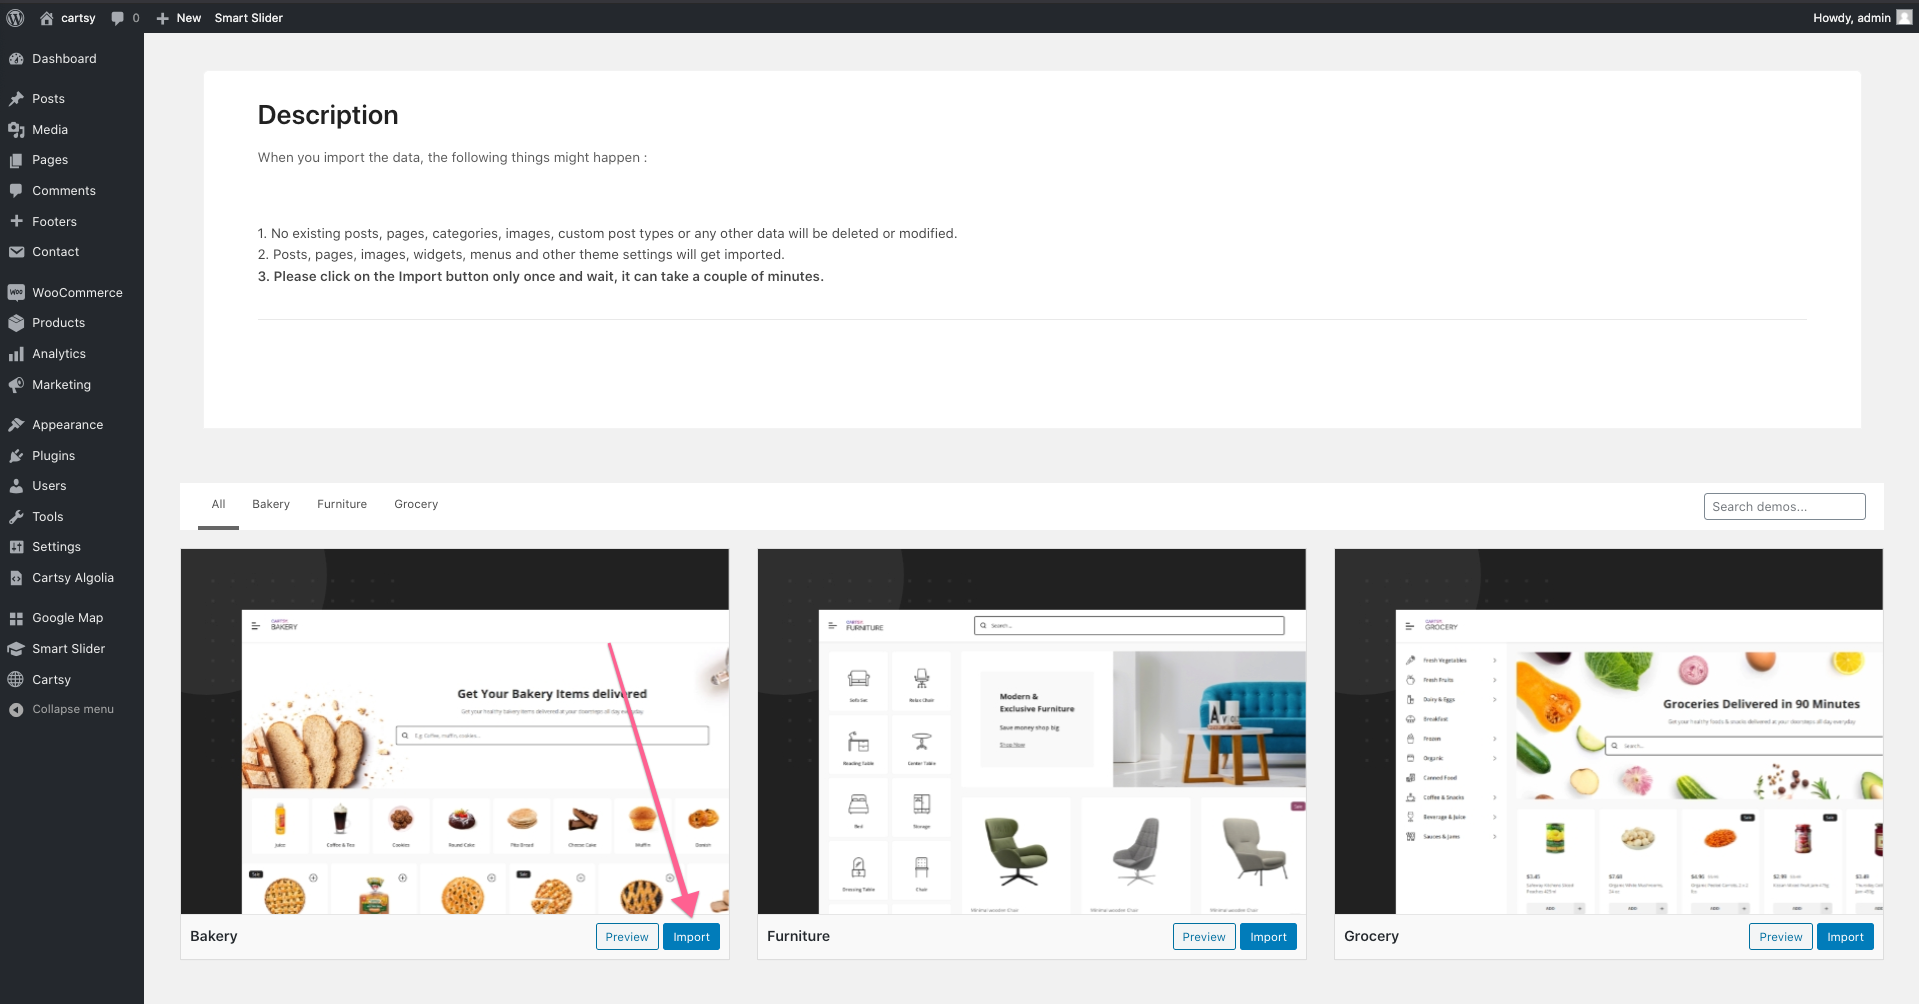
After clicking that button, the page will be redirected to a layout page. From that page, you can import different layouts. For this documentation, we'll import the bakery layout.
After import, the data make sure you re-sync algolia. To do that, go to Cartsy Algolia and click the Sync All button.

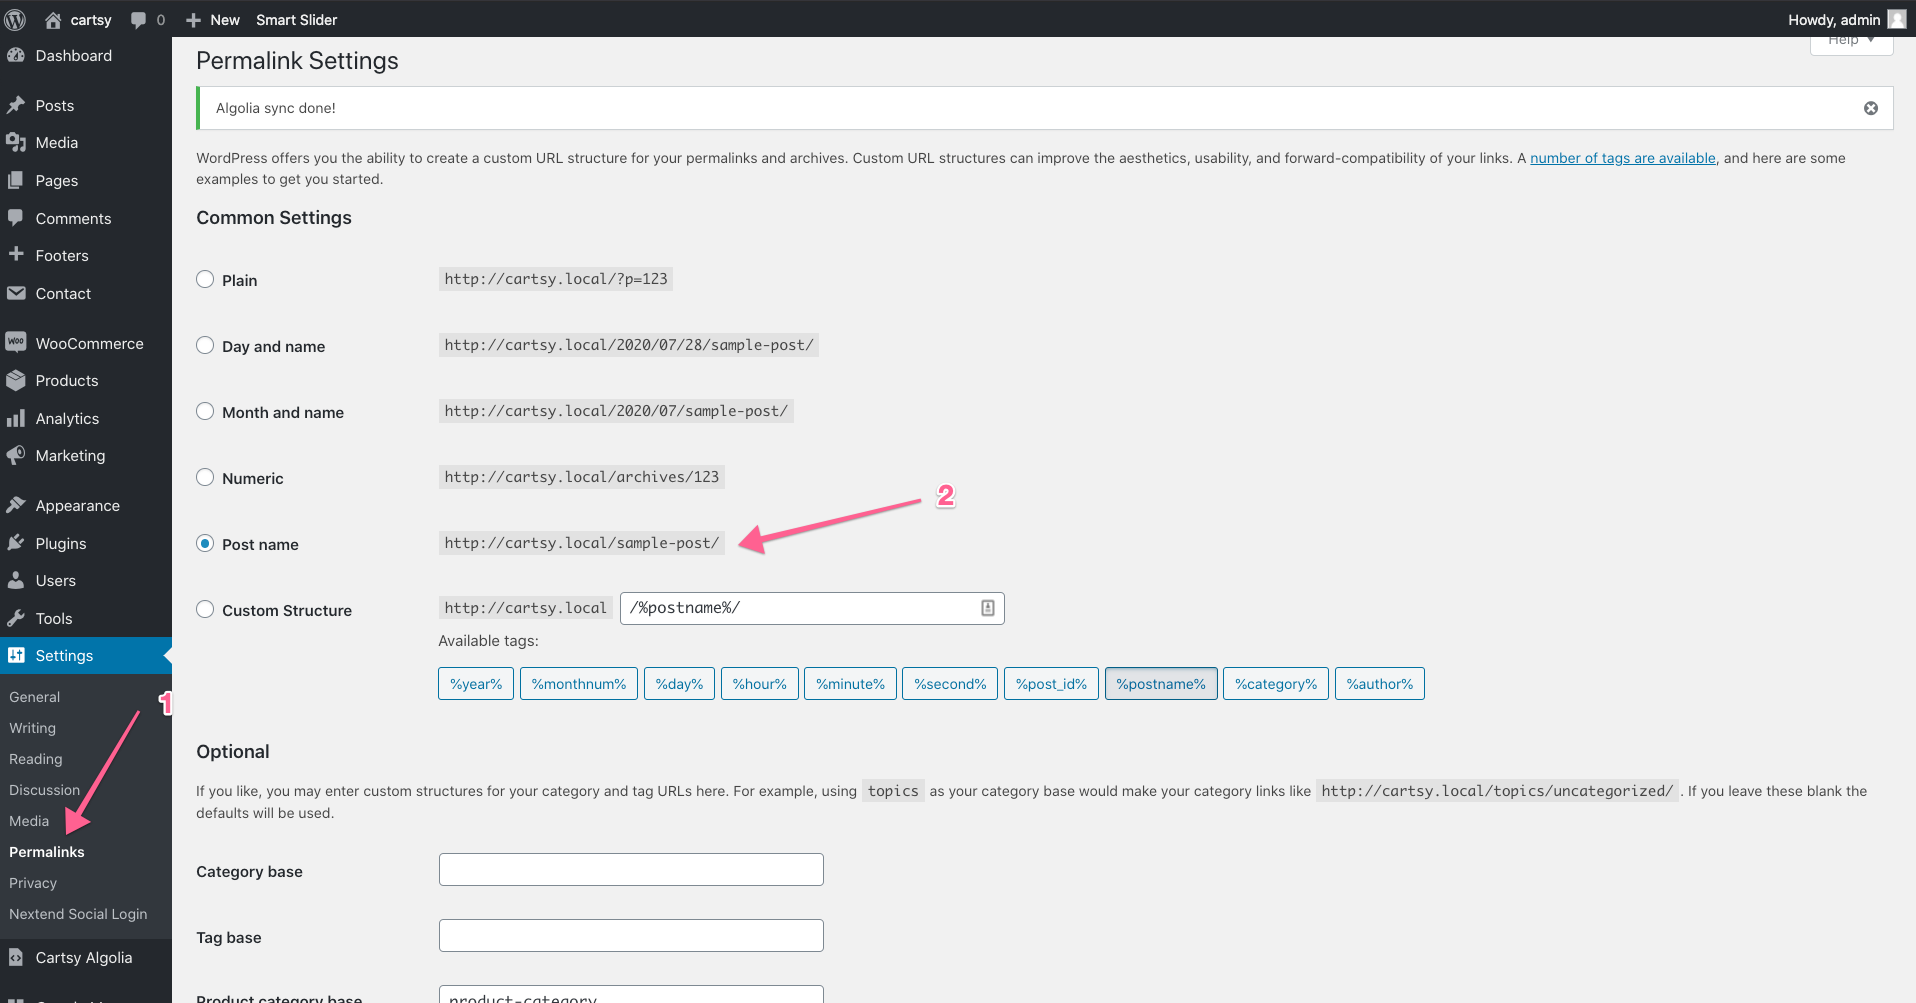
Permalink Setup
This step is a very tiny but very very important step. Goto your admin Dashboard Settings->Permalinks and set the Post Name permalink structure. You can chose any other permalink structure rather than Plain . Check below image and follow the arrows.
Theme Settings
We have used kirki WordPress customizer framework to build our theme settings. You can go to theme global settings from frontend using the customize button in frontend admin bar.

In customizer you will see below settings menus
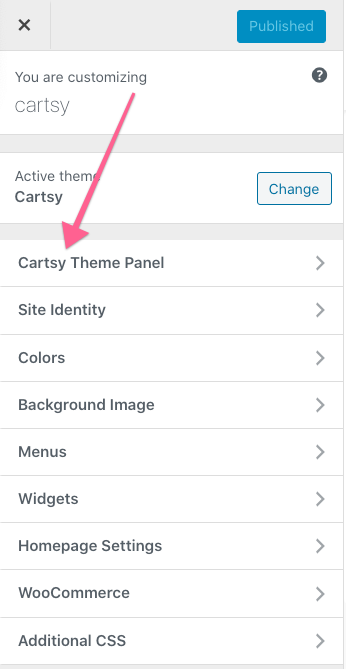
Now click on the Cartsy Theme Panel menu and you will get below settings
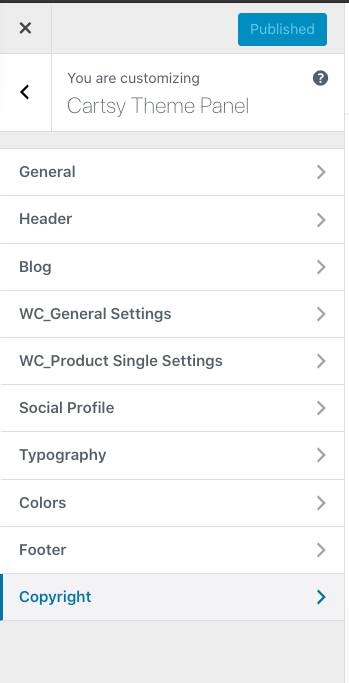
Now If you click on the Header menu you will get below header settings to customize theme header
Settings Options
General Settings:
From General Settings you can enable or disable page sidebar

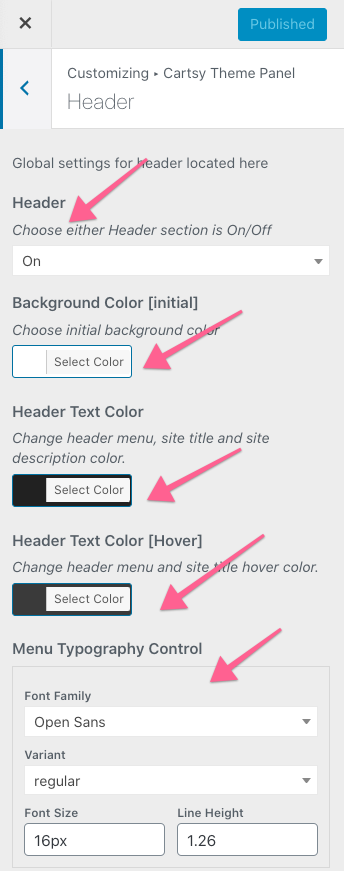
Header Settings:
From Header Settings, you can enable or disable page header, search bar, use transparent header, sticky header & change the background color, text color of a sticky header, etc.
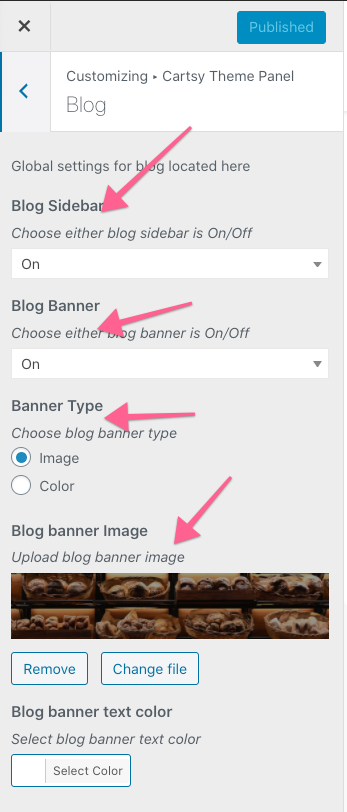
Blog Settings:
From Blog Settings, you can enable or disable blog sidebar, blog banner, change banner type, etc.
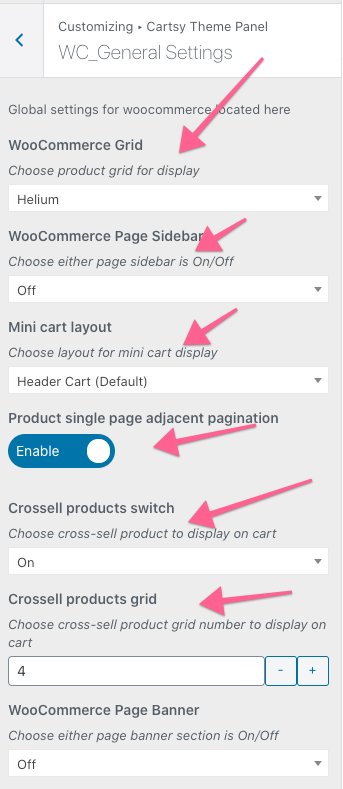
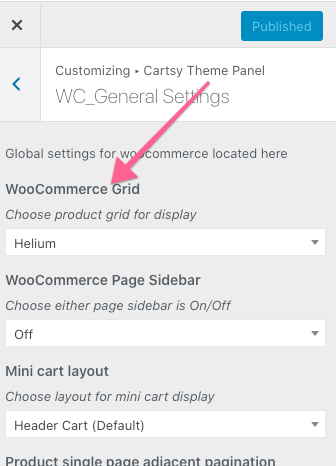
WC_General Settings:
From WC_General Settings, you can change the layout of the product grid, enable or disable the WooCommerce product page sidebar, page banner, change the layout design of the WooCommerce mini cart, enable or disable cross-sell product switch, etc.
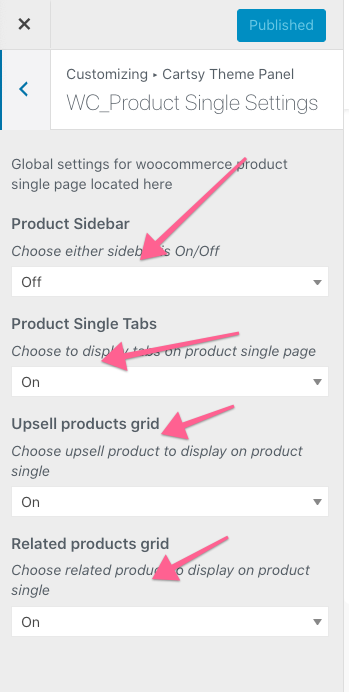
WC_Product Single Settings:
From WC_Product Single Settings, you can enable or disable single product page sidebar, use single product tabs, show Upsell products grid, show related products, change the quantity of the product on relevant products section, etc.
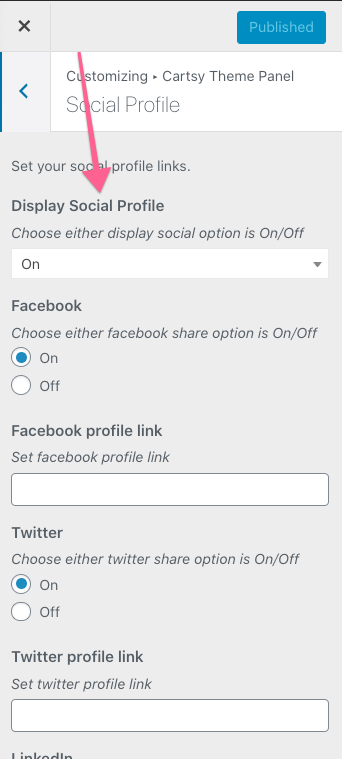
Social Settings:
From Social Settings, you can enable or disable specific social platform also you can change the profile link, etc.
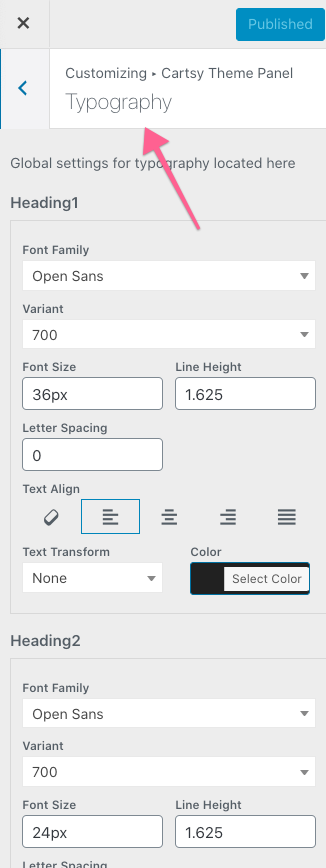
Typography Settings:
From Typography Settings, you can change the typography for your entire website.
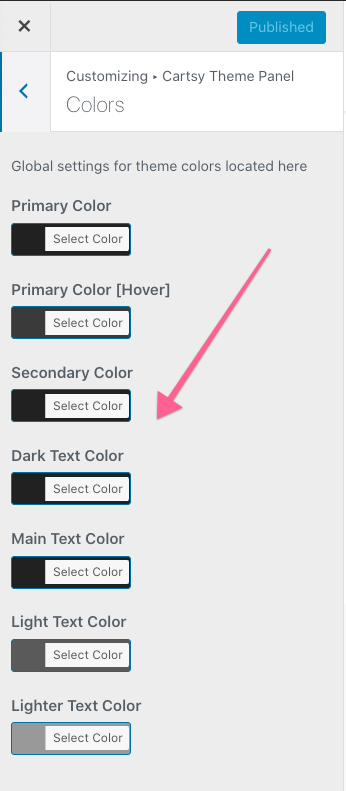
Color Settings:
From Color Settings, You can change the brand color of your website.
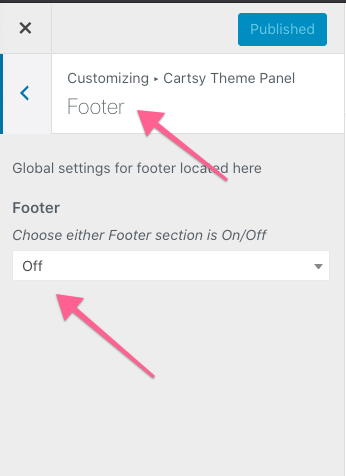
Footer Settings:
From Footer Settings, you can enable or disable footer section.
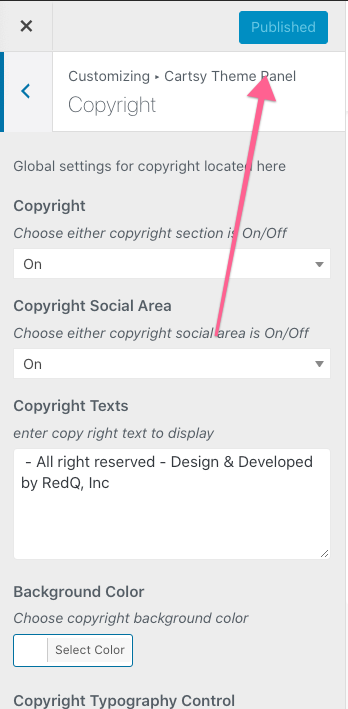
Copyright Settings:
From Copyright Settings, you can enable or disable the copyright section. Also, you can change the copyright text, color, etc.
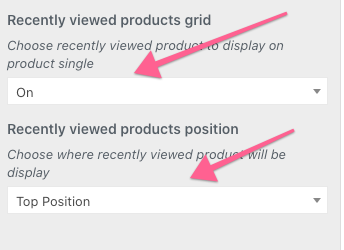
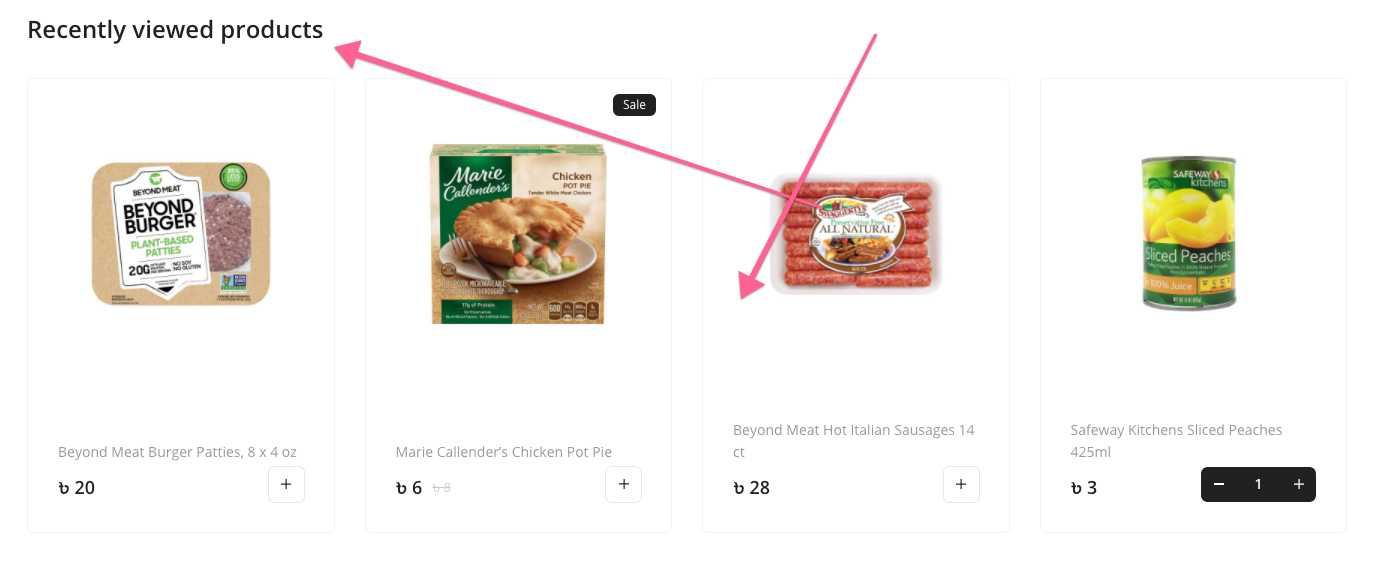
How to enable recently viewed product
To enable the recently viewed product go to,
Customizer Settings -> Cartsy Theme Panel -> WC_Product Single Settings -> and ON Recently viewed product
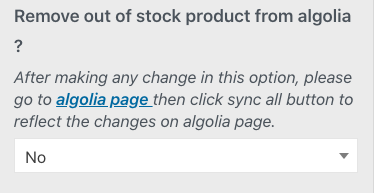
How to remove out of stock product from the homepage?
You can enable or disable to show out of stock product from homepage or Algolia page. To do that go to, Customizer -> Cartsy Theme Panel -> WooCommerce General and set yes/no for Remove out of stock product from algolia ?
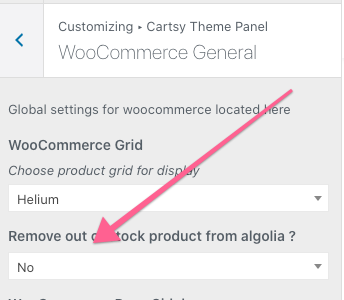
After the change, make sure you sync Algolia.

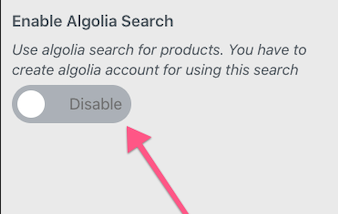
How to use Native Search
To enable or disable Algolia/Native search go to, Customizer -> Cartsy Theme Panel -> General ->Enable/Disable Algolia Search.
Display out of stock products on the homepage
To hide or show out of stock products on the homepage or Algolia page, go to Customizer -> Cartsy Theme Panel -> WooCommerce General -> Show or hide out of stock products
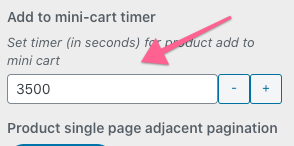
Customize timer for toast
To customize timer for the toast go to,
Customizer Settings -> Cartsy Theme Panel -> WC_Product Settings -> and set timer
Gutenberg Blocks
Cartsy theme is build on Gutenberg Blocks. In our theme we have provided few native gutenberg blocks using those blocks we have configured our theme pages. You can also use those blocks to add them to any pages or blogs. Below image shows all the gutenberg blocks our theme offers.
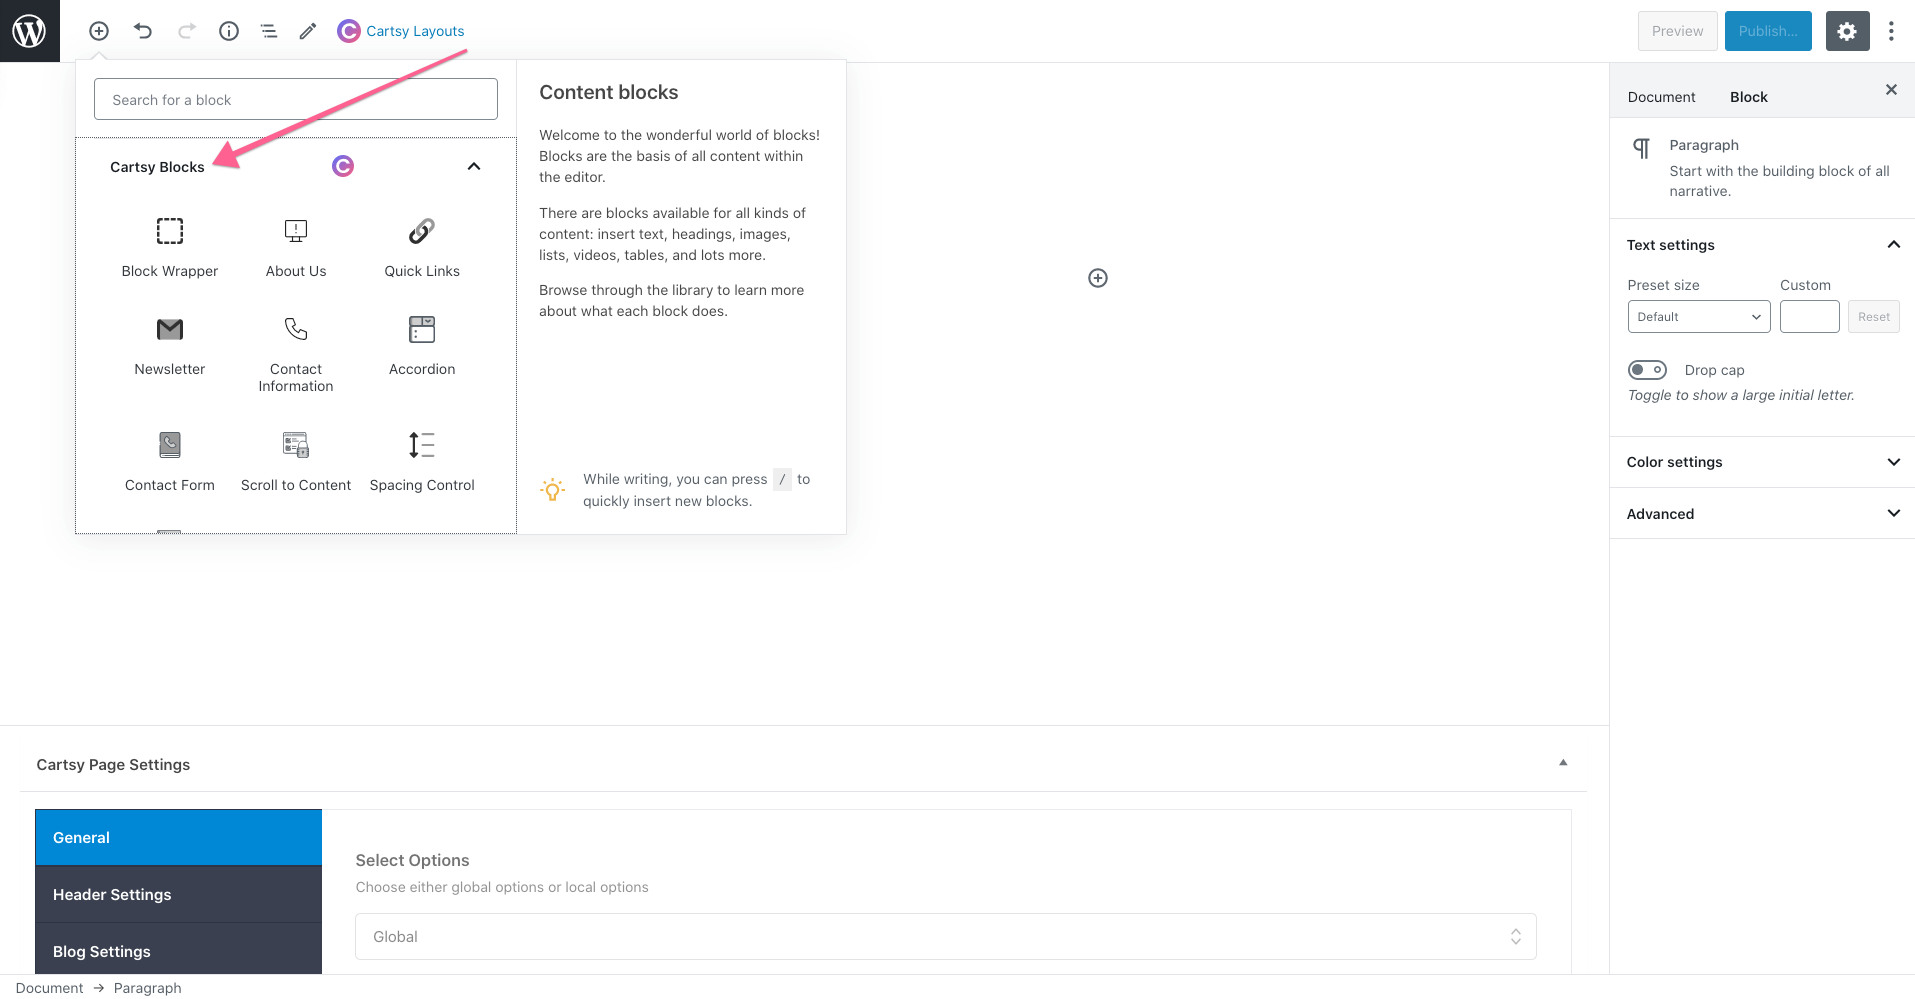
You can use any one of these blocks. Just hover over the block and you can see its preview with a description of what this block represents.
Cartsy Layout
We add some generic layout page on the Gutenberg page.
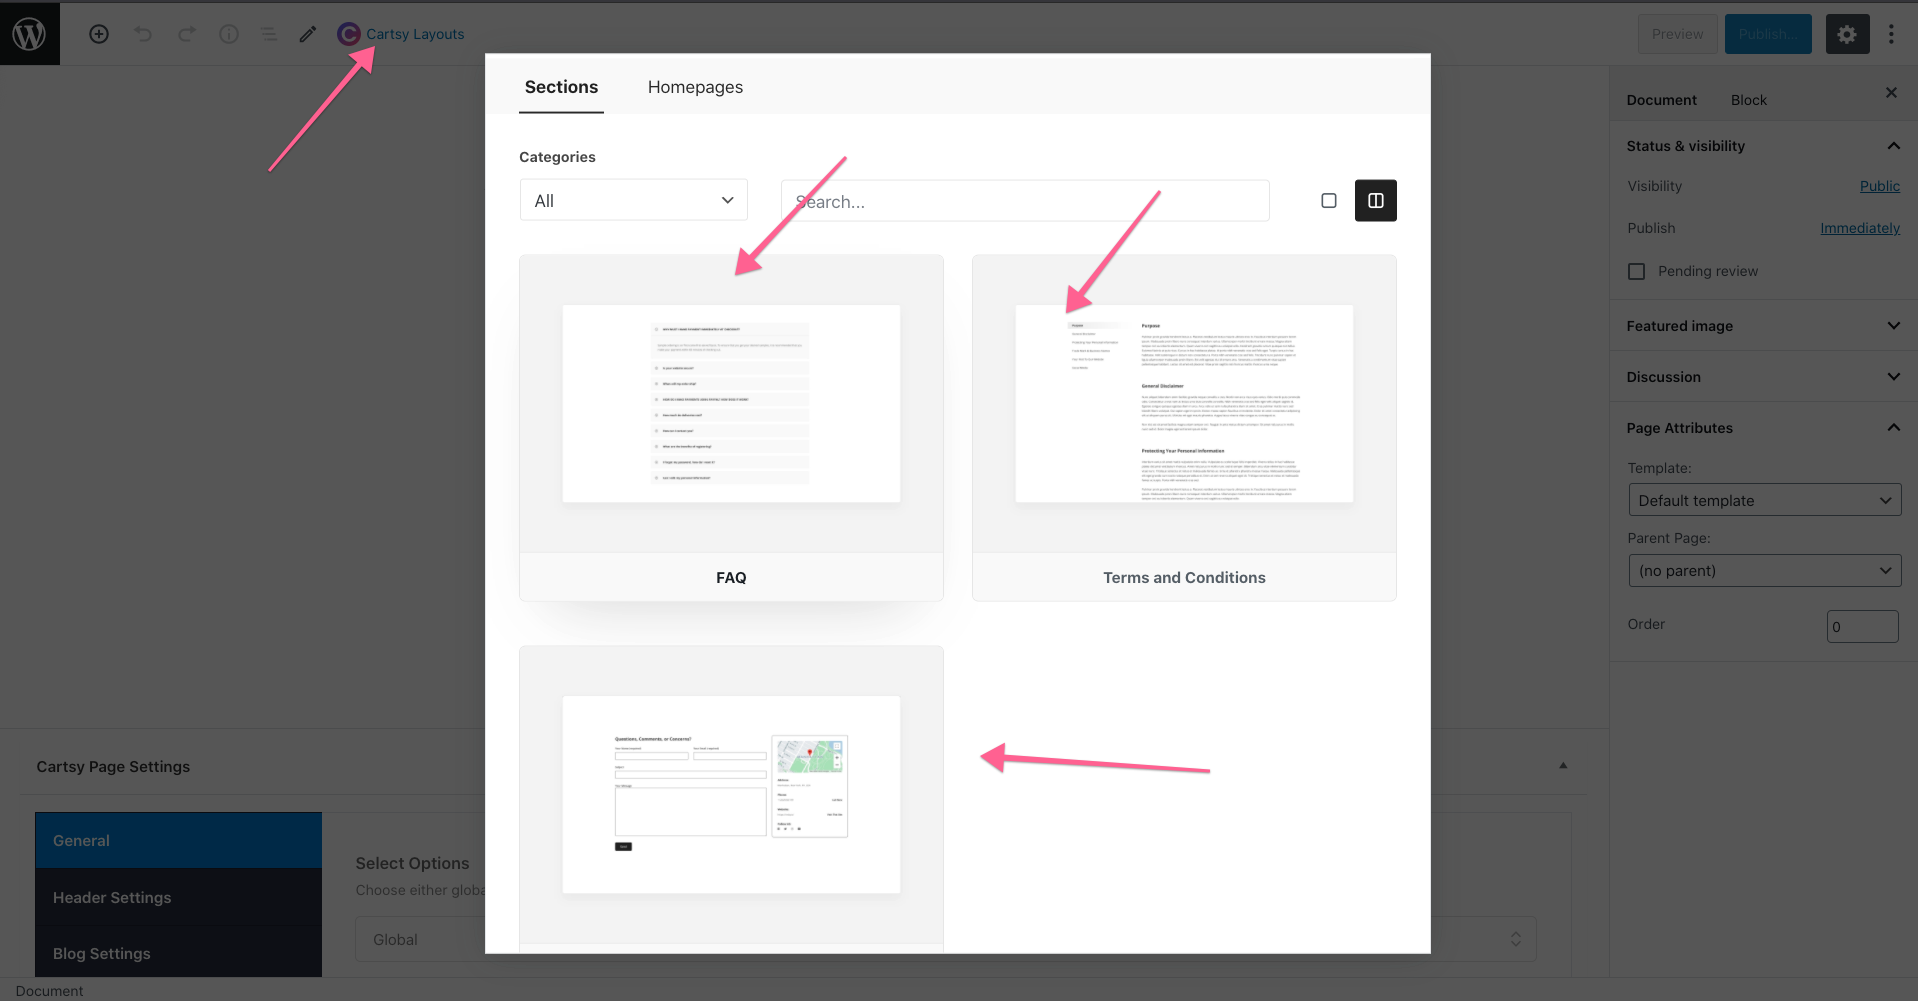
More layout will be coming in the future.
Product Layout
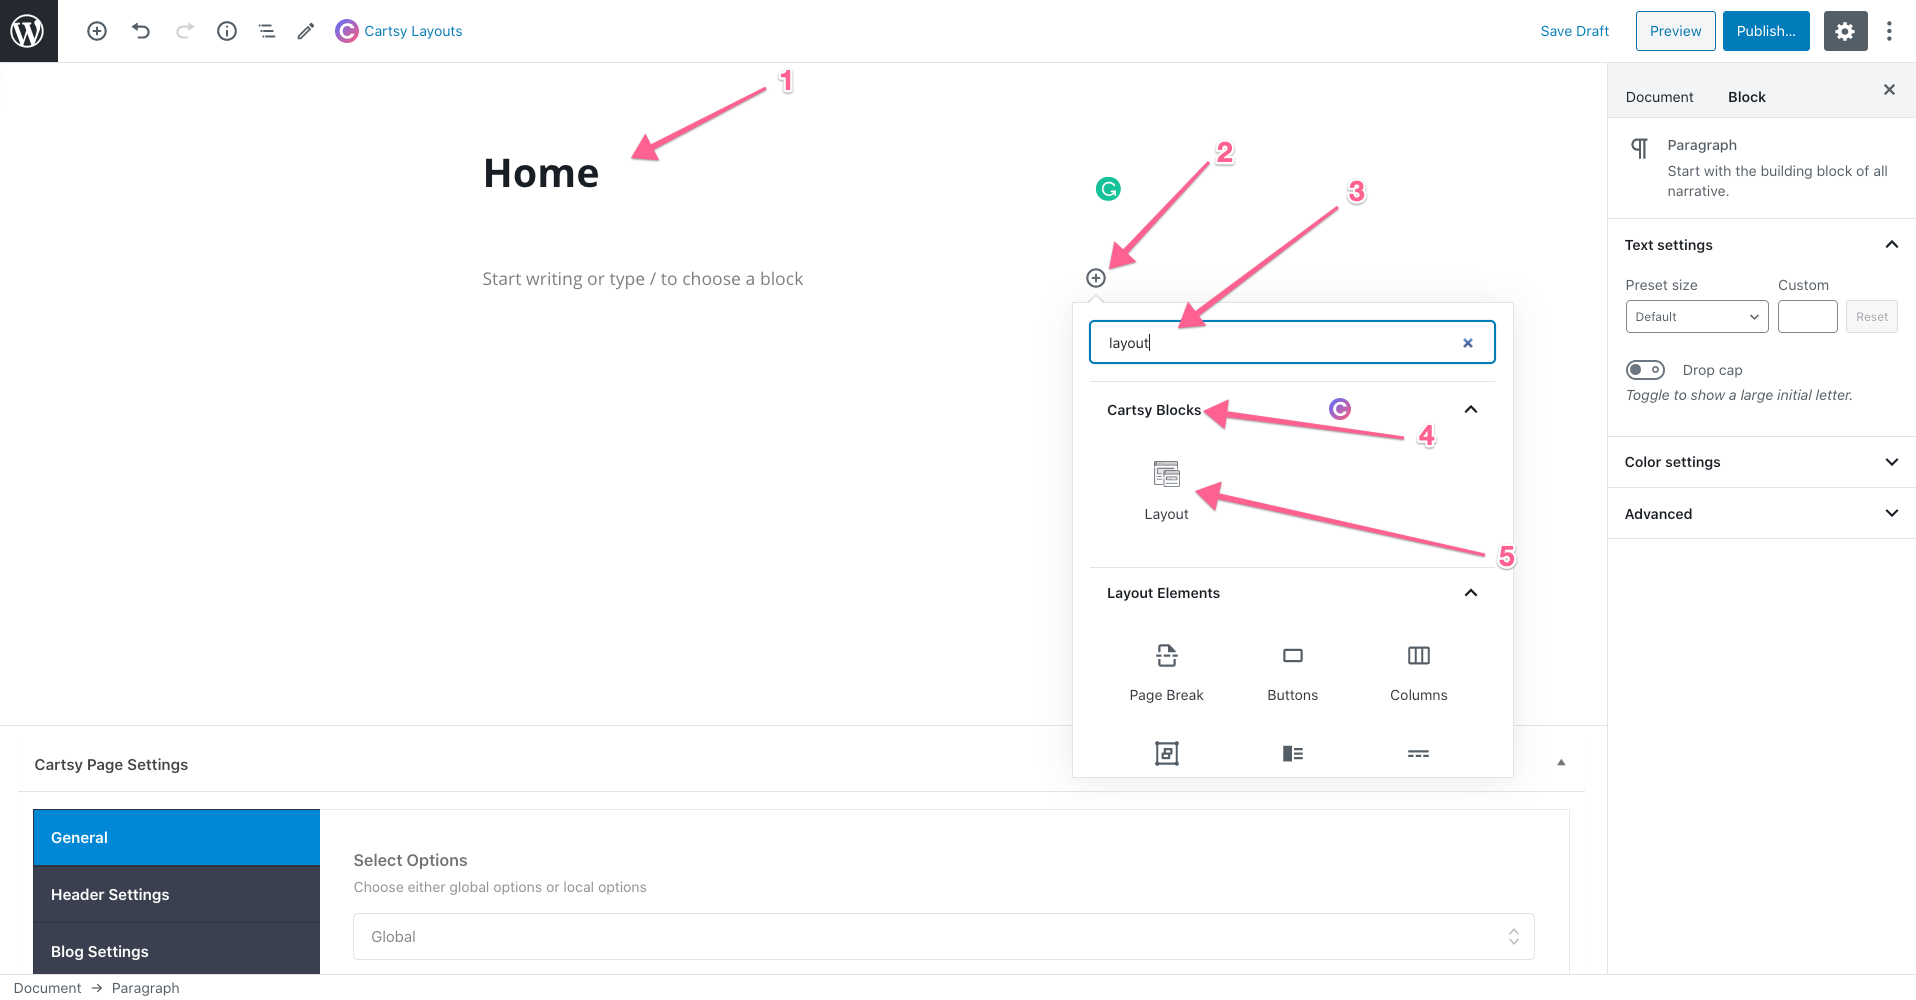
We've several product layouts, and you can build a custom product page using those gutenberg layouts. To create a custom layout at first go to a new page
Then,
- Input the page title
- Click plus button for search Gutenberg block
- Search layout from Gutenberg search block
- click layout
After click layout a pre-defined layout will be setup.
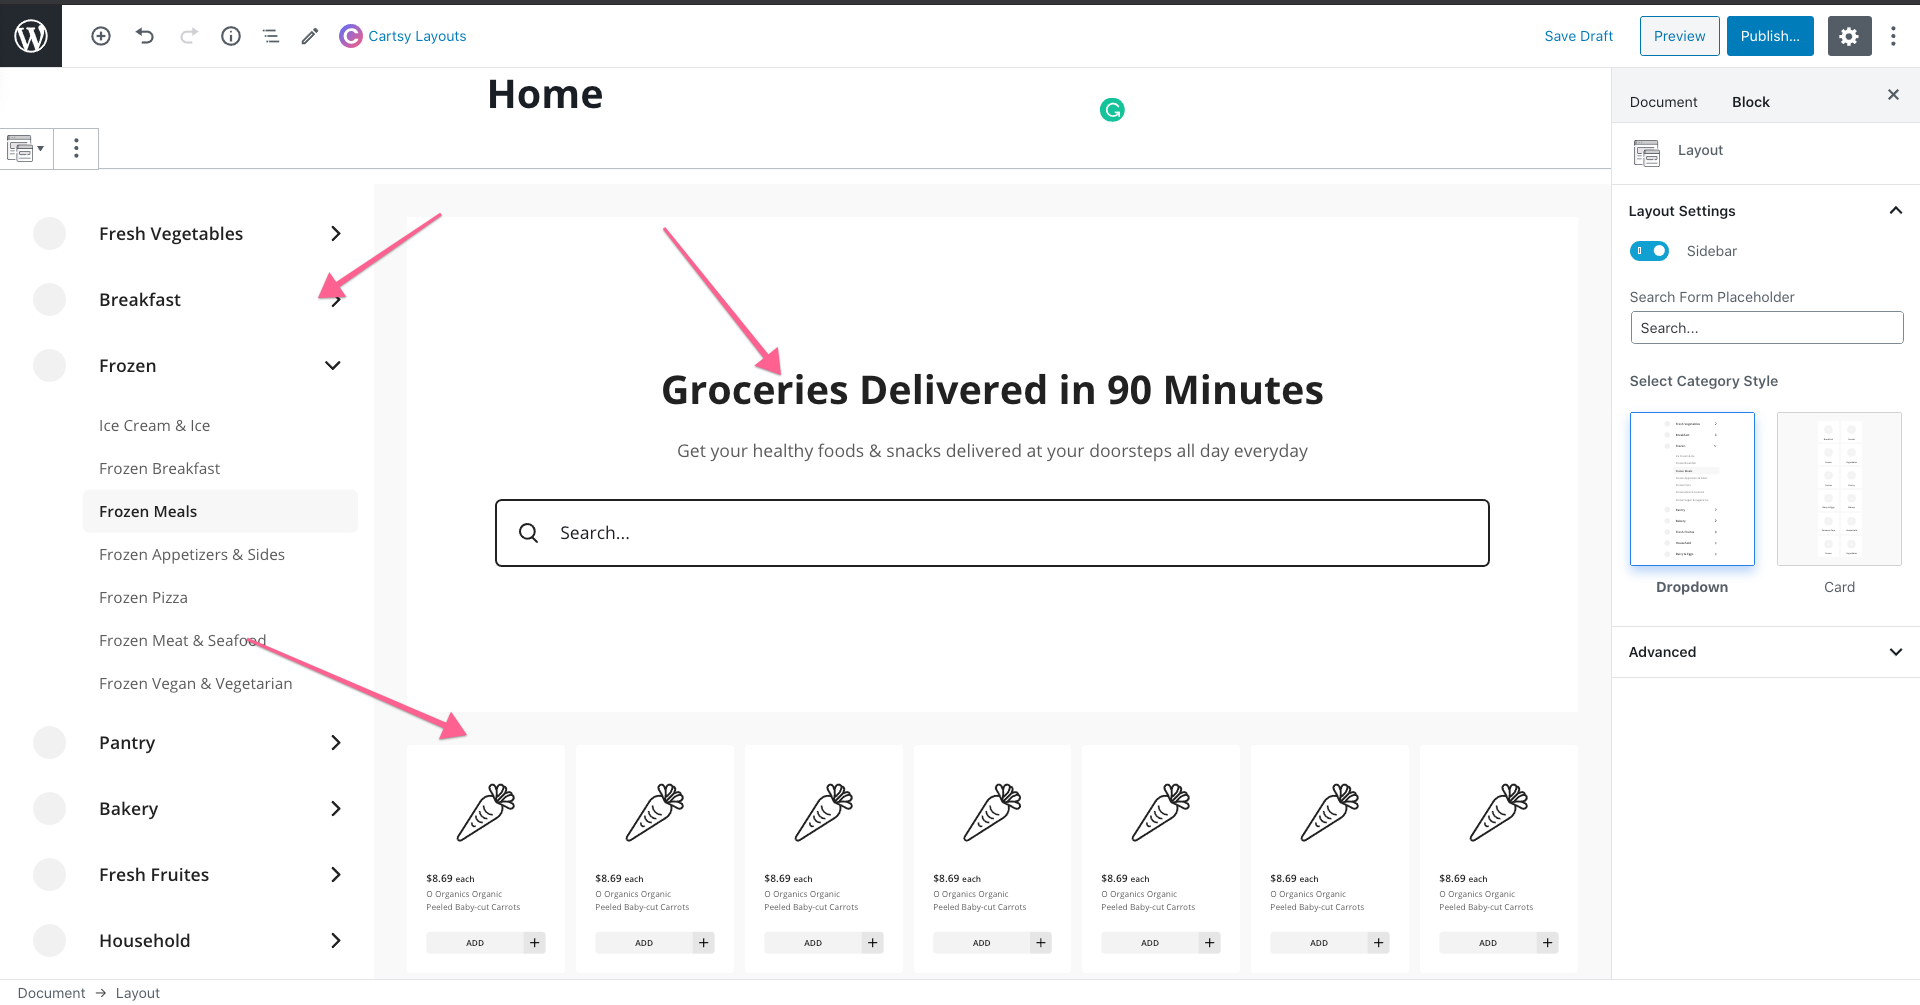
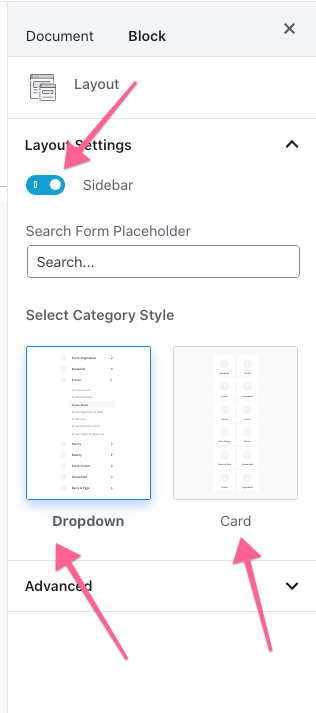
If you want to disable sidebar, then disable sidebar from Layout settings otherwise select sidebar style.
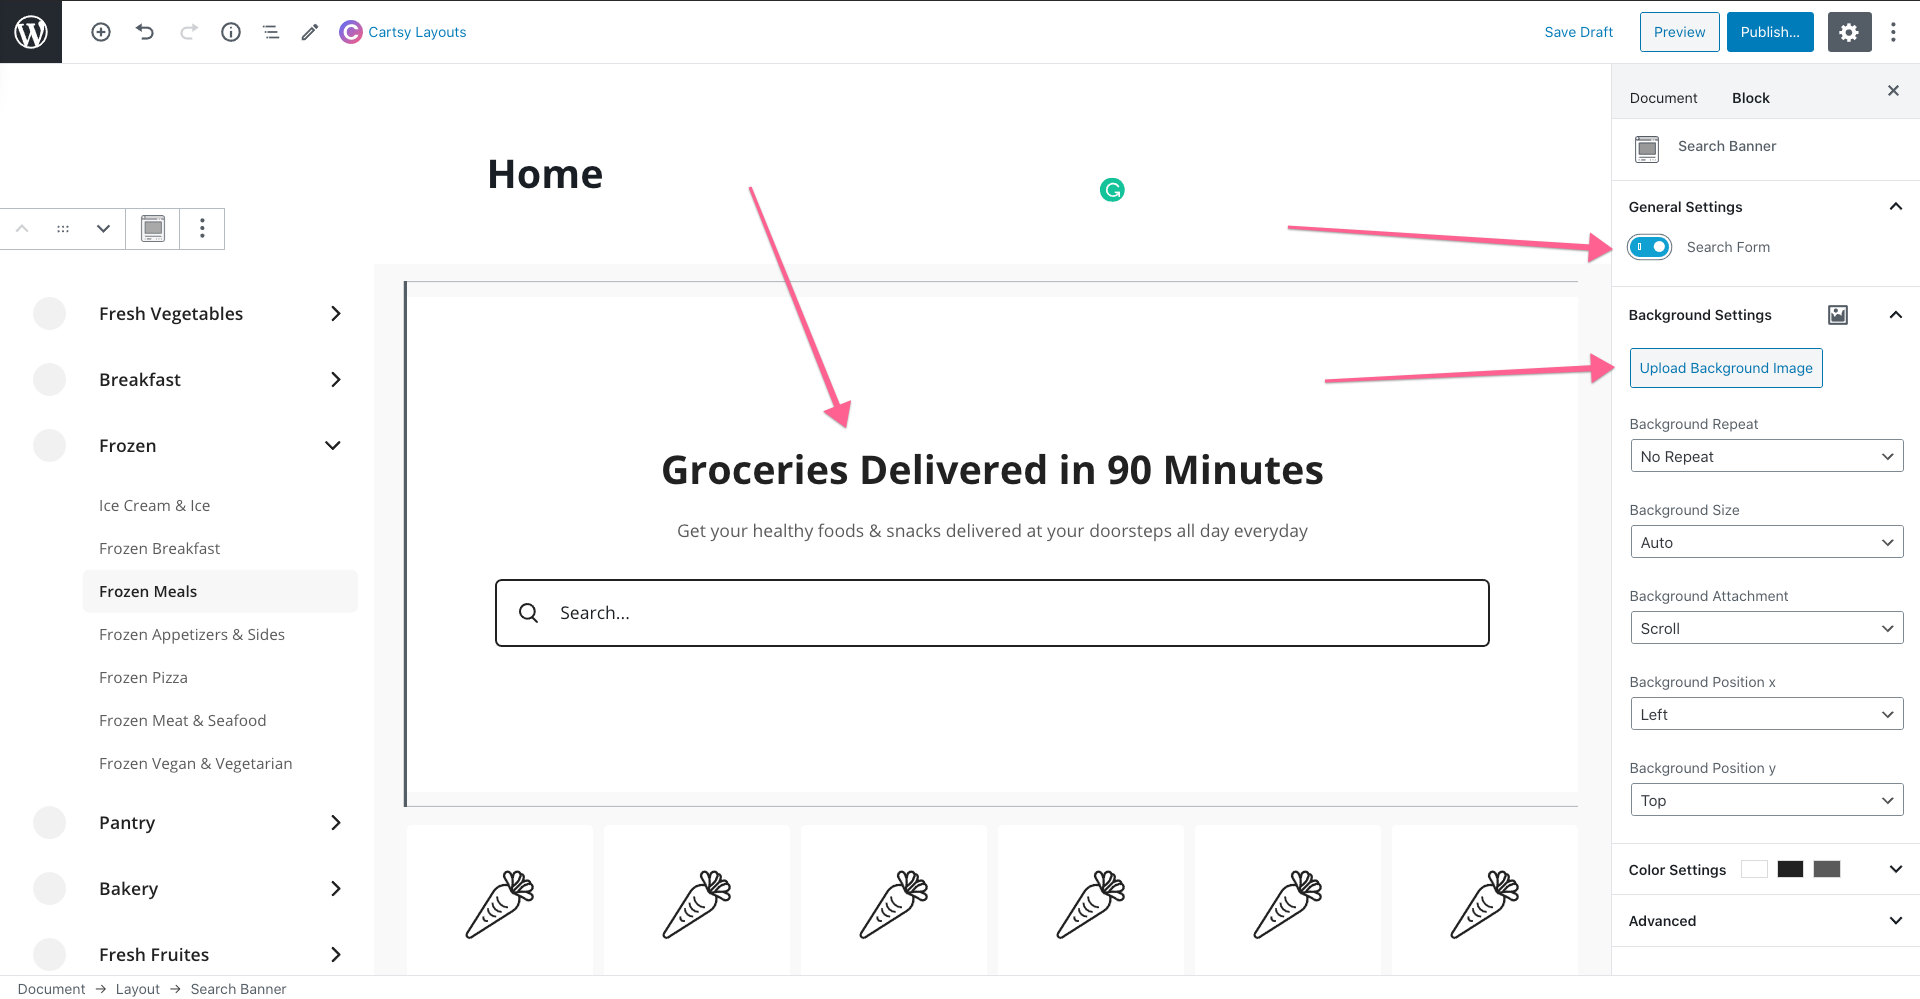
From the banner, you can upload a banner image. Also, you can disable the search option from the banner.
We already some product layout and will be adding lots of layout designs in the future. From product section settings, you can change the product layout style.
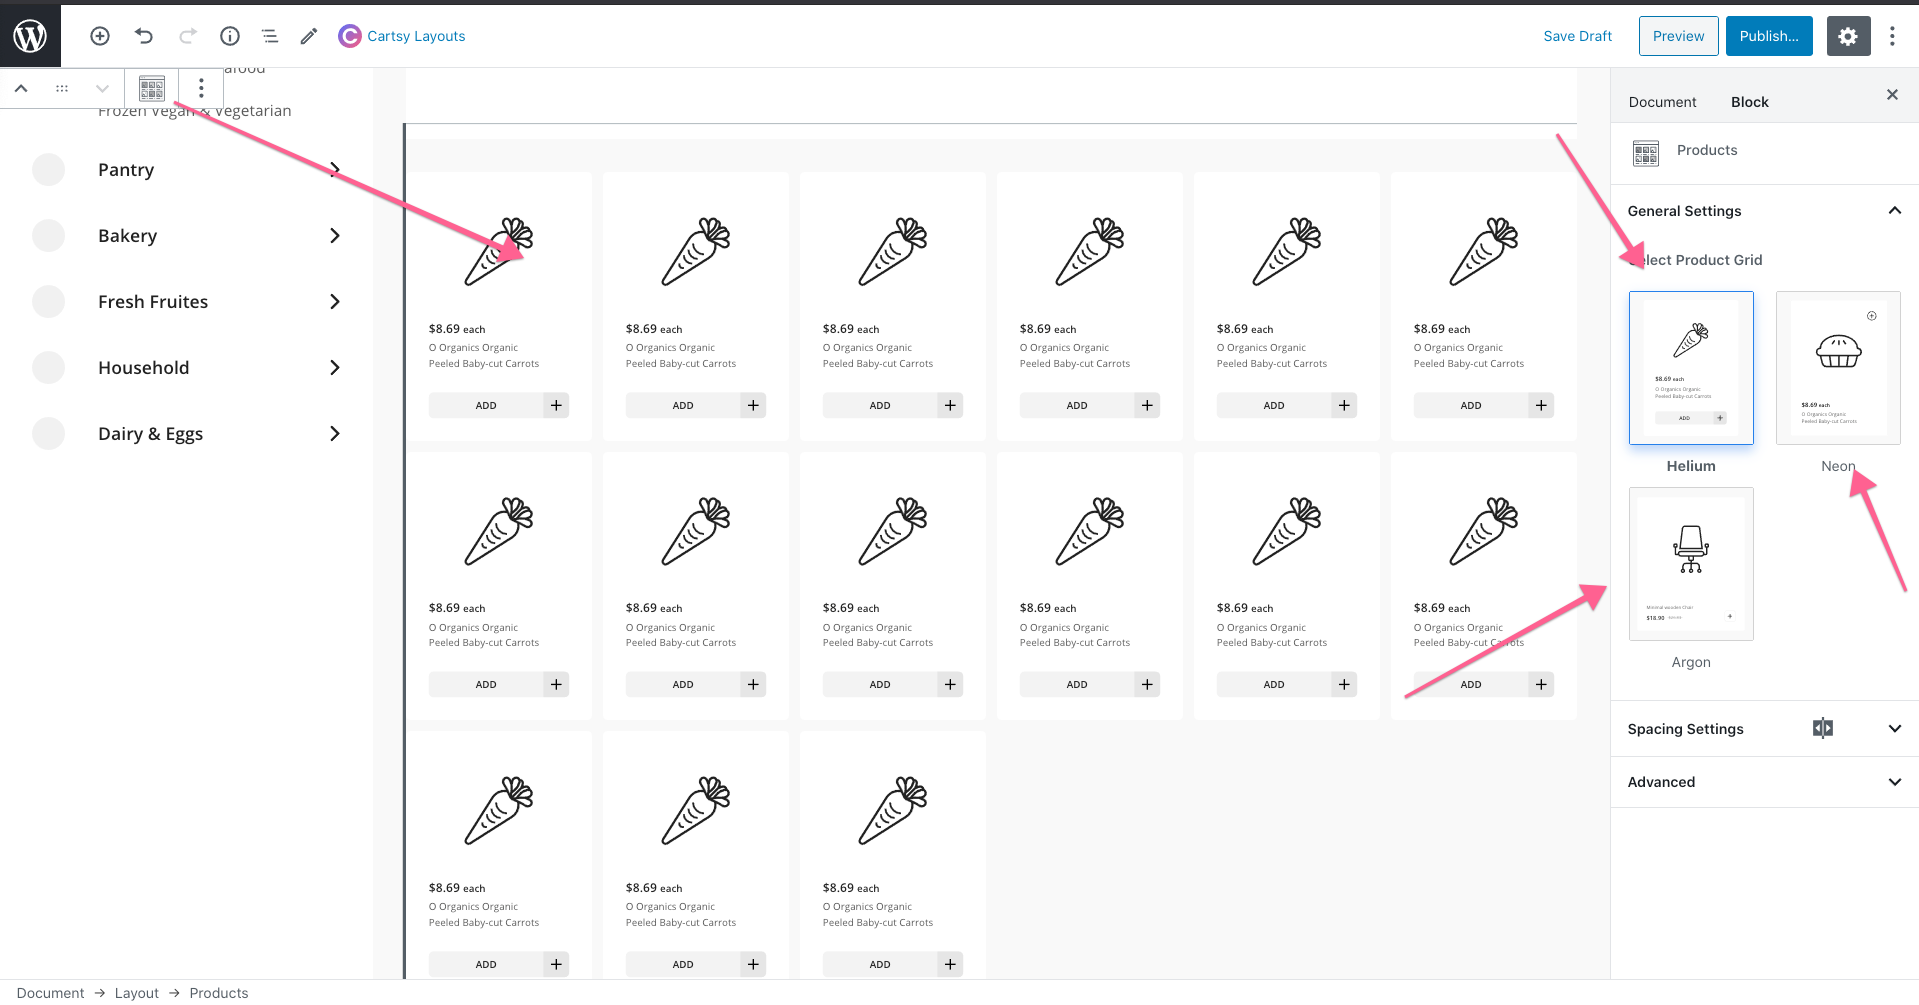
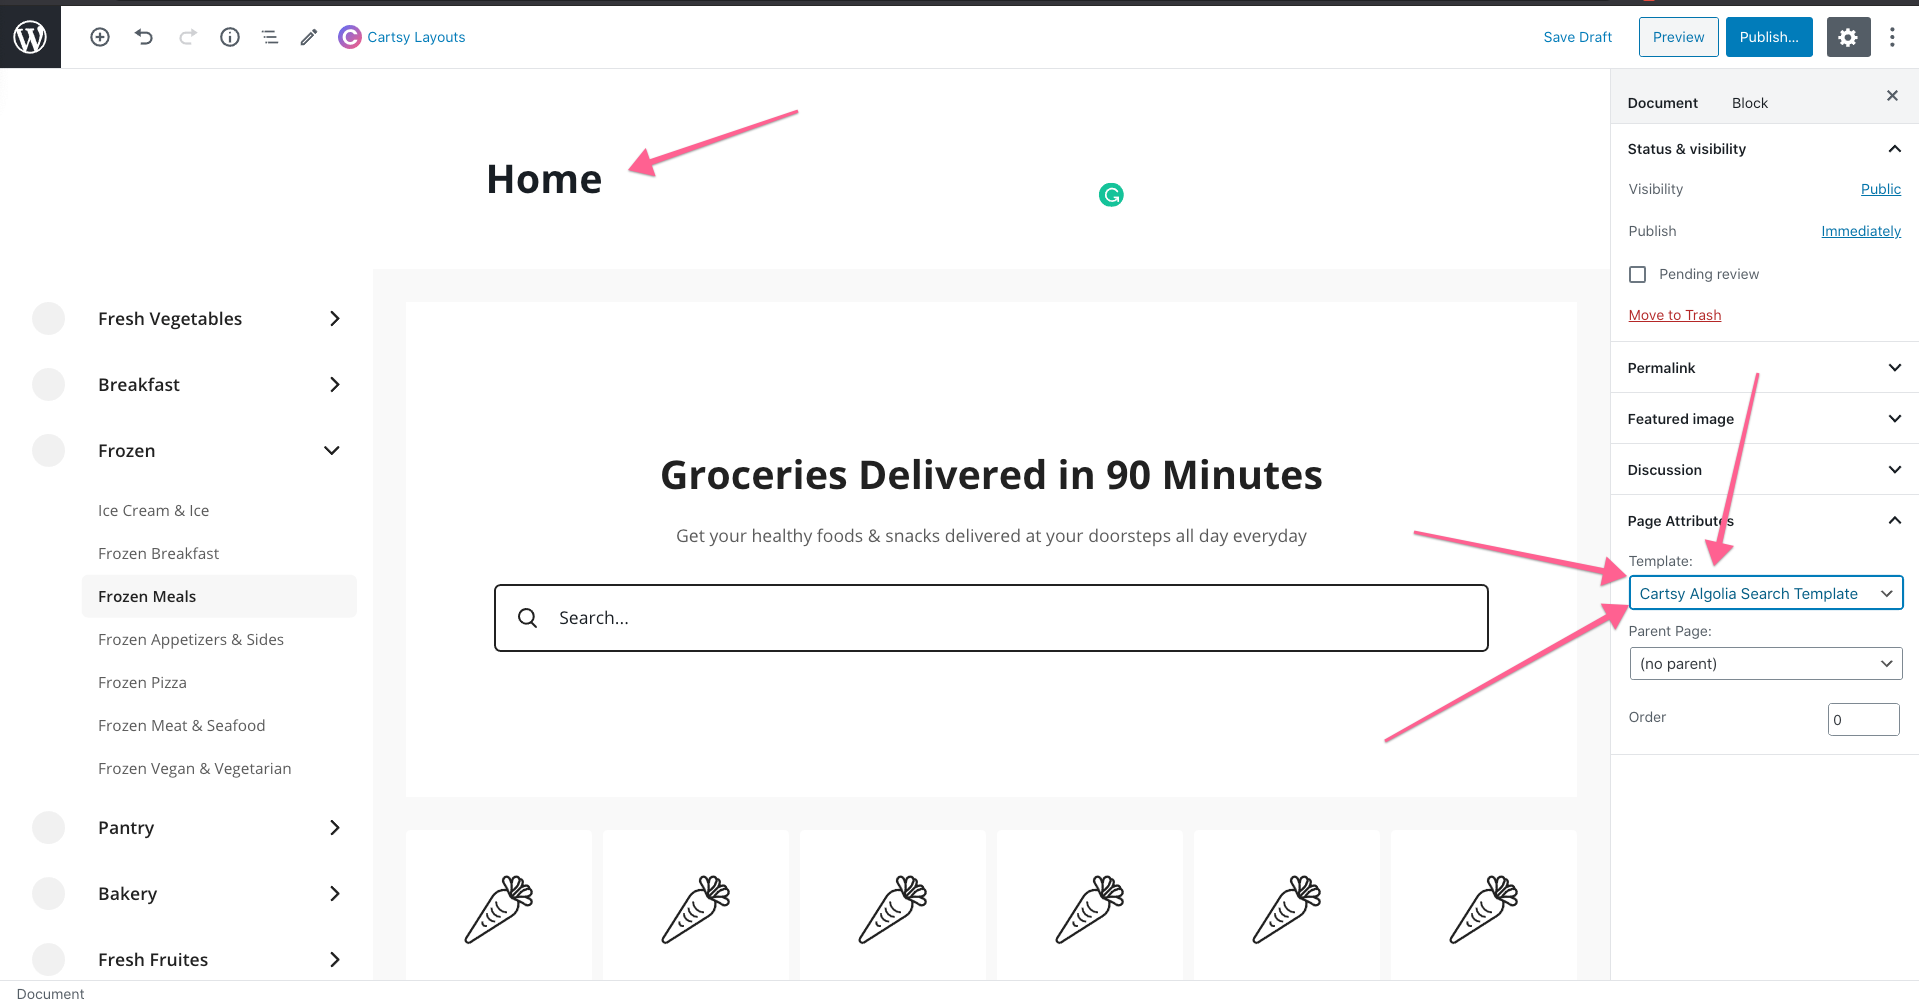
After building the product layout, change the page template to Cartsy Full With Template and publish the page.
Change Default Product Page
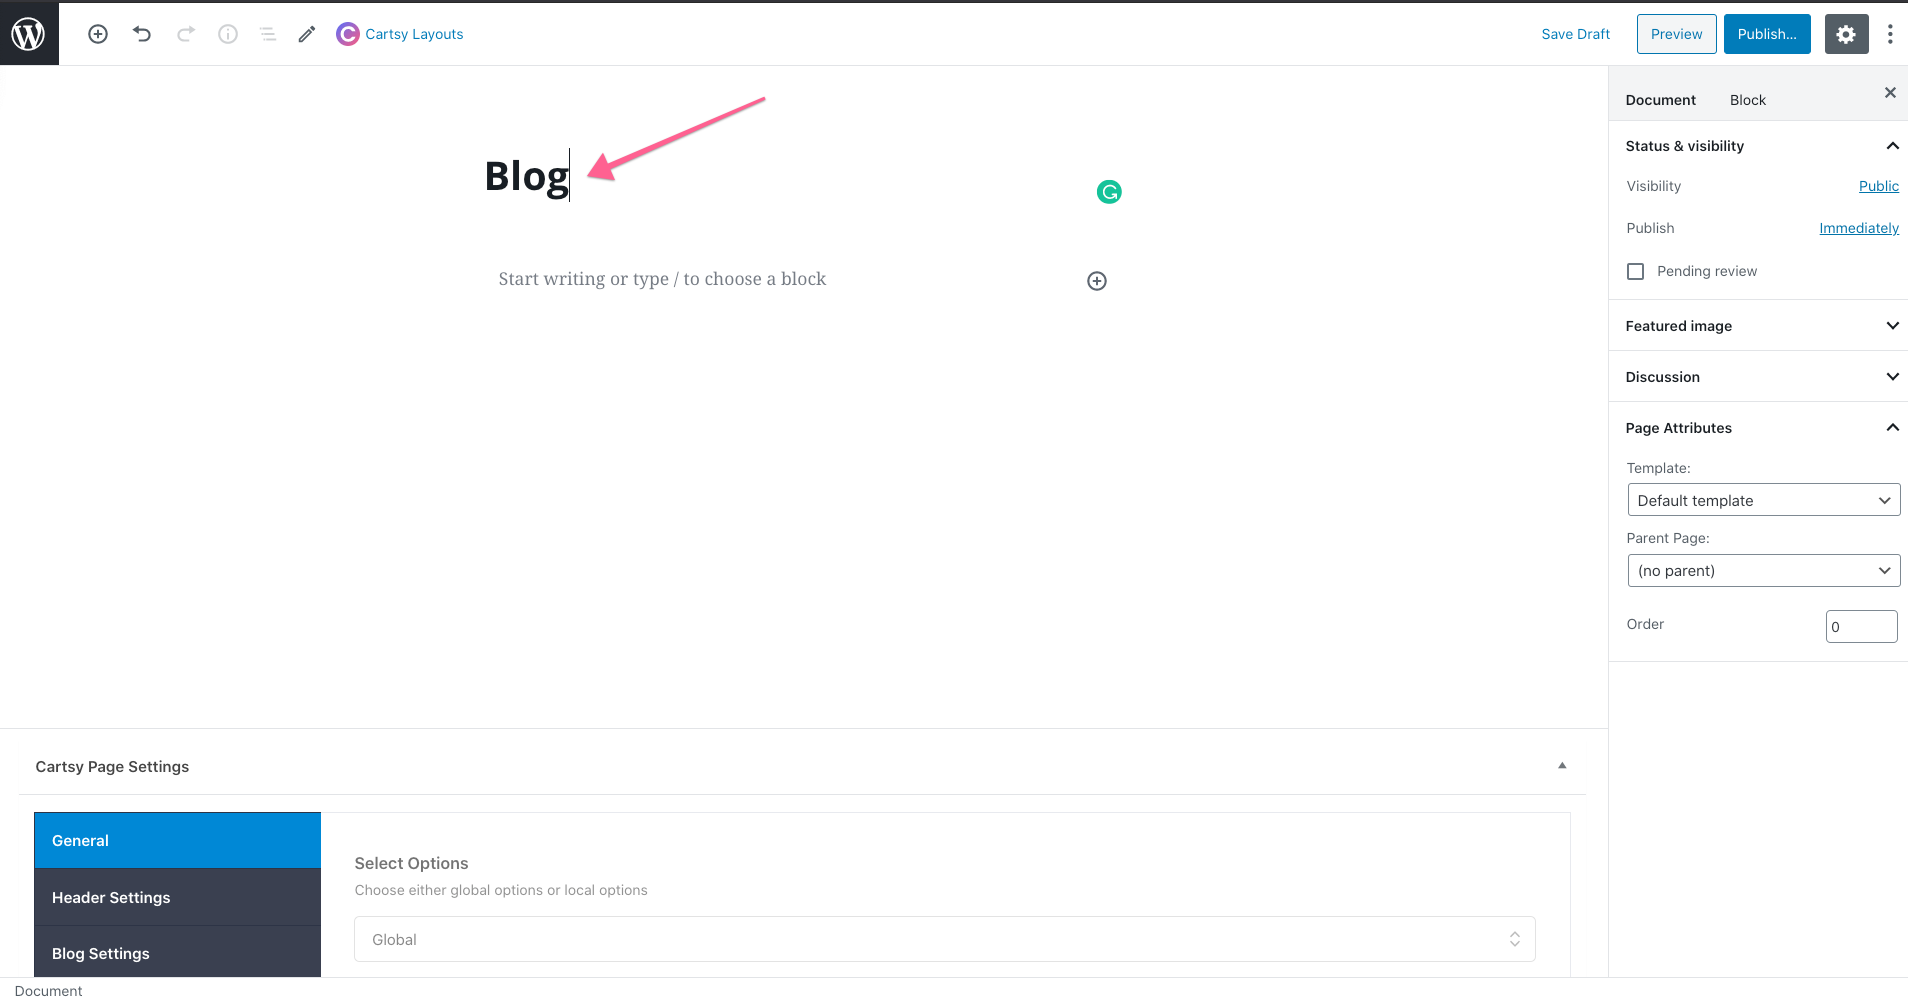
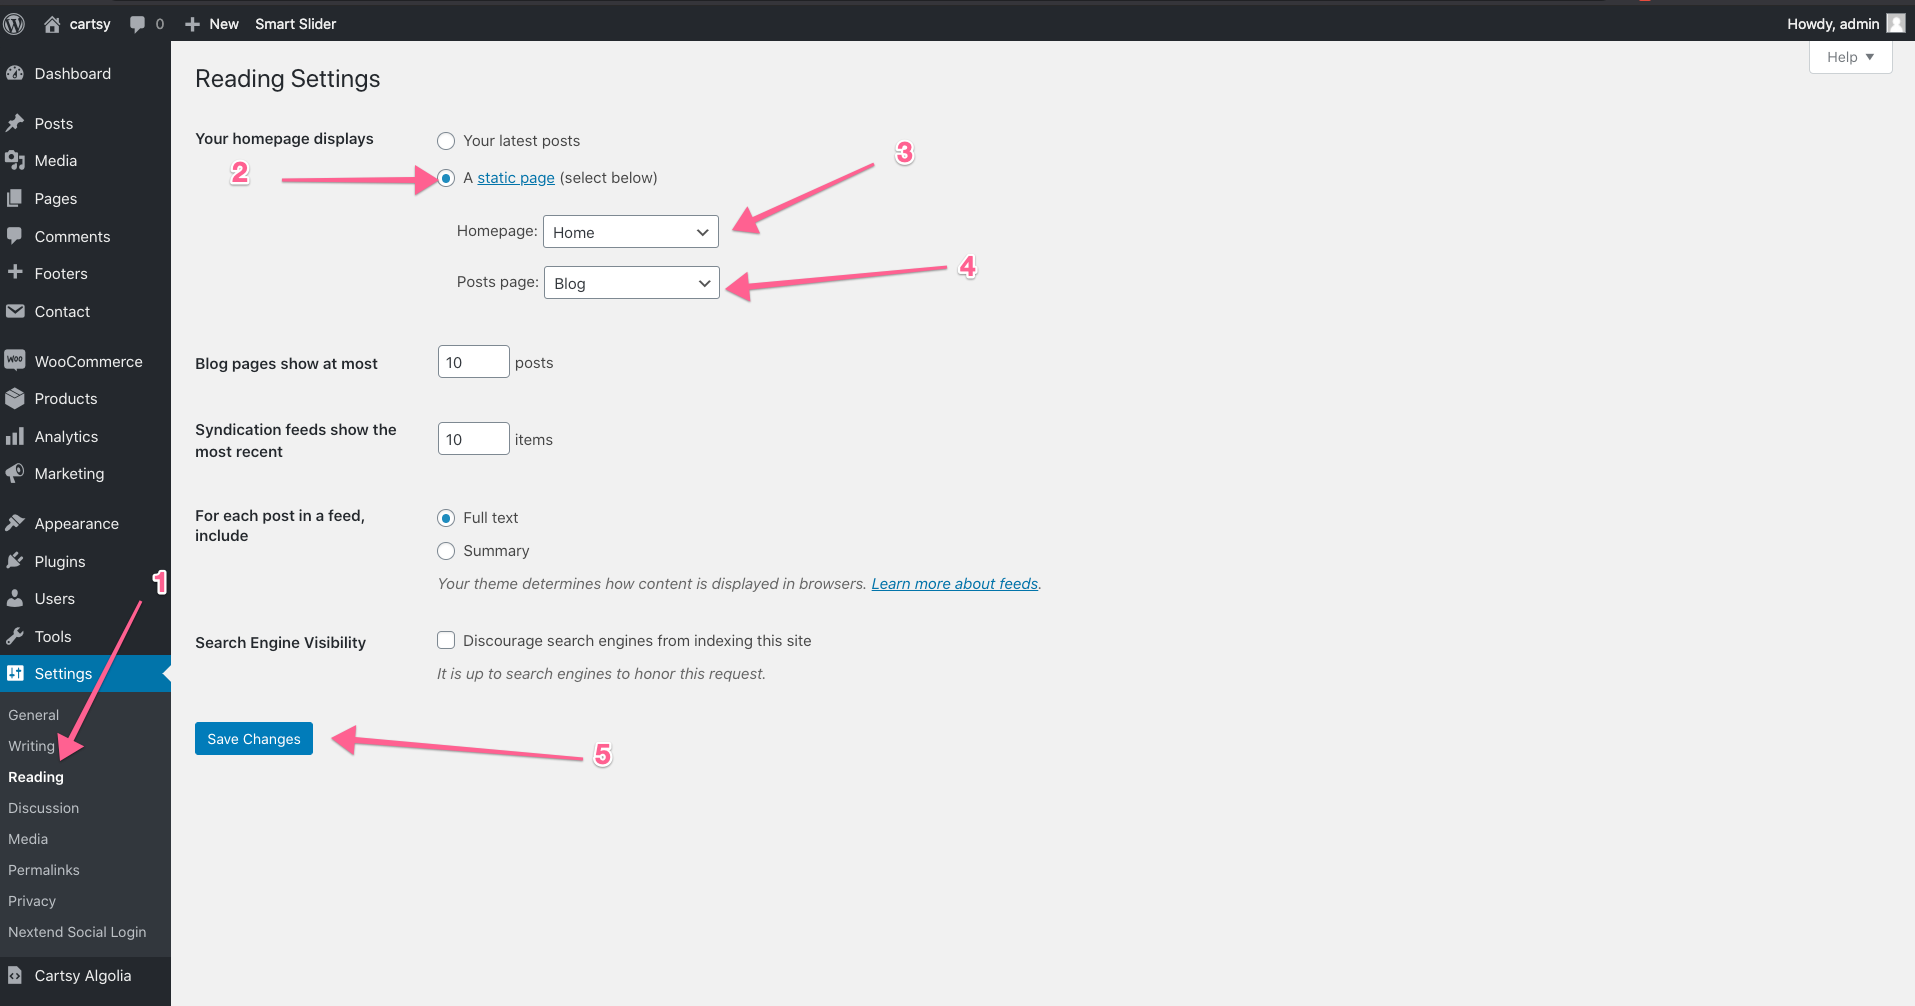
To change the default home page to newly created custom product layout page, create an empty blog page and go to the Settings -> Reading -> Change homepage display to static
Shop Page Layout
To change the shop page layout,
- Go to the
shop page. - Click the
customizebutton from the top bar - then go to
Cartsy Theme Panel -> WC_General Settingsand change theWooCommerce grid.
Menu
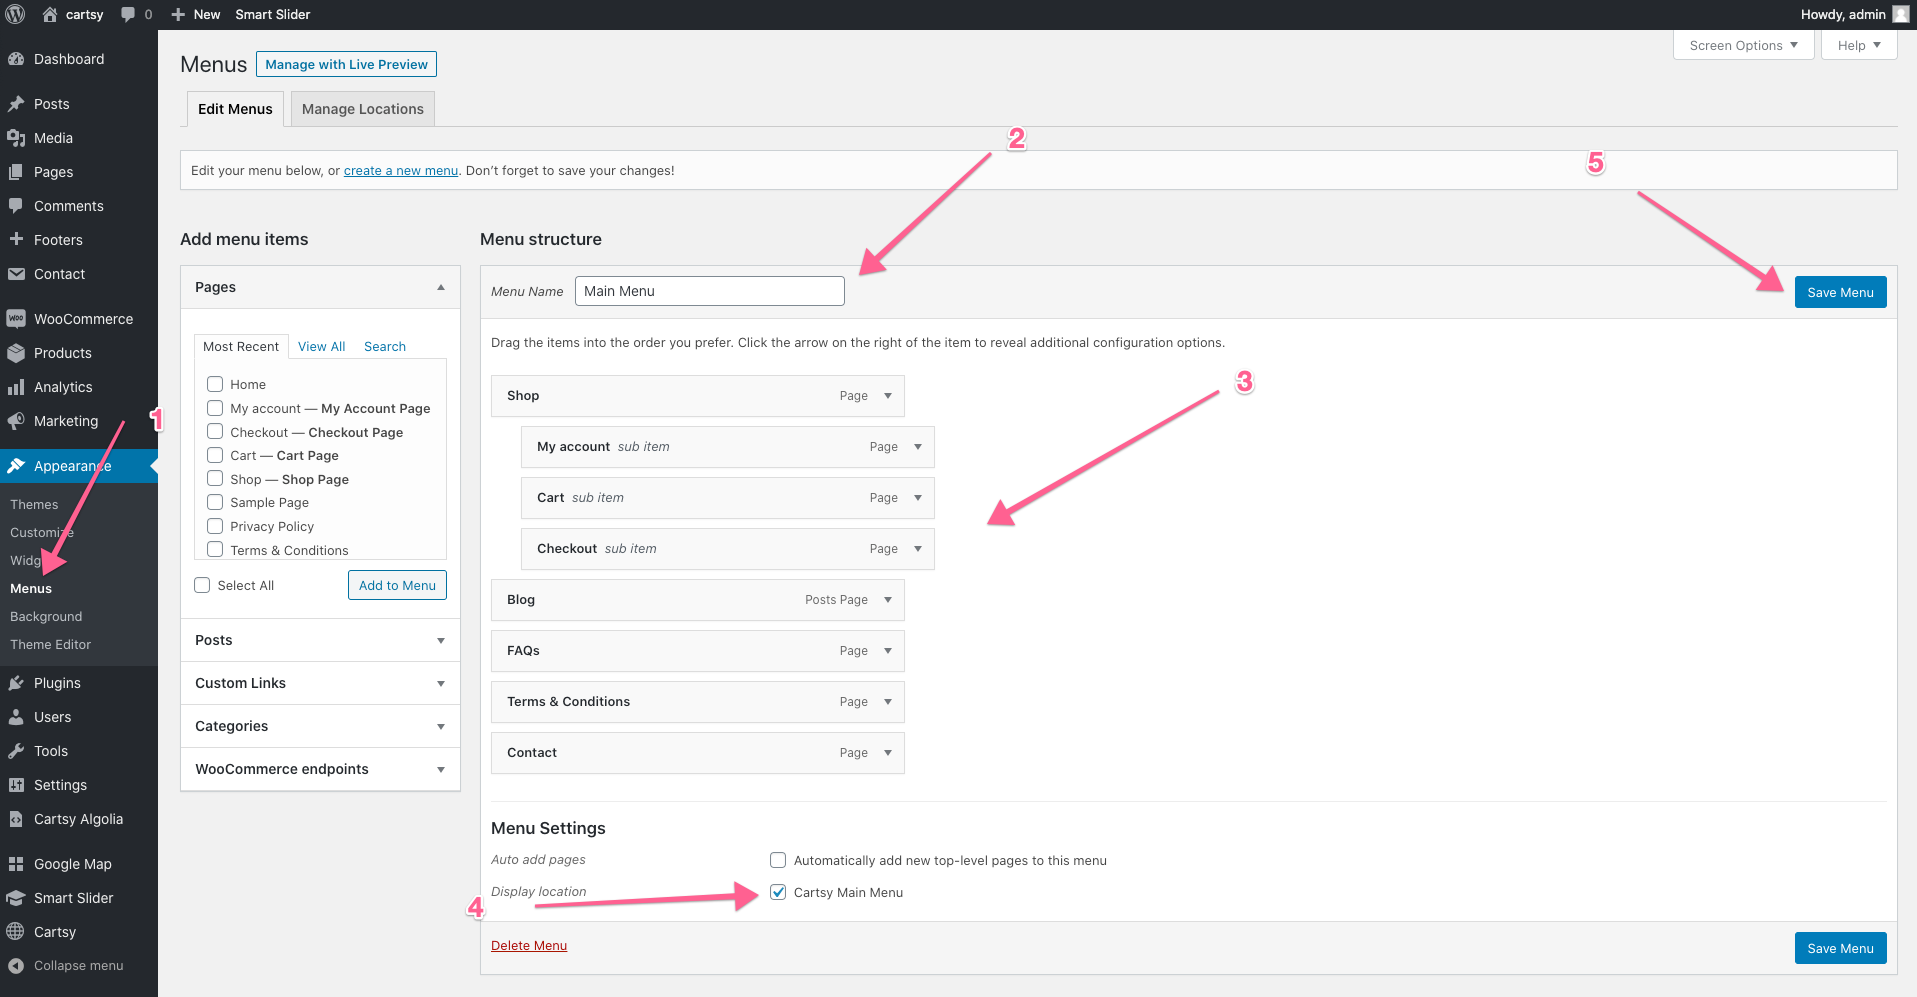
Create Menu
To Create at first, go to Appearance->Menus and from that menu section and create your menu. Before saving the menu, make sure you clicked Cartsy Main Menu for that menu.
Page Settings
To override any global theme settings(customizer settings) for an specific page there is a page settings in every page. From that page settings you can set quite a few specific settings for that page. Suppose you want to turn off banner for a page then you can easily do that from Page Settings
First scroll down to the bottom to any page and you will find the below settings panel
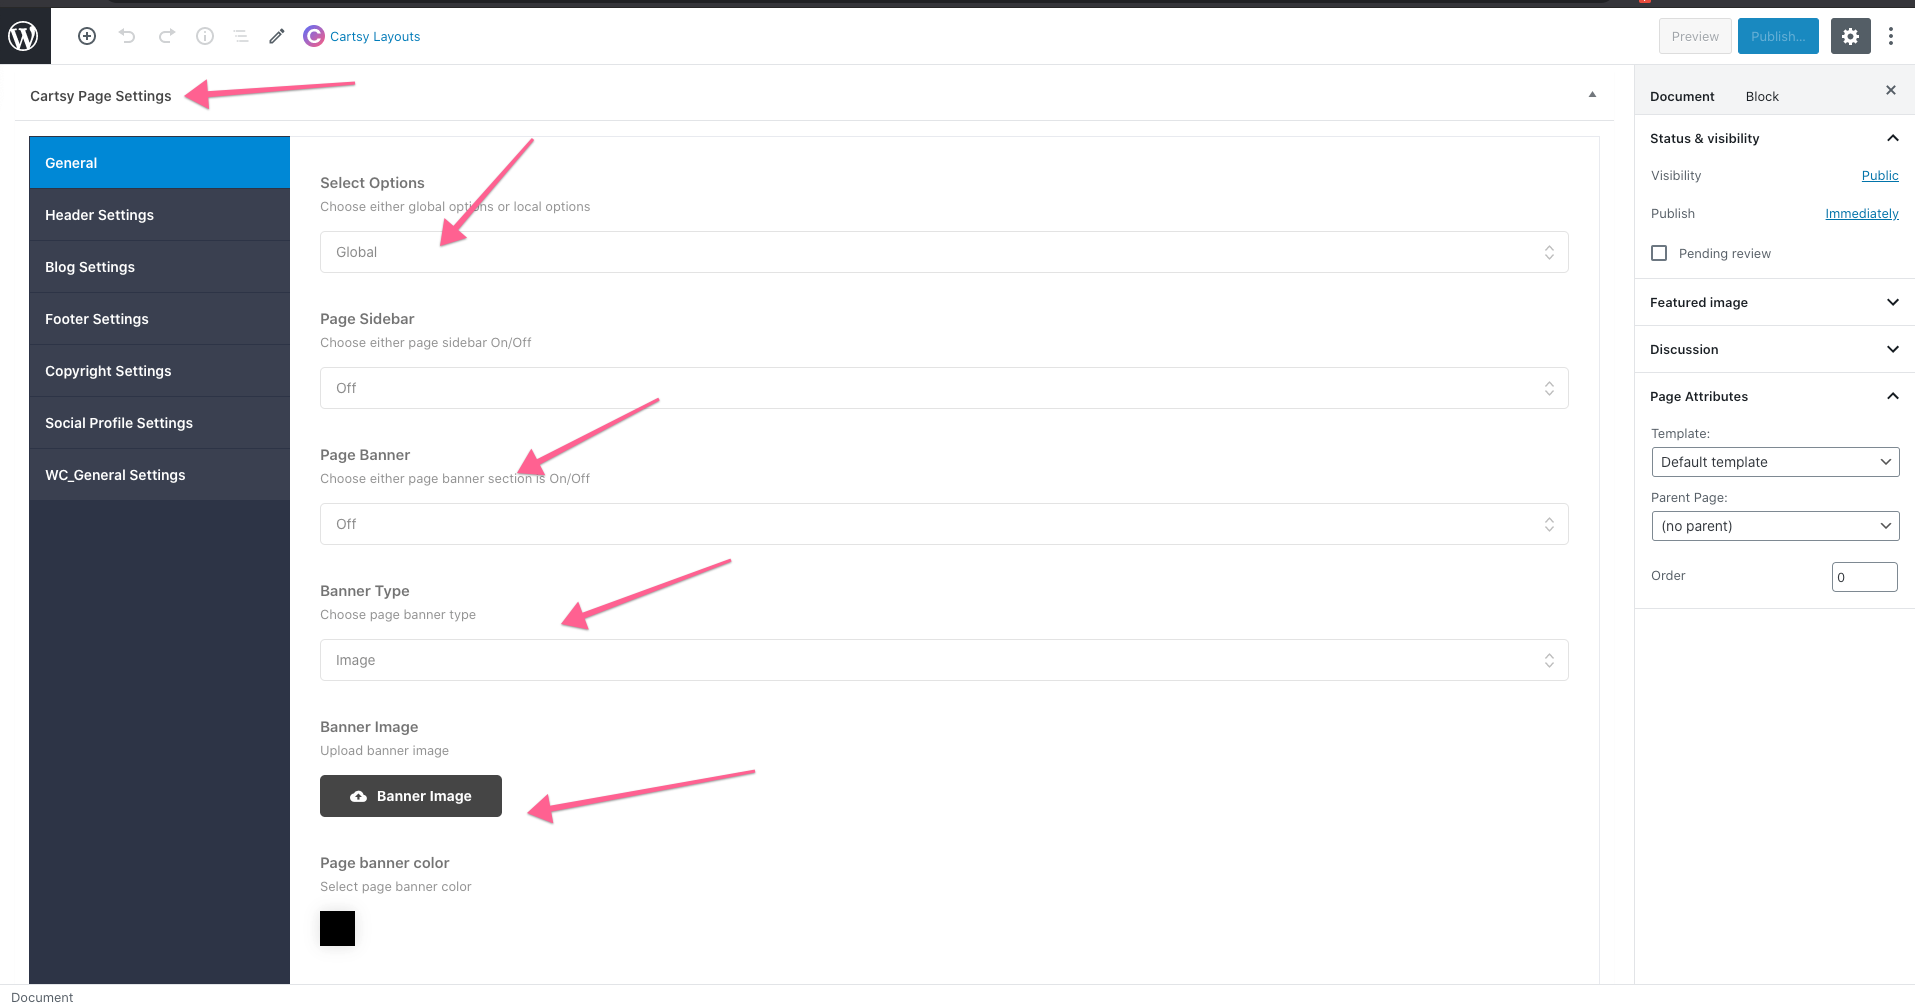
Now suppose if you want to turn off the page banner then goto General tab and change specific settings. Check below image
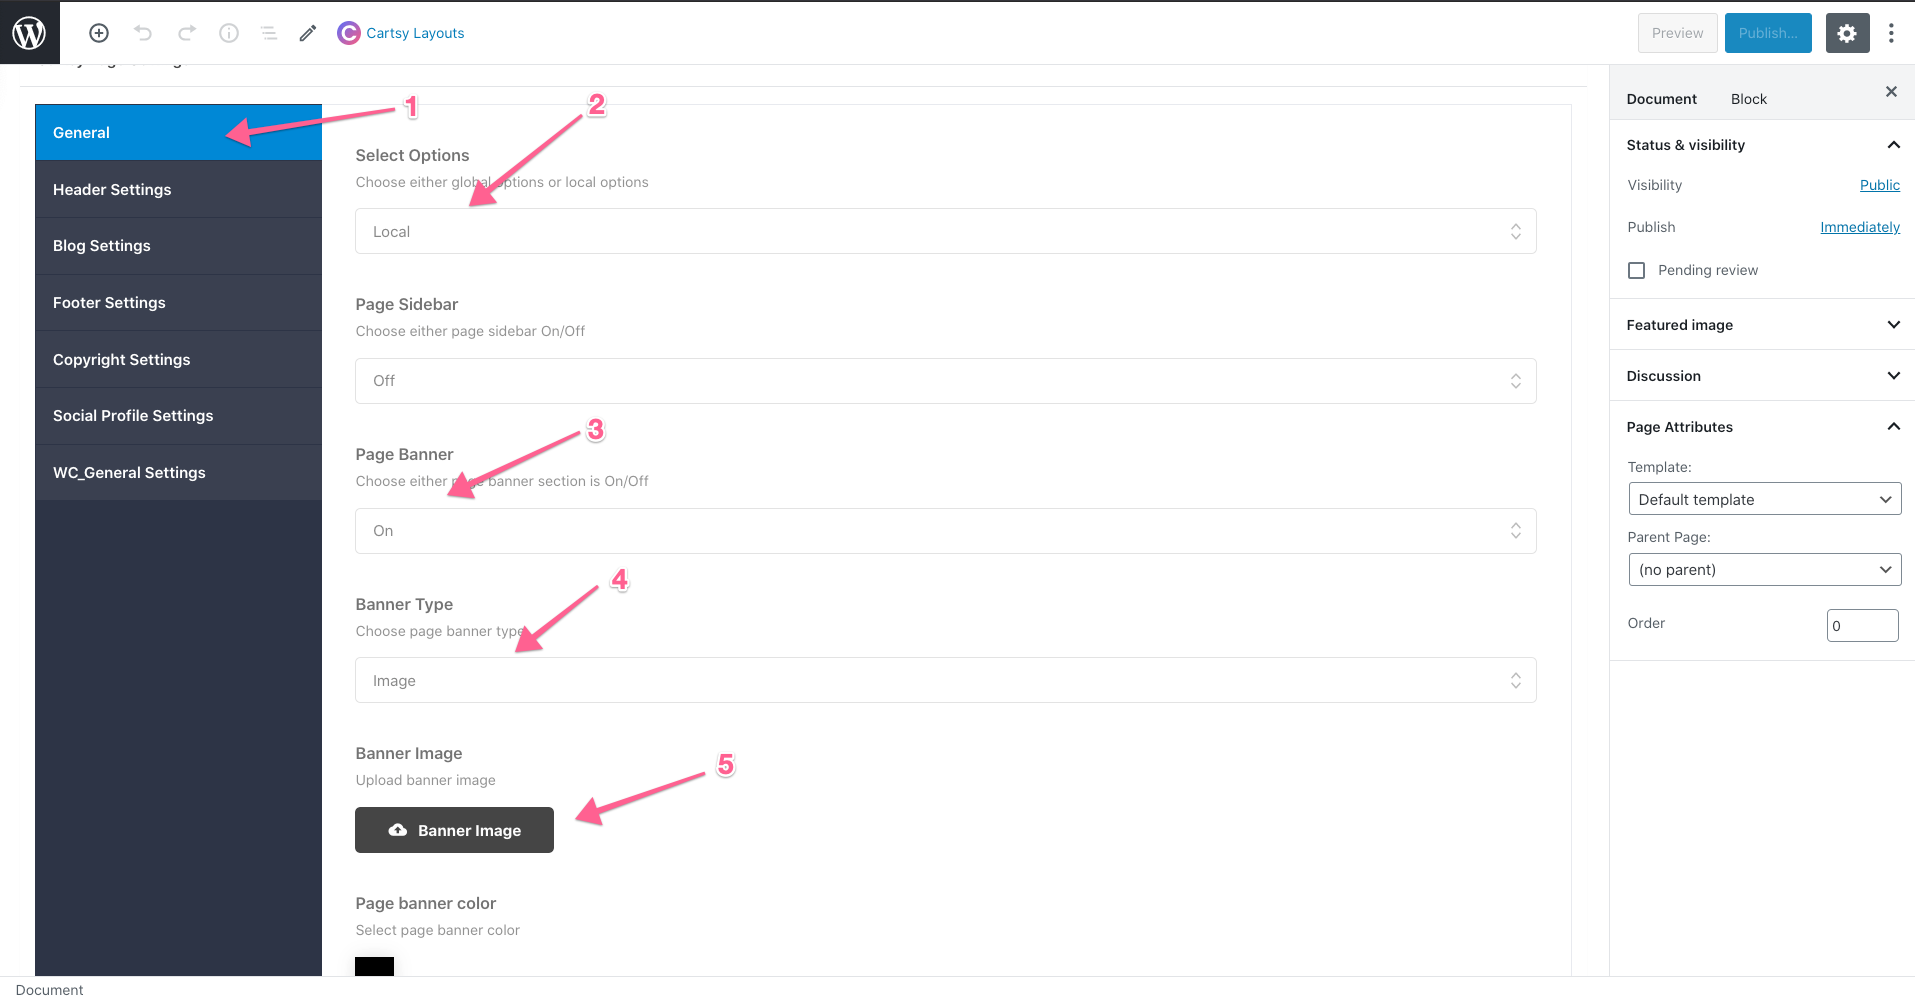
After going to the General tab change the Select Option from Global to Local then turn Page Banner off from next settings. Follow the arrow sign.
Plugins
In our theme we have provided few plugin. Check the specific plugin section for its corresponding settings and how it works.
Cartsy Helper
Cartsy Helper is the main helper plugin for the theme. In this plugin below tasks is done
- Creating
cartsypost type. - Creating Taxonomies for
cartsy - Creating all the blocks
- Creating the page settings.
To add/edit the cartsy for admin you will get a
menu in the admin Dashboard. From there you can add cartsy and taxonomies. Its pretty simple basic WordPress things. So we are not discussing it in details here.
Cartsy Algolia
This plugin is used to sync your local data with Algolia and providing fast and reliable search using Algolia. In the plugin you need to do two things.
- Configure using Algolia API Keys
- Sync all cartsy using the
Sync Allbutton from the algolia settings.
We have already discussed everything about configuring algolia in our Plugin Configuration chapter. Follow that instruction if you haven't already configured that. If you have configured that before importing the demo data then you might not need the Sync All. But still for being sure you can sync all data you won't lose any data.
Now for syncing all data to algolia you have to press the Sync All button the from the Cartsy Algolia Dashboard menu.
This syncing process is a asynchronous process it will sync your data in background. When done it will show an admin notice in any of your admin page. You can cross the notice it won't show again.
In the page you will see below section

When the sync is done you will get an admin notice like below image in the page top

FireMobile - WordPress & WooCommerce firebase
This is a WordPress plugin which enable mobile OTP/Two-Factor login in your site using firebase. On cartsy theme, you'll this plugin as a free bundle, and to use this plugin, you need some additional configuration.
Why Firebase
Firebase provides Firebase's phone number sign-in request quota is high enough that most apps won't be affected. However, if you need to sign in a very high volume of users with phone authentication, you might need to upgrade your pricing plan. See the pricing page.
Installation
The plugin already bundles with cartsy theme as a Recommended plugin. Just go to Appearance -> Cartsy Required Plugin
and install Firebase Mobile Authentication [by RedQ, Inc]
Quick Start
Instructions :
- If you do not have an Firebase project, you can create one from here link
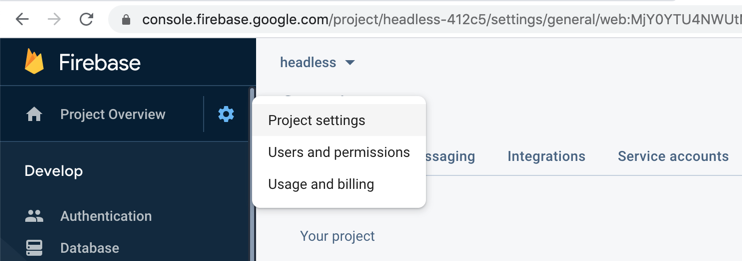
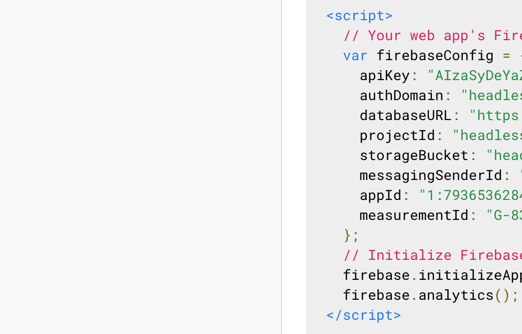
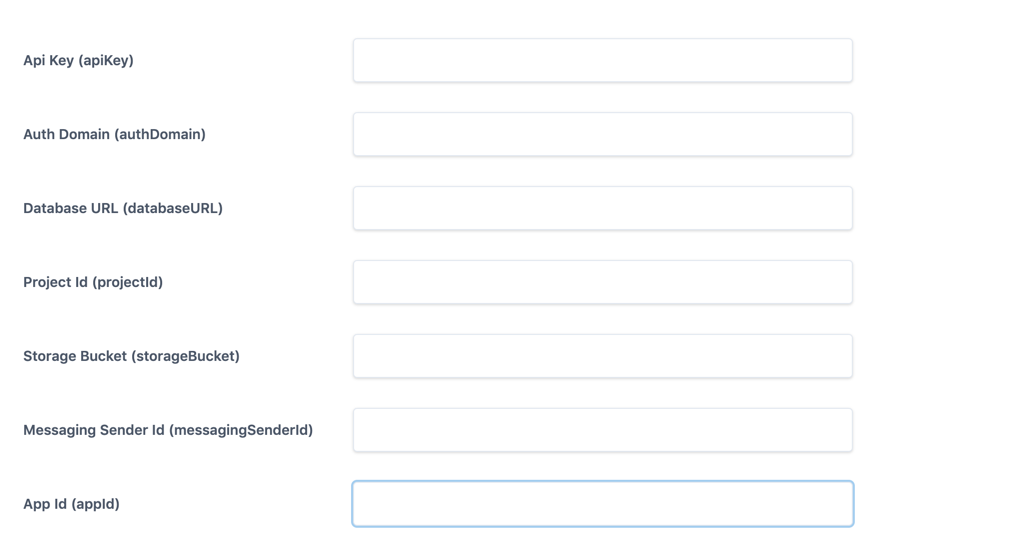
- Now go to your Firebase Project
overview-> Project settingsand copy paste firebase configuration in below fields one by one
- In the Firebase console, open the Authentication section.
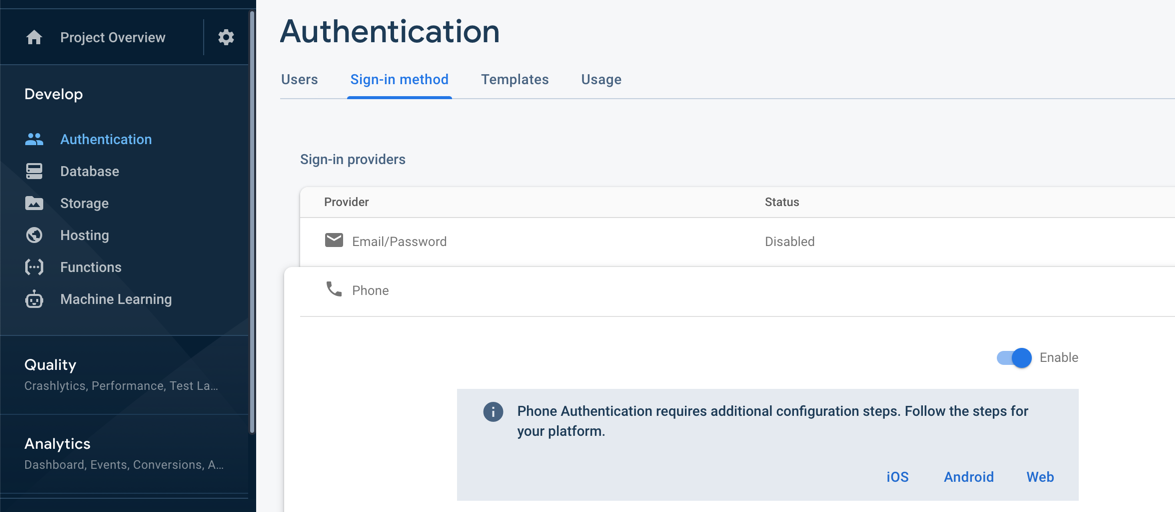
- On the Sign-in Method page, enable the Phone Number sign-in method.
- On the same page, if the domain that will host your app isn't listed in the OAuth redirect domains section, add your domain.

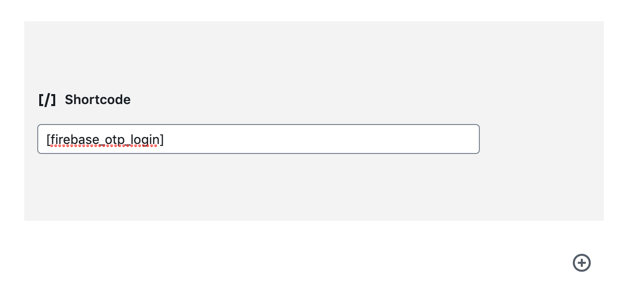
- Copy this shortcode [firebase_otp_login] and add it to any place on your site you like.
- That's it, You should be able to use mobile login in your WordPress and WooCommerce site.
Shortcode
[firebase_otp_login]
just copy the above shortcode and put it into any page
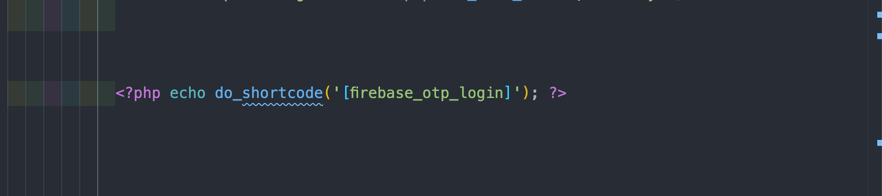
You can also place it into the code,
Shortcode Paramerter
- 'phone_button_text' => default value 'Send Code'
- 'code_button_text' => default value 'Verify & Login',
- 'phone_toggle_button_text' => default value 'Continue with Phone',
- 'recaptcha' => default value 'invisible', // invisible or normal
you can change the above default value by using the shorcode in below format
xxxxxxxxxx[firebase_otp_login phone_button_text="Send me Code" code_button_text="Verify Code" phone_toggle_button_text="Login with Phone" recaptch="normal"]
Recaptcha
you can either show or hide recaptcha using invisible or normal option in the above shortcode. Recaptcha is must for firebase login.
Customization
You can use css code to customize the color, font-size etc.
if you want to work on the code then check the below file
php and html code for the shortcode can be found in Shortcodes/FirebaseOTPLogin.php file. In this file you can change the html structure or any tag but be careful changing id or structure might cause the plugin to lose it's functionality.
We recommend to override design from the theme using css code. this way you can receive future update easily.
Compatible Plugin List
Cartsy built on proper WordPress and WooCommerce coding standards, and for that, all the org plugins should be working fine by default. However, we test some popular plugins and provide custom design and support for that plugin. You'll get the full list here:
- Contact Form 7 (https://wordpress.org/plugins/contact-form-7/)
- Nextend Social Login (https://wordpress.org/plugins/nextend-facebook-connect/)
- Product Social Sharing (https://wordpress.org/plugins/wpupper-share-buttons/)
- YITH Wishlist (https://wordpress.org/plugins/yith-woocommerce-wishlist/)
- Facebook Messenger Chat (https://wordpress.org/plugins/facebook-messenger-customer-chat/)
- Whatsapp Chat Support (https://wordpress.org/plugins/wp-whatsapp-chat/)
- WPML Translation (https://wpml.org/)
- PWA Support (https://wordpress.org/plugins/super-progressive-web-apps/)
- GDPR Cookie Notice (https://wordpress.org/plugins/cookie-notice/)
Child Theme
In the theme package you should get a file named cartsy-child.zip . Upload this zip as theme and activate it. Make sure you have already Cartsy installed. Both child and main theme must have to be installed but child theme have to be activated.
FAQ
How to update theme?
We add an automatic system to push the update to your website. You'll get a notification on your site when your theme is outdated, and from that notification or update dashboard, you can update your theme.
How to use child theme?
In the theme package you should get a file named cartsy-child.zip . Upload this zip as theme and activate it. Make sure you have already Cartsy installed.
Both child and main theme must have to be installed but child theme have to be activated.
How to optimize my site?
To optimize your site you can use below two free plugin. You can also configure CDN and for object caching you can also use Redis if your server support it.
You can use any other caching plugin.
After deactivating and reactivating the theme my site is broken nothing is showing properly. How to fix?
make sure Cartsy Helper and Cartsy Algolia plugin is active. If not please activate these plugins. These to plugin got deactivated when Cartsy theme is not active.
Google Map doesn't work on my contact information page?
To use google map on any page, you've to add google map key first. At first, generate a google map key from google console, and after that, insert that key on the wp-admin google maps admin panel.
Change logs
V1.2.1
xxxxxxxxxx- Native search added [Algolia search is kept optional]- RTL Support provided- Mini-cart issue fixed- category scroll issue fixed on mobile device- Algolia Search issue fixed- CSS issues fixed
V1.2
xxxxxxxxxx- new product grid (fluorine)- New mini-cart layout- Add slider option to banner section- Design fix for multi-language- Add option to enable/disable out of stock product on home or Algolia page- GDPR plugin support- Restructure helper plugin code for future maintainability- Fix mobile logo design issue [bug]- Fix mobile chat widget issue [bug]- Fix Checkout page terms & condition checkbox [bug]- Fix product cart and toaster issue [bug]- Fix +- quantity input design issue [bug]
V1.1
xxxxxxxxxx- Three new product grid (Krypton, Xenon, Radon)- Thee new homepage layout- Recently viewed product system- Mailchimp integration with popup messages- Firebase mobile auth plugin- Grid image lazy loading- Add-to-cart toast time control settings- Product social share support- Wishlist support- Facebook messenger chat support- Whatsapp chat support- WPML plugin support- PWA support
v1.0
xxxxxxxxxx- initial release.