AWS Setup Guide
The following demonstates how to deploy Puddle on AWS. The process involves steps that need to be taken on the AWS console as well as steps that will be taken on the Puddle Linux instance. As such, please make sure you have permissions to do the following:
- Create a VPC with public and private subnets
- Create a subnet (this will be created under the created VPC)
- Create 2 Elastic IPs
- Create an AWS ElastiCache Redis instance
- Create an AWS RDS Postgres instance
- Modify and create security groups
- Modify and create IAM roles
After the above has been verified, you are now ready to proceed.
Components, Communication, and System Lifecycle
Before diving into how to install Puddle on AWS, it’s important to cover some basics on how Puddle works. Specifically, we present three figures. The first figure provides a high-level diagram of all components of a Puddle system on AWS. The second figure provides a system-level diagram of communication channels in Puddle. The third diagram demonstrates the system lifecycle when creating a new system on Puddle.
Puddle Components
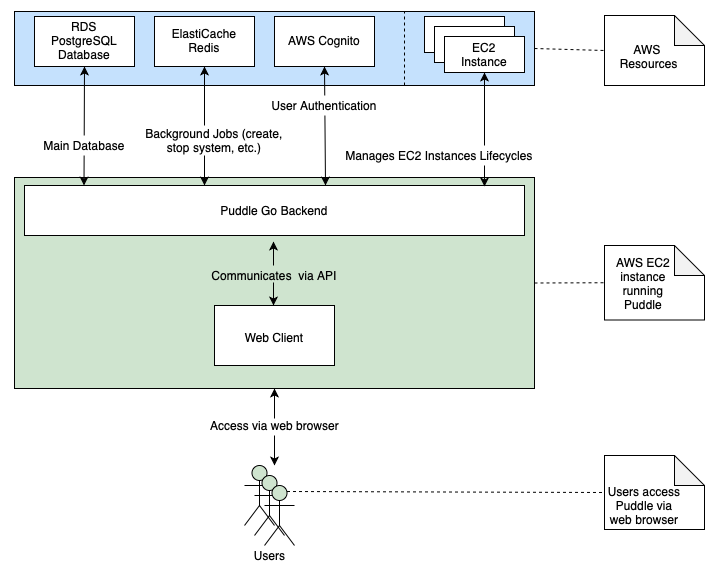
This image demonstrates at a high level all the components in the Puddle system on AWS.
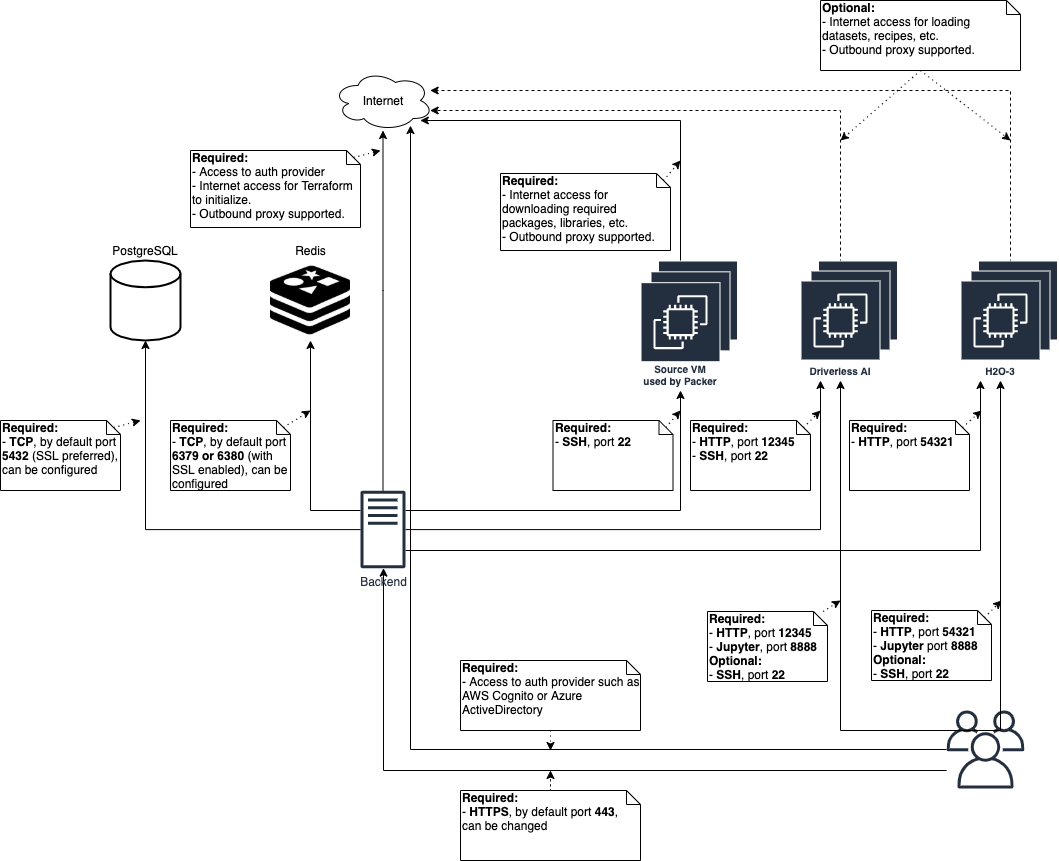
Puddle Communication Channels
As outlined in the following diagram, Puddle makes use of Redis as a queueing mechanism. When installing Puddle on AWS, you create a Redis cluster using ElastiCache. Puddle uses Redis to queue up various jobs such as the creation of systems, images, and users. Notifications are also queued up using Redis.
This diagram also shows how Puddle makes use of a database (specifically, a PostgreSQL database). When installing Puddle on AWS, you also create an RDS PostgreSQL database to store various types of information. For example, data about systems such as their type and public IP are stored in the database. Another example of information stored in the database is information about running sessions such as the cost, status, and price per hour.
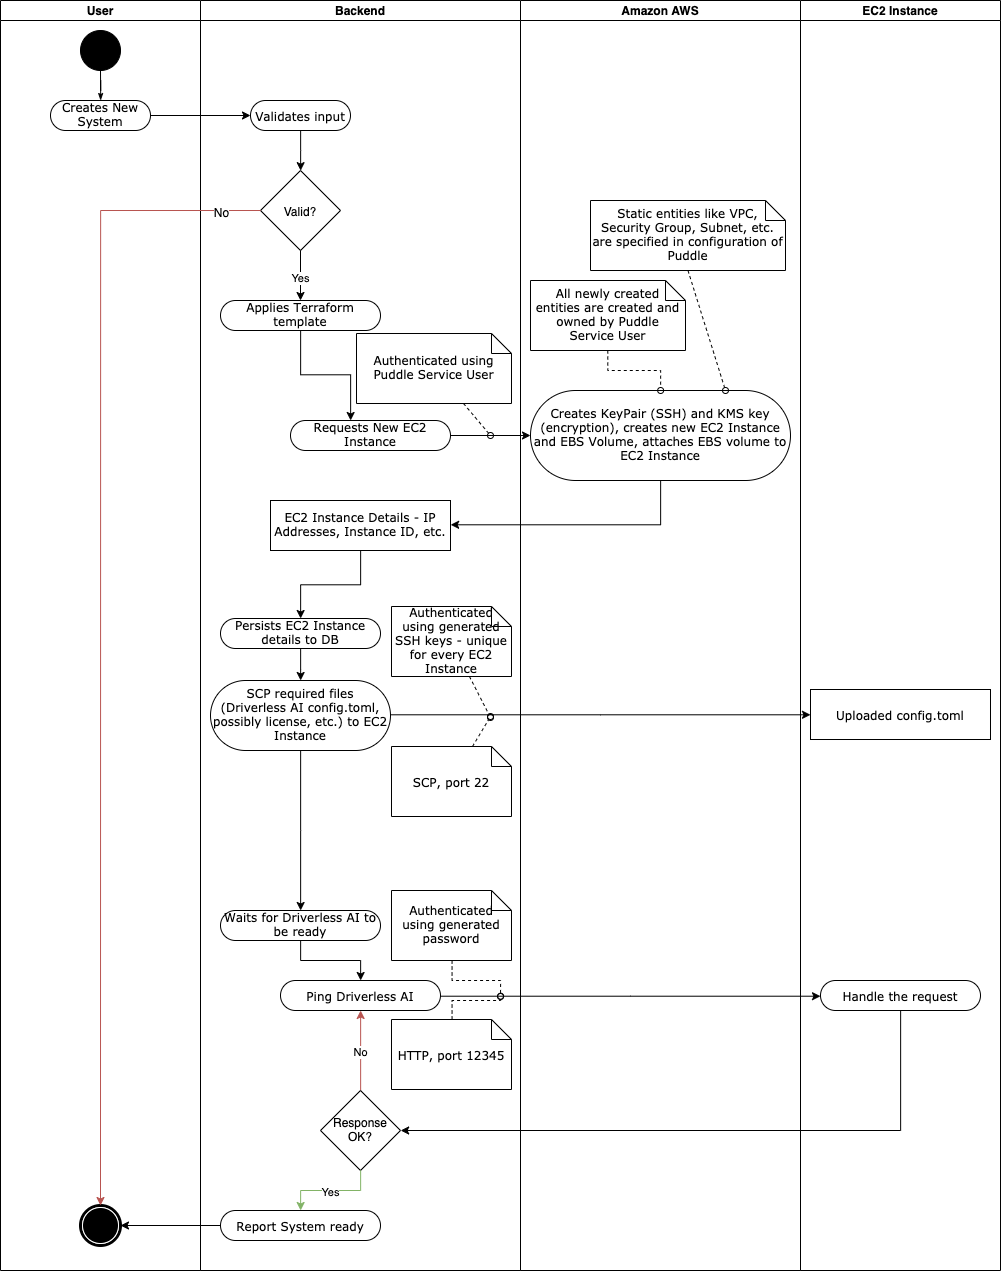
New System Lifecycle
This diagram demonstrates the system lifecycle when creating a new system on Puddle. Specifically, it demonstrates creating a new Driverless AI system.
AWS Resources & Puddle Setup
The following section covers the steps to deploy and set up required AWS resources.
Create Elastic IPs
You will need to create two Elastic IPs. The first will be for the NAT gateway for the VPC you create, and the second will be for the Puddle backend EC2 instance. Create the two IPs and give them descriptive names; this will facilitate selecting the NAT gateway IP later.
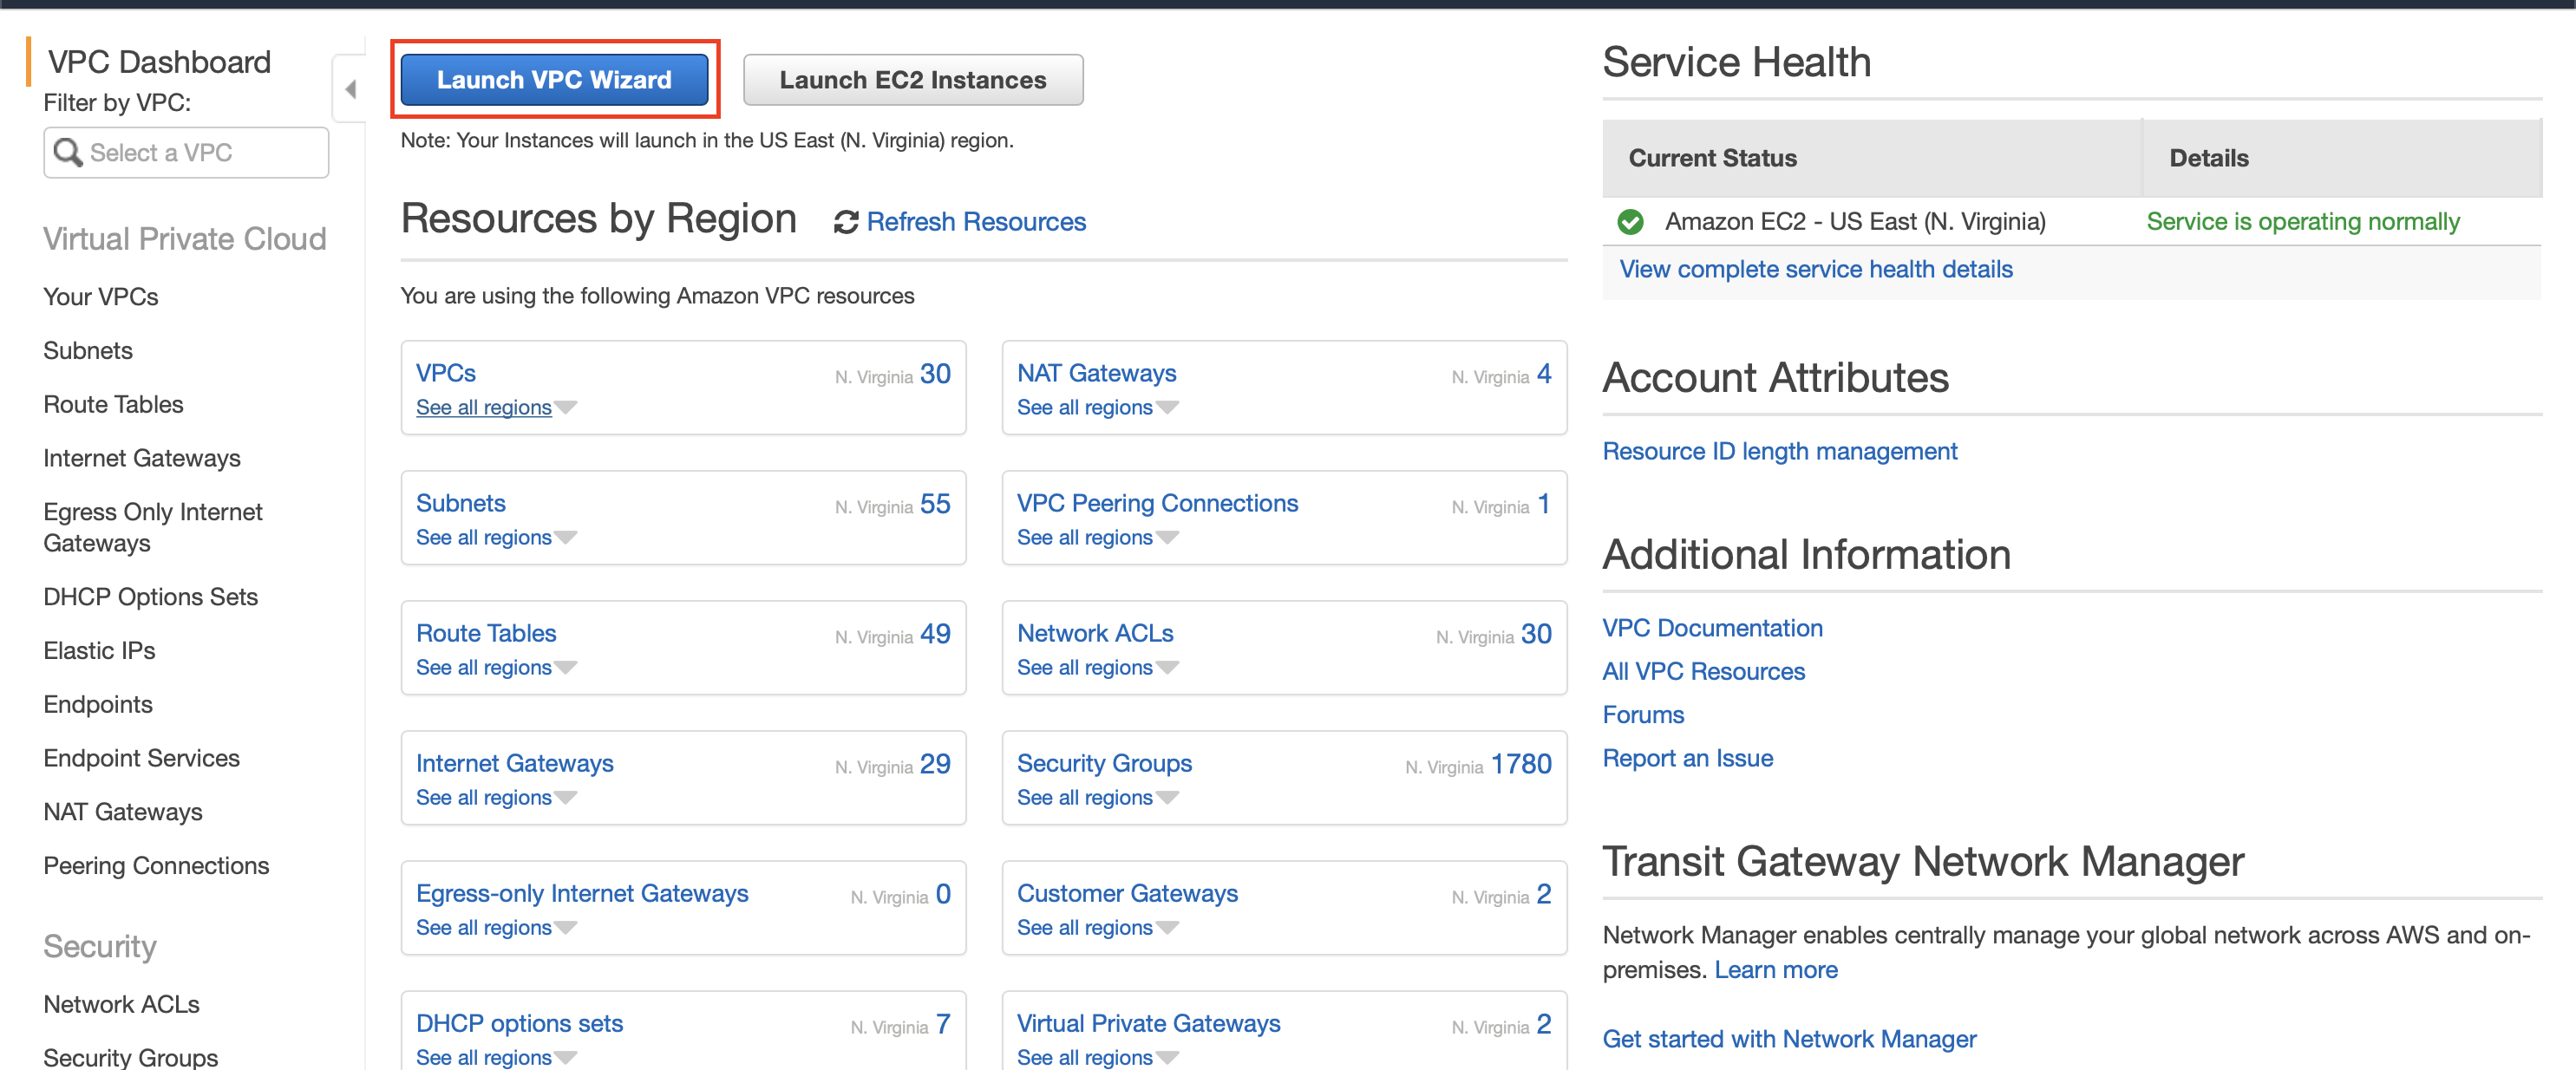
VPC Setup
Start by setting up a VPC within which the Puddle backend will exist. In the AWS console, navigate to the VPC service and click the Launch VPC Wizard button.
On the next page, select the VPC with Public and Private Subnets option.
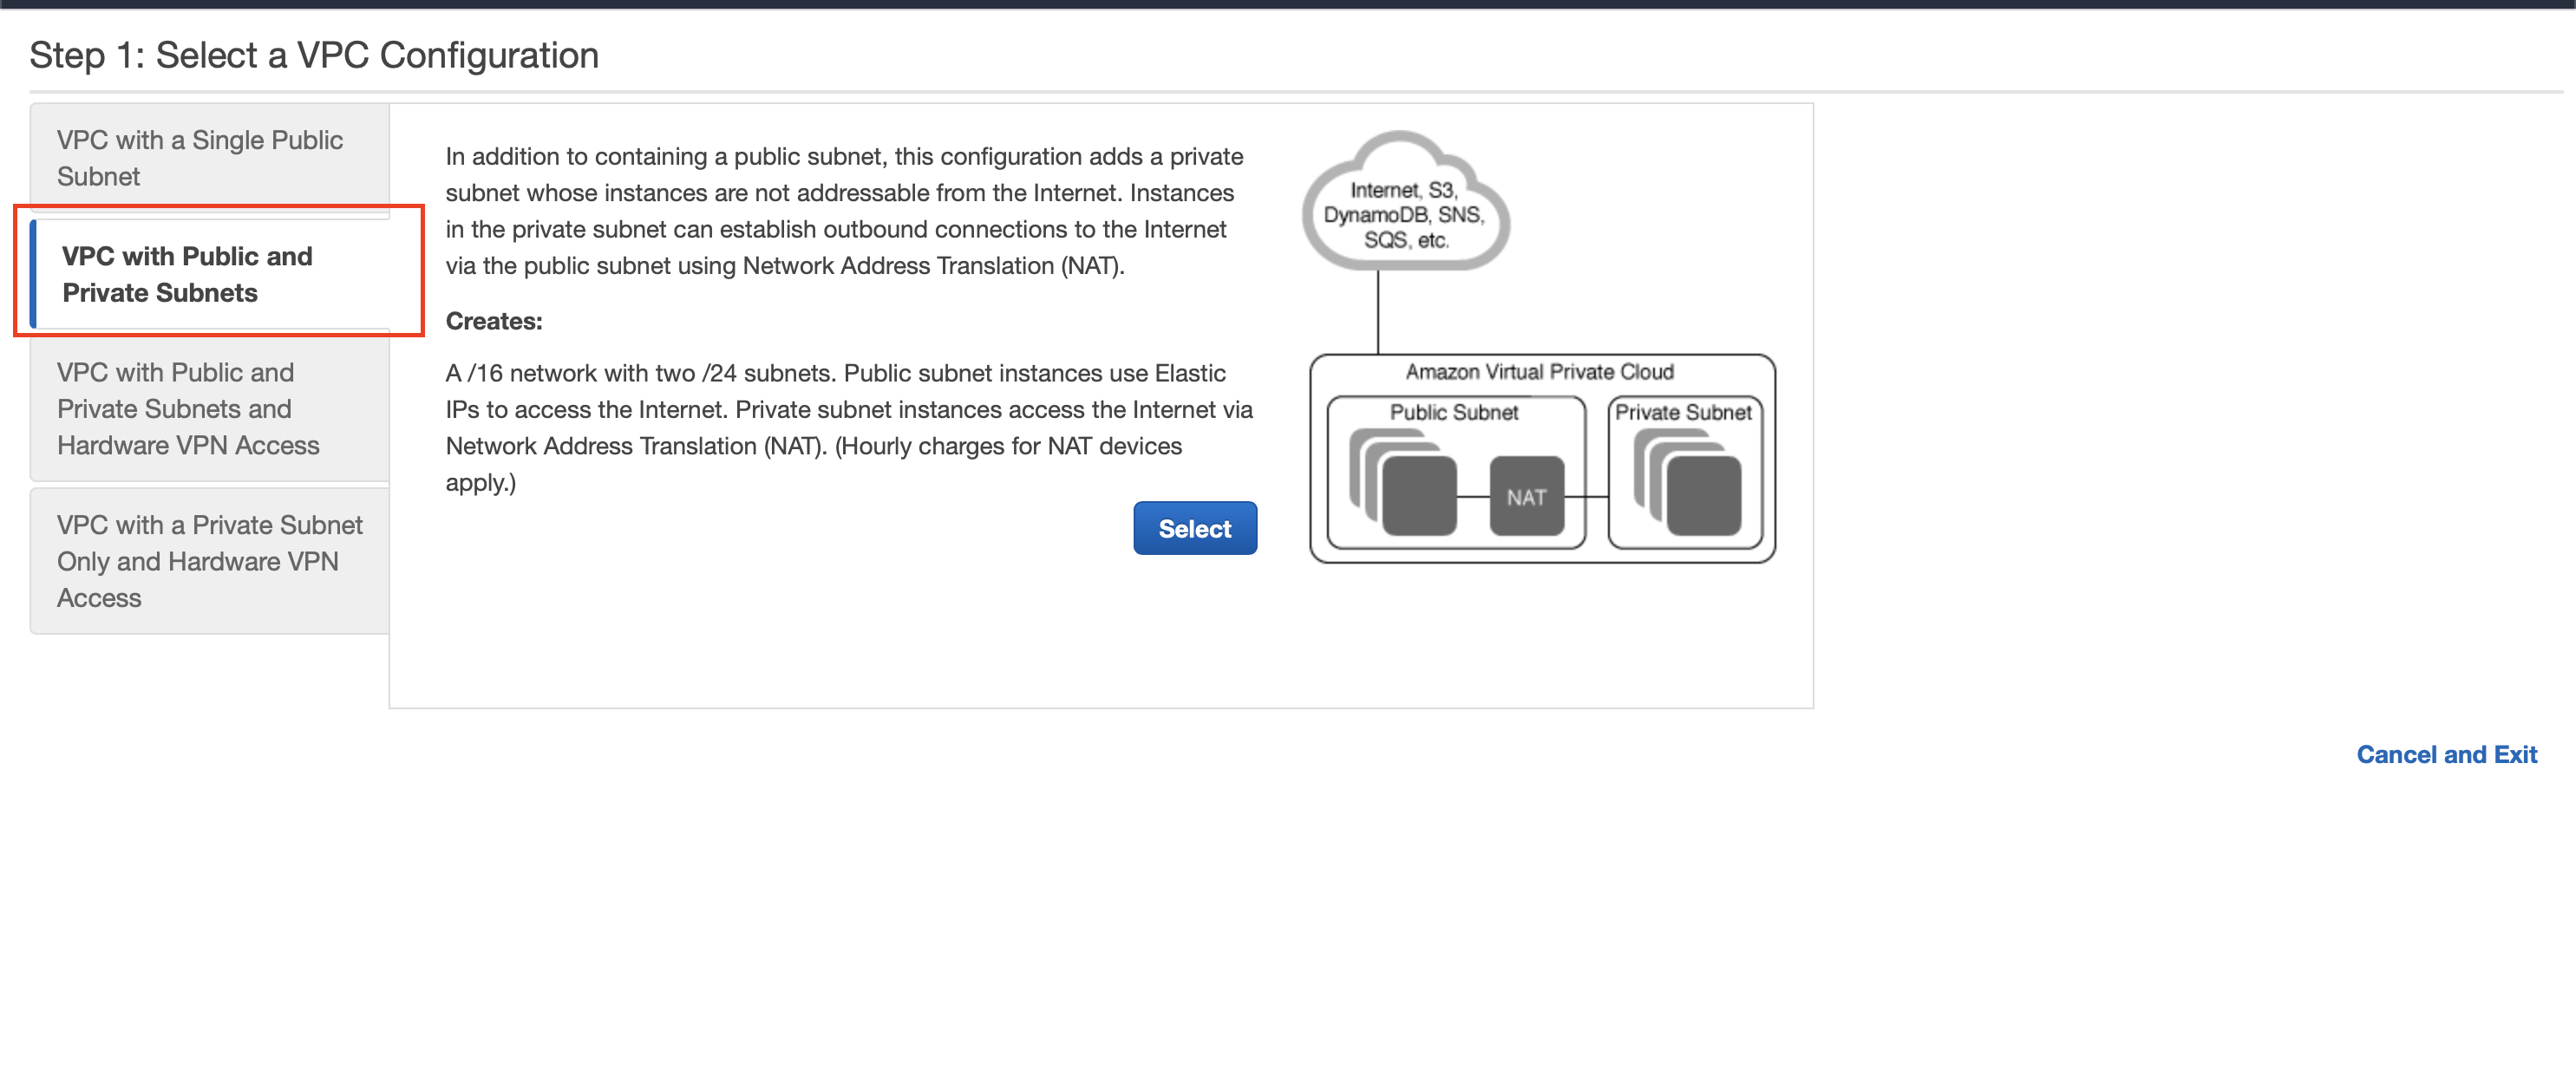
Click Select and proceed to the following page. At this point, you’ll have to update and input certain configurations. We recommend and require updating the following configurations:
- VPC name: Give the VPC a descriptive name, so it’s easy to find and use later (for example: “puddle-vpc”).
- Public subnet name: Give the public subnet a descriptive name because you will be selecting subnets later (for example: “puddle-public-subnet”).
- Private subnet name: Give the private subnet a descriptive name because you will be selecting subnets later (for example: “puddle-private-subnet”).
- Elastic IP Allocation ID: Select the Elastic IP created earlier for the NAT gateway.
After updating the configurations above, simply click Create VPC. At this point, you’re almost done with your VPC setup. The last thing you need to do is create a third subnet. This is necessary because RDS requires that you have at least two subnets in two different regions. As it stands, the two subnets created with the VPC are in the same region.
Within the same AWS service, click on Subnets on the left-hand menu.
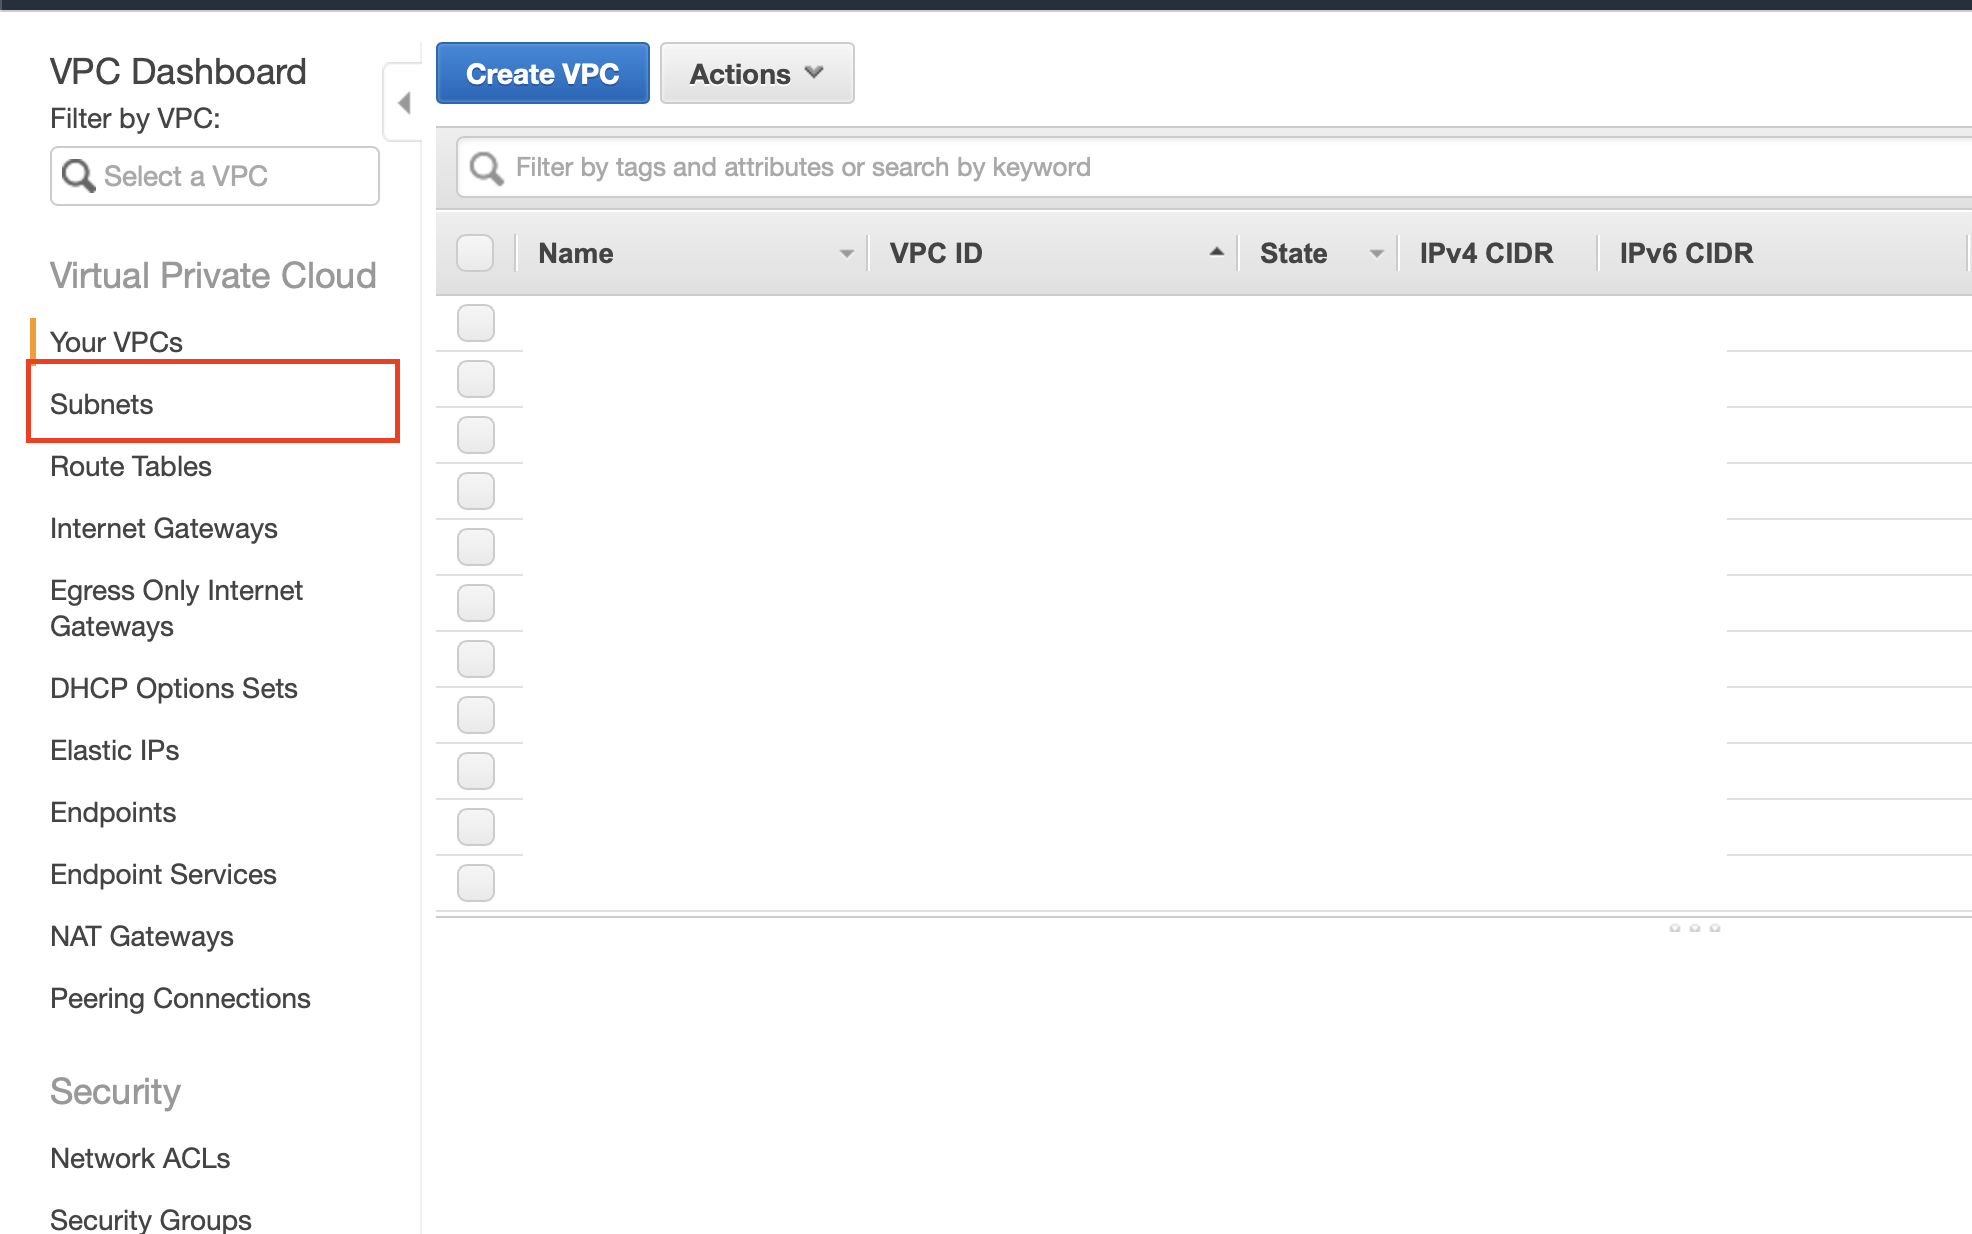
Next, click on Create Subnet at the top of the subnets page. Give the subnet a descriptive name (for example, “puddle-rds-subnet”). Then select the VPC created above, and select a region different than the one the public and private subnets belong to. Finally, provide a valid IPv4 CIDR block that doesn’t overlap with the other subnets.
This concludes the VPC setup.
AWS RDS Database Setup
Now proceed to creating the Postgres database that is required for this Puddle setup. Navigate to the RDS service in the AWS console and select Databases on the left-hand menu.
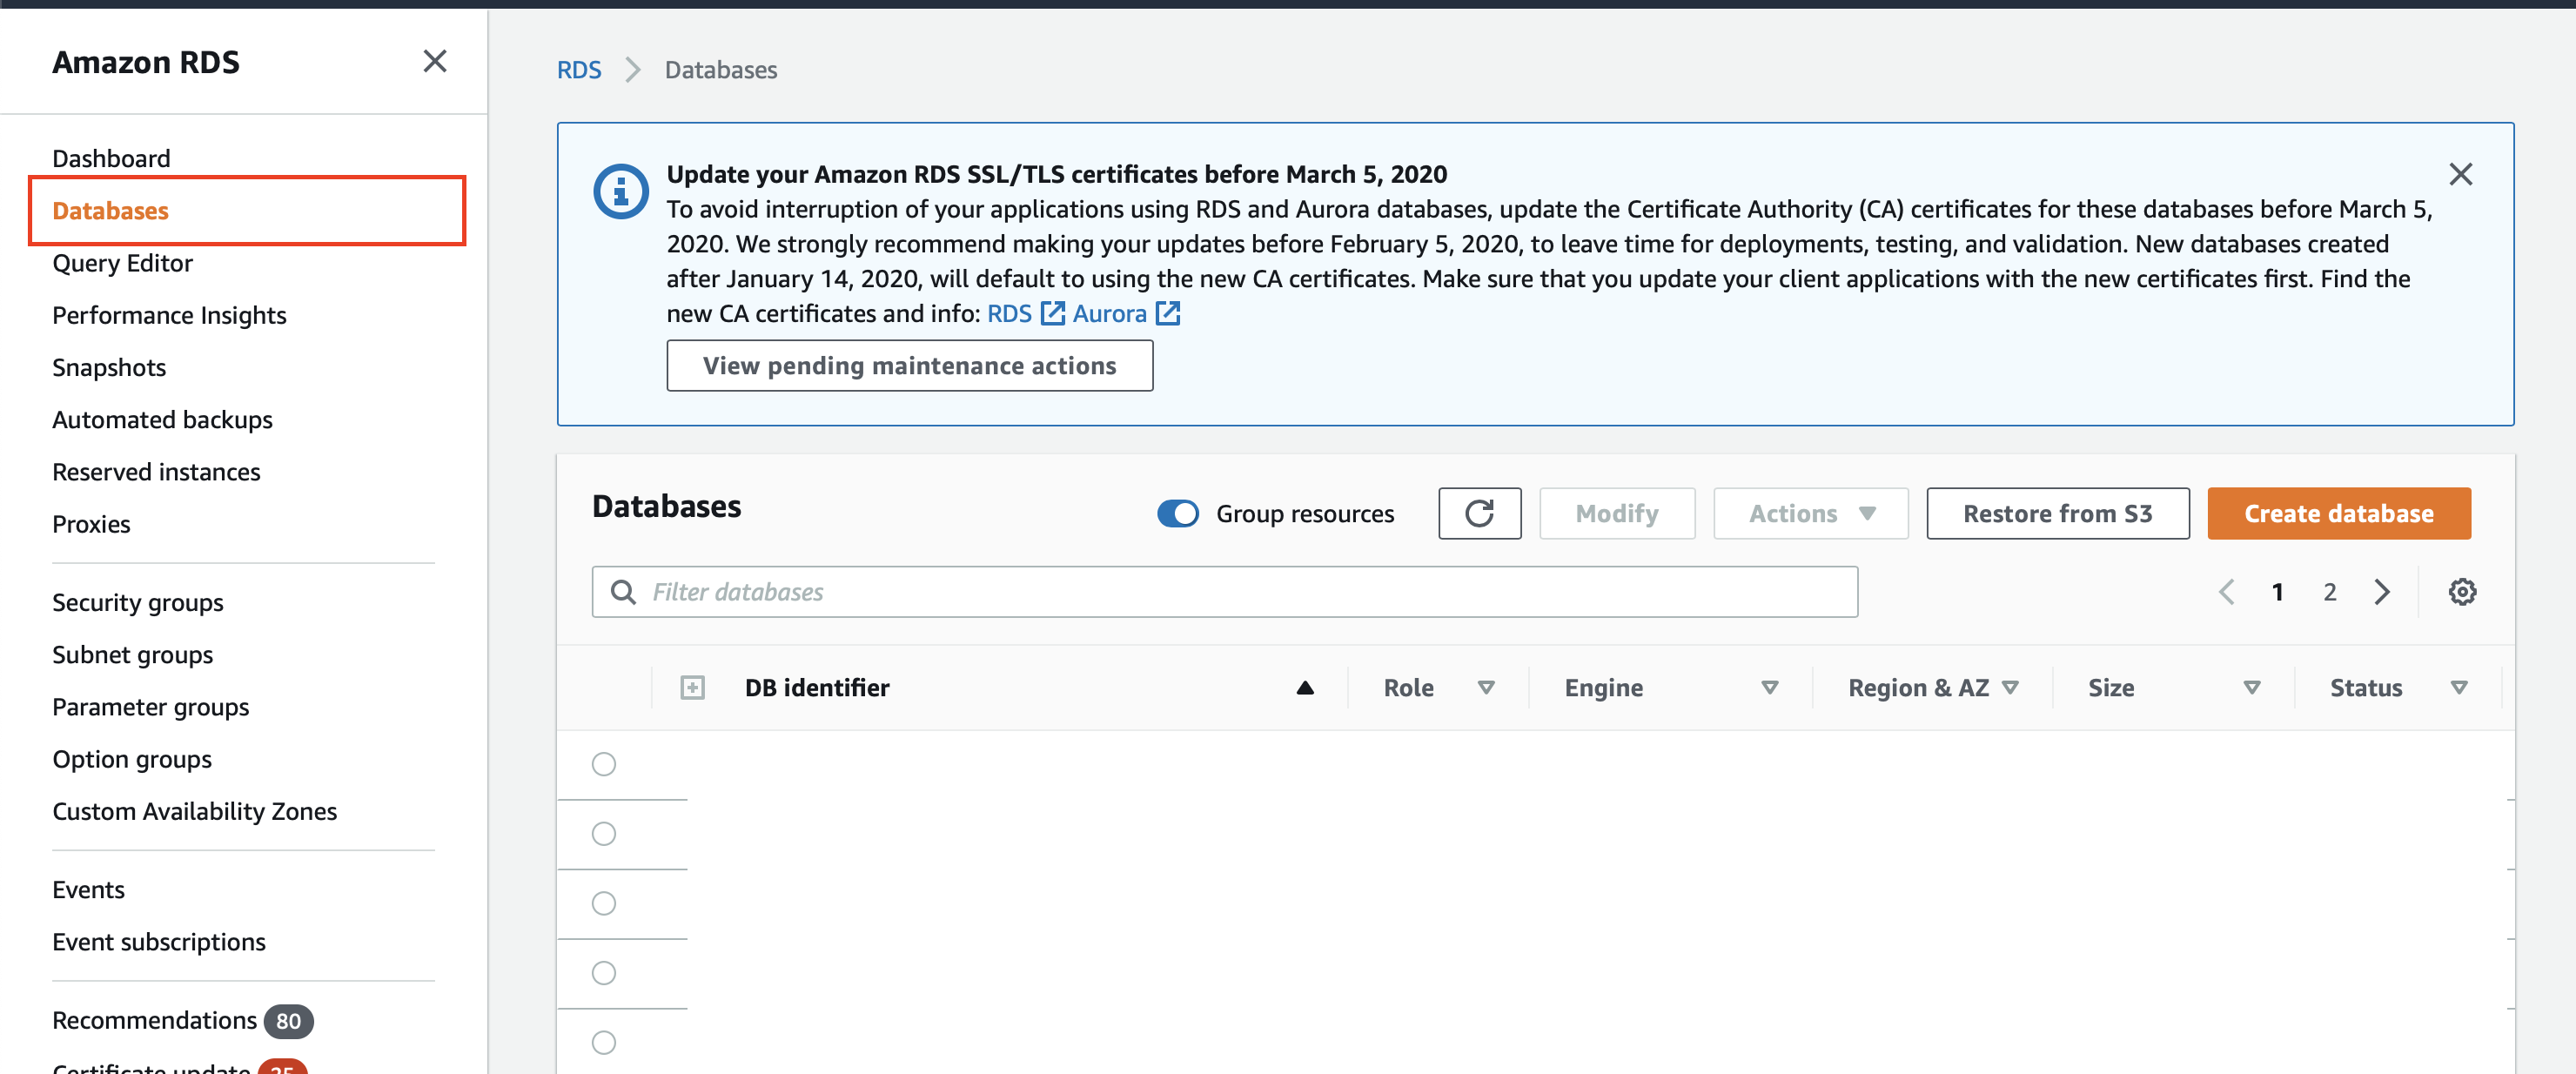
Click on the big orange Create database button on the right-hand side. Set the following configurations:
Under Engine type:
Engine type: PostgreSQL
- The latest version will work just fine. As of the writing of these docs, the latest version was
PostgreSQL 11.5-R1.
- The latest version will work just fine. As of the writing of these docs, the latest version was
Under Settings:
- DB instance identifier: puddle
- Master username: puddle
- Master password & Confirm password: Set a secure password and make a note of it; you’ll need it later when configuring Puddle.
Under connectivity:
- Virtual Private Cloud (VPC): Select the VPC created above.
Under Additional Configuration:
- Virtual Private Cloud (VPC): puddle
Unless otherwise specified, leave all other configurations the same.
Click Create Database, and your new RDS PostgreSQL database should now be created.
AWS ElastiCache Redis Setup
Navigate to the AWS ElastiCache Dashboard in the AWS console. On the left-hand menu, select Redis.
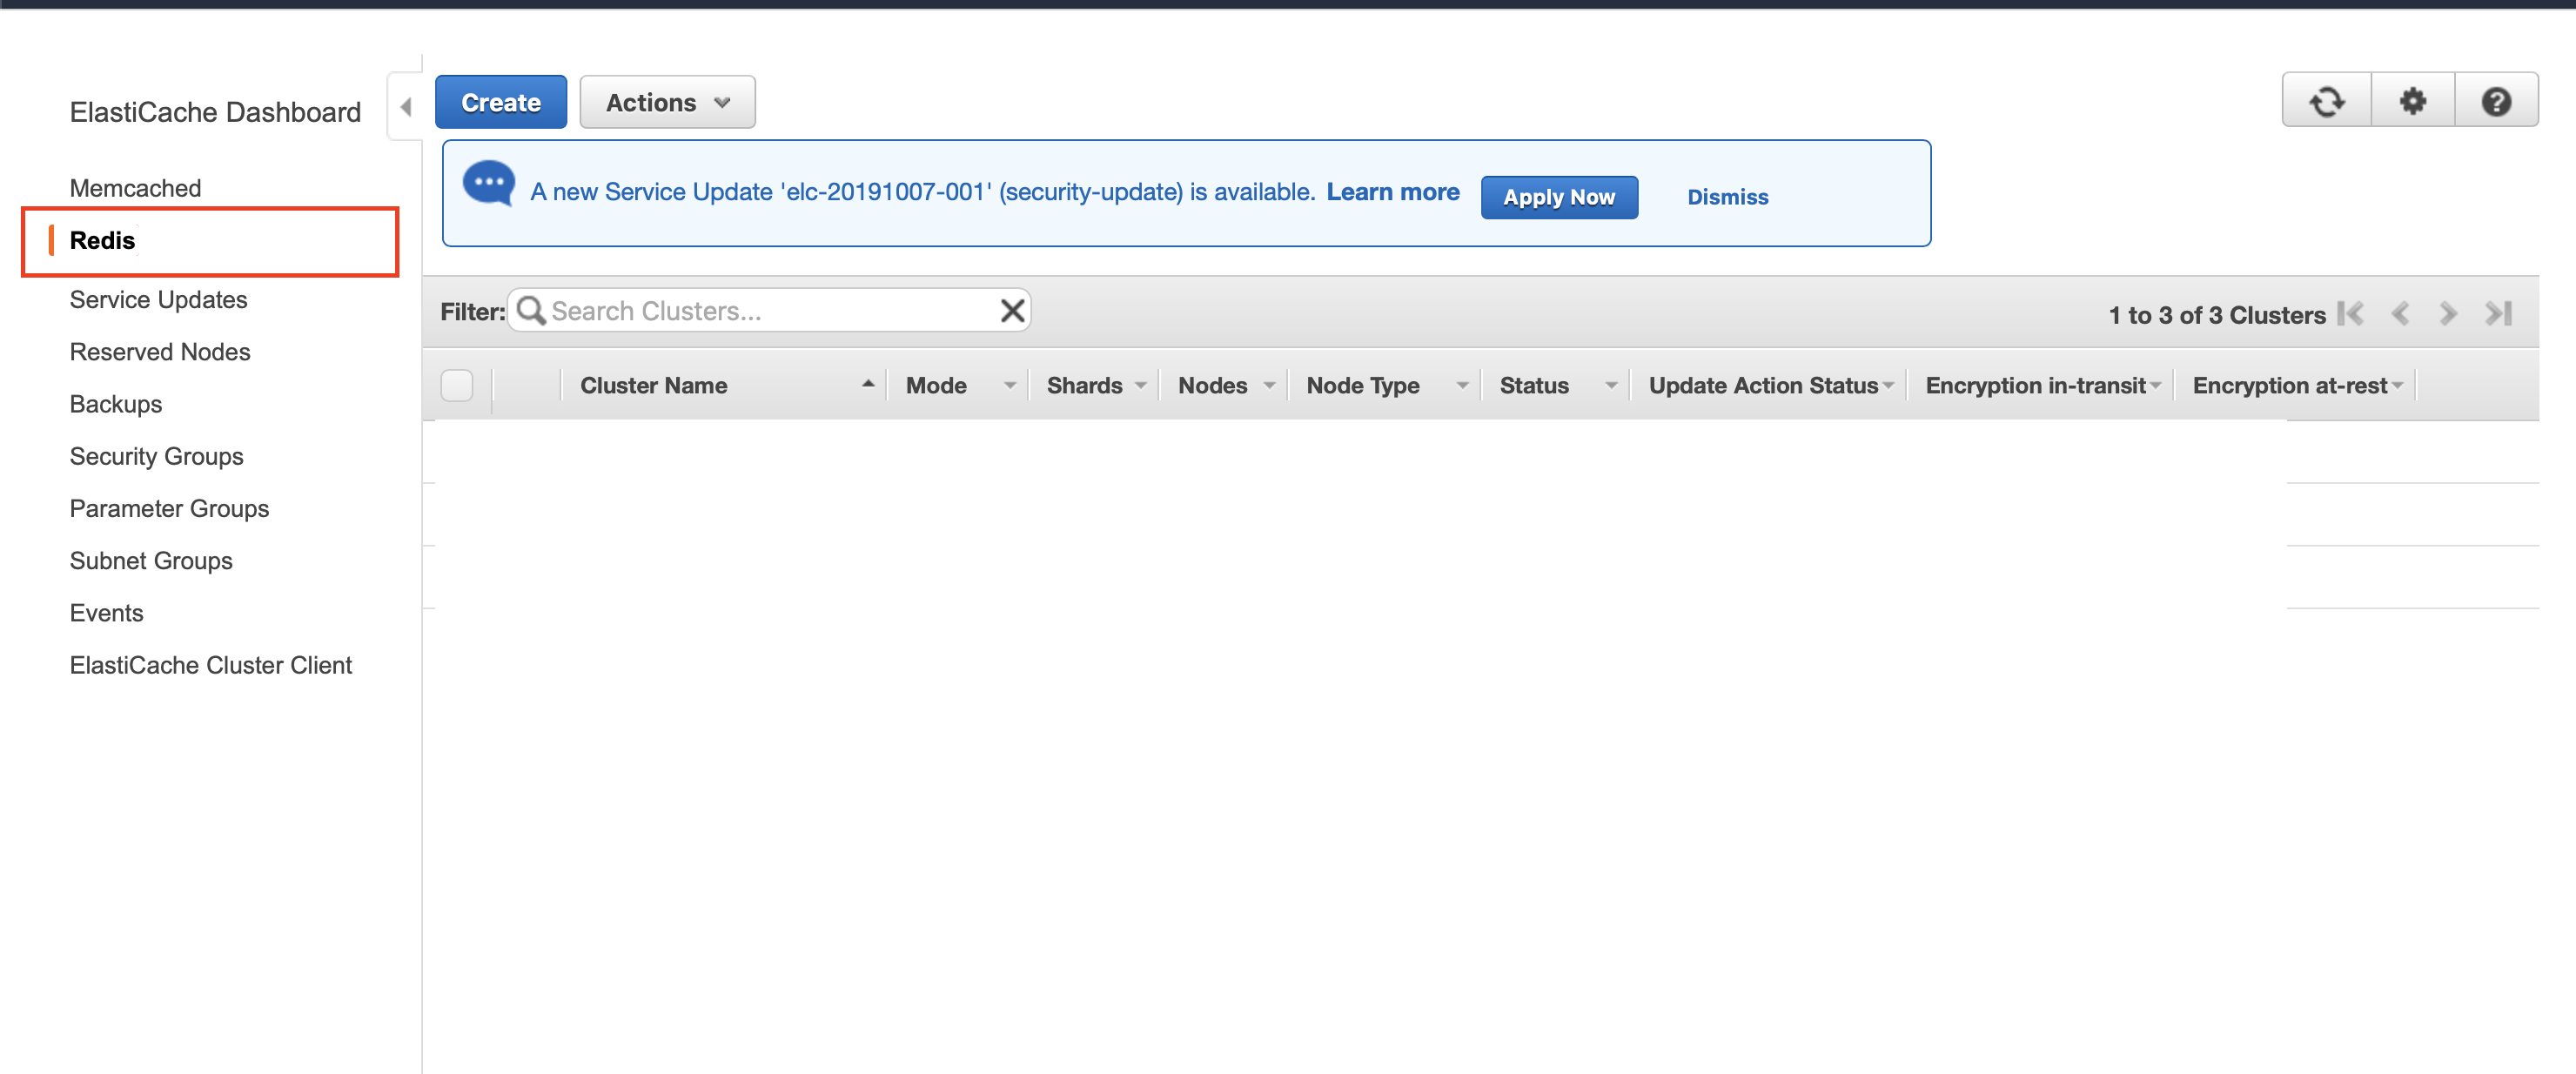
Click Create at the top of the page. On the next page, set the following configurations:
Under Redis settings:
- Name: Provide a descriptive name (for example: “puddle-redis”).
- Description: Provide a description (for example: “Redis for Puddle setup”).
Under advanced Redis settings:
Subnet group: Select Create new and set the following configurations:
- Name: Provide a descriptive name for the subnet group (for example: “puddle-redis-subnet-group”).
- VPC ID: Select the VPC created above.
- Subnets: Select all three subnets
Keep note of the Security Group ID used by the Redis instance. The ID is located under Security. You will need to modify it later.
Finally, click Create. While the Redis instance is starting, modify the Security Group that it will use. Find the group and modify the Source of the inbound rule to be 0.0.0.0/0.
AWS Cognito Setup
In this setup, Puddle is configured to use AWS Cognito for authentication. You may, however, use LDAP or Active Directory for authentication. Navigate to the AWS Cognito service in the AWS console. Click on Manage User Pools, and then click on Create a user pool.
On the next page enter a descriptive Pool name. Next, click on App clients on the left-hand menu and click on Add an app client. Set the following configurations:
- App client name: Provide a descriptive client name such as “puddle-app-client”.
Keep the other configurations as they are and click Create app client.
Next, select Review on the left-hand menu, and create the user pool by clicking on Create pool.
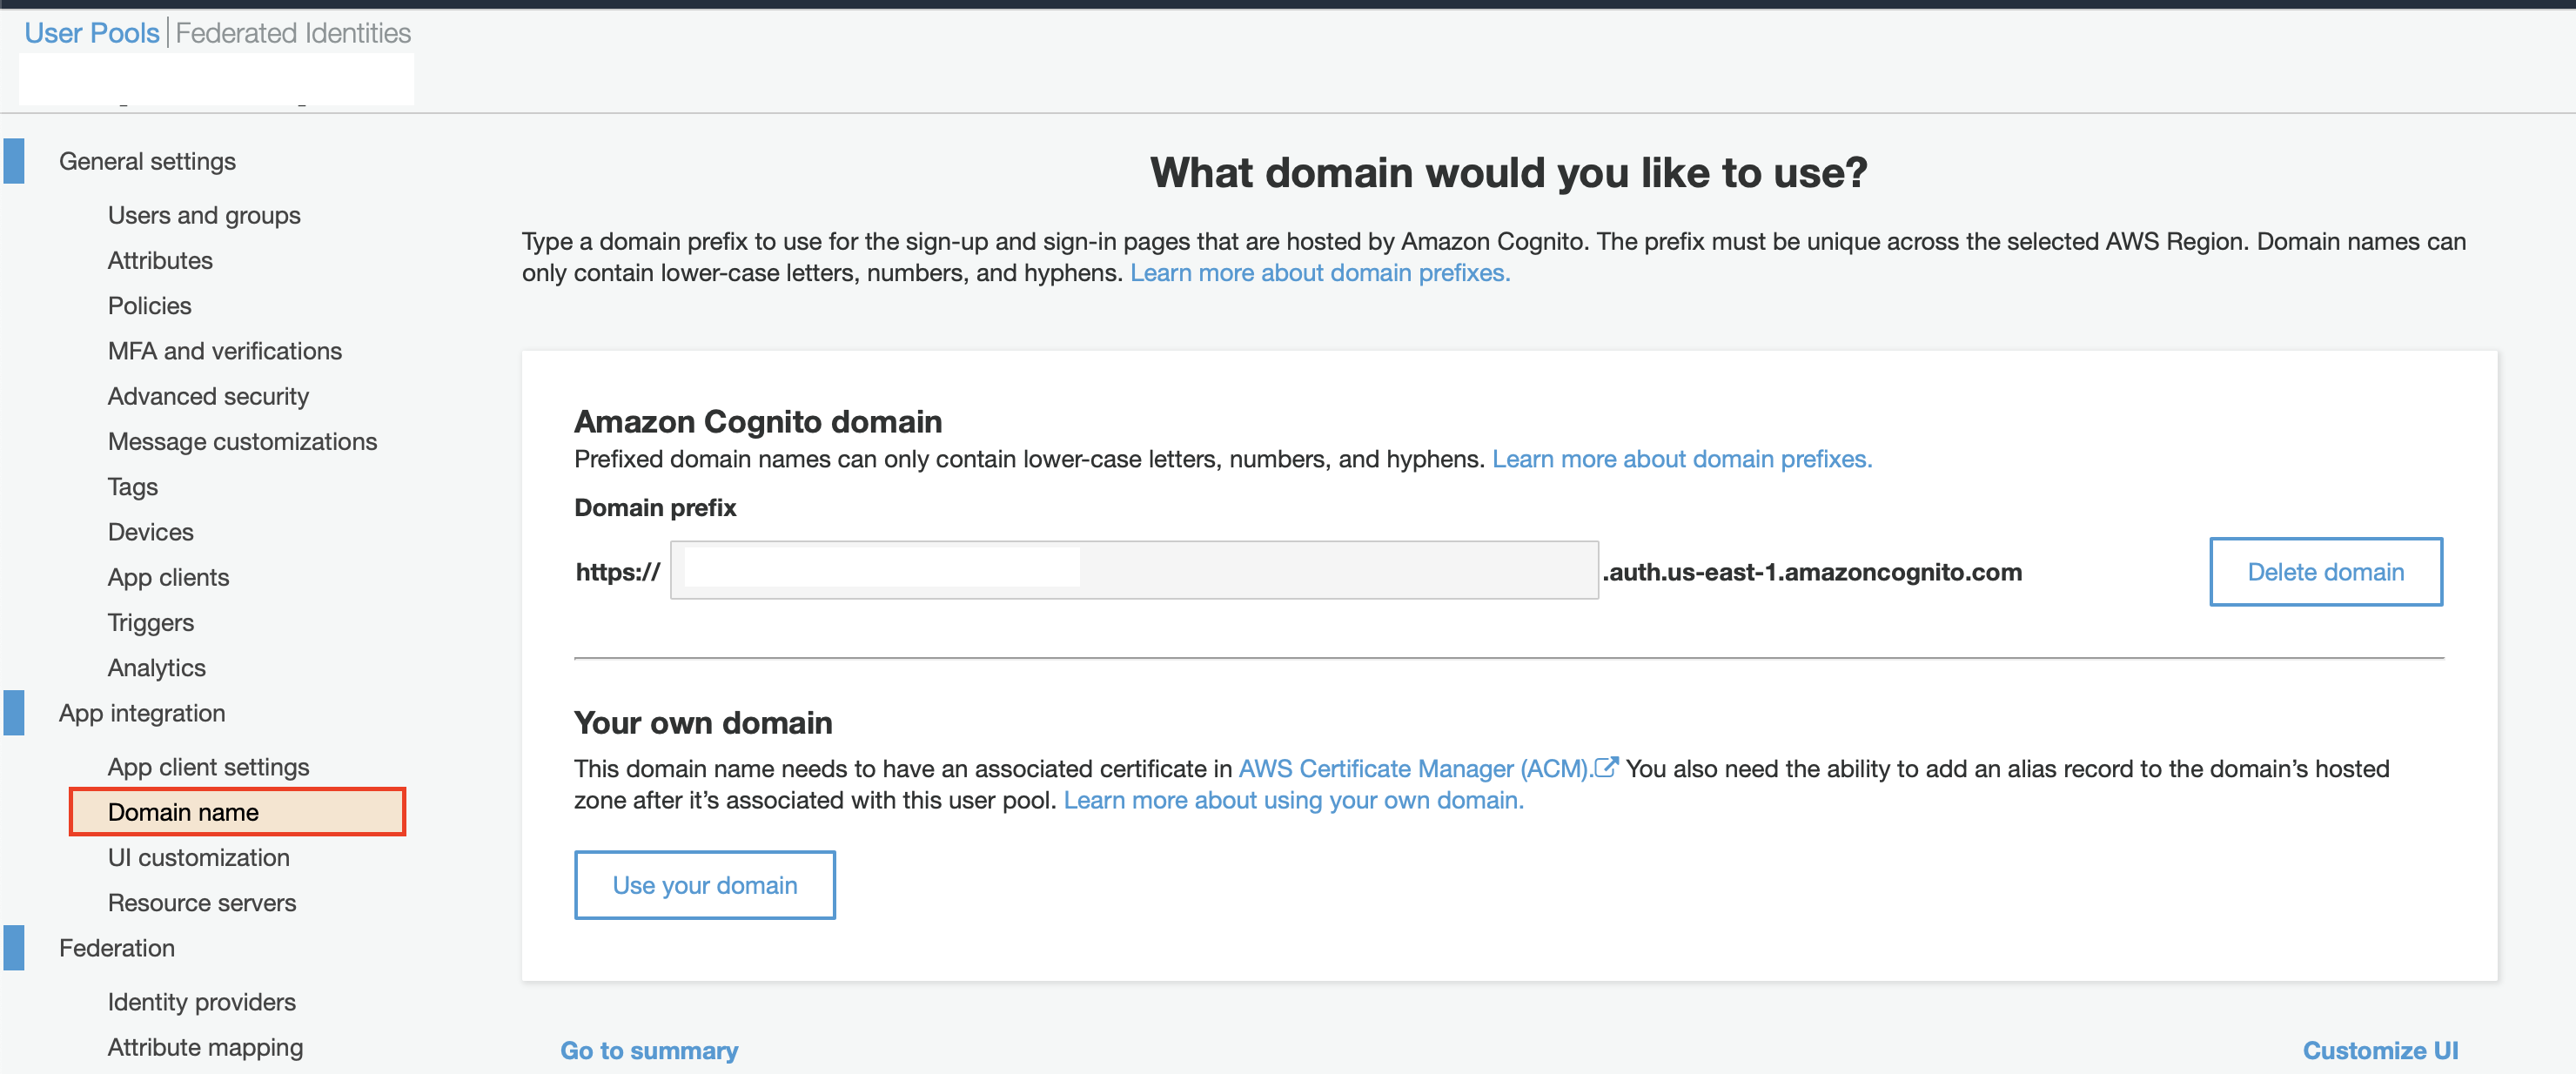
Your new user pool will now show up in the list of the user pools. Select your new user pool, and then select Domain name on the left-hand menu. Enter a descriptive name (for example: “https://puddle_xxx.auth.us-east-1.amazoncognito.com”).
Now select App client settings on the left-hand menu and set the following configurations:
- Enable Identity Providers: check the box Select all.
- Under Sign in and sign out URLs:
- Callback URL: https://[Elastic IP of EC2 Instance]/aws-cognito-callback
- Sign out URL: https://[Elastic IP of EC2 Instance]/logout
- Under OAuth 2.0:
- Allowed OAuth Flows: Select Authorization code grant.
- Allowed OAuth Scopes: Select phone, email, openid, and aws.cognito.signin.user.admin.
Save your changes.
Security Group For Puddle Setup
You will have to create a new Security Group for Puddle to use. All instances created by Puddle will have this security group. Navigate to Security Groups and create a new one. Set the following inbound rules:
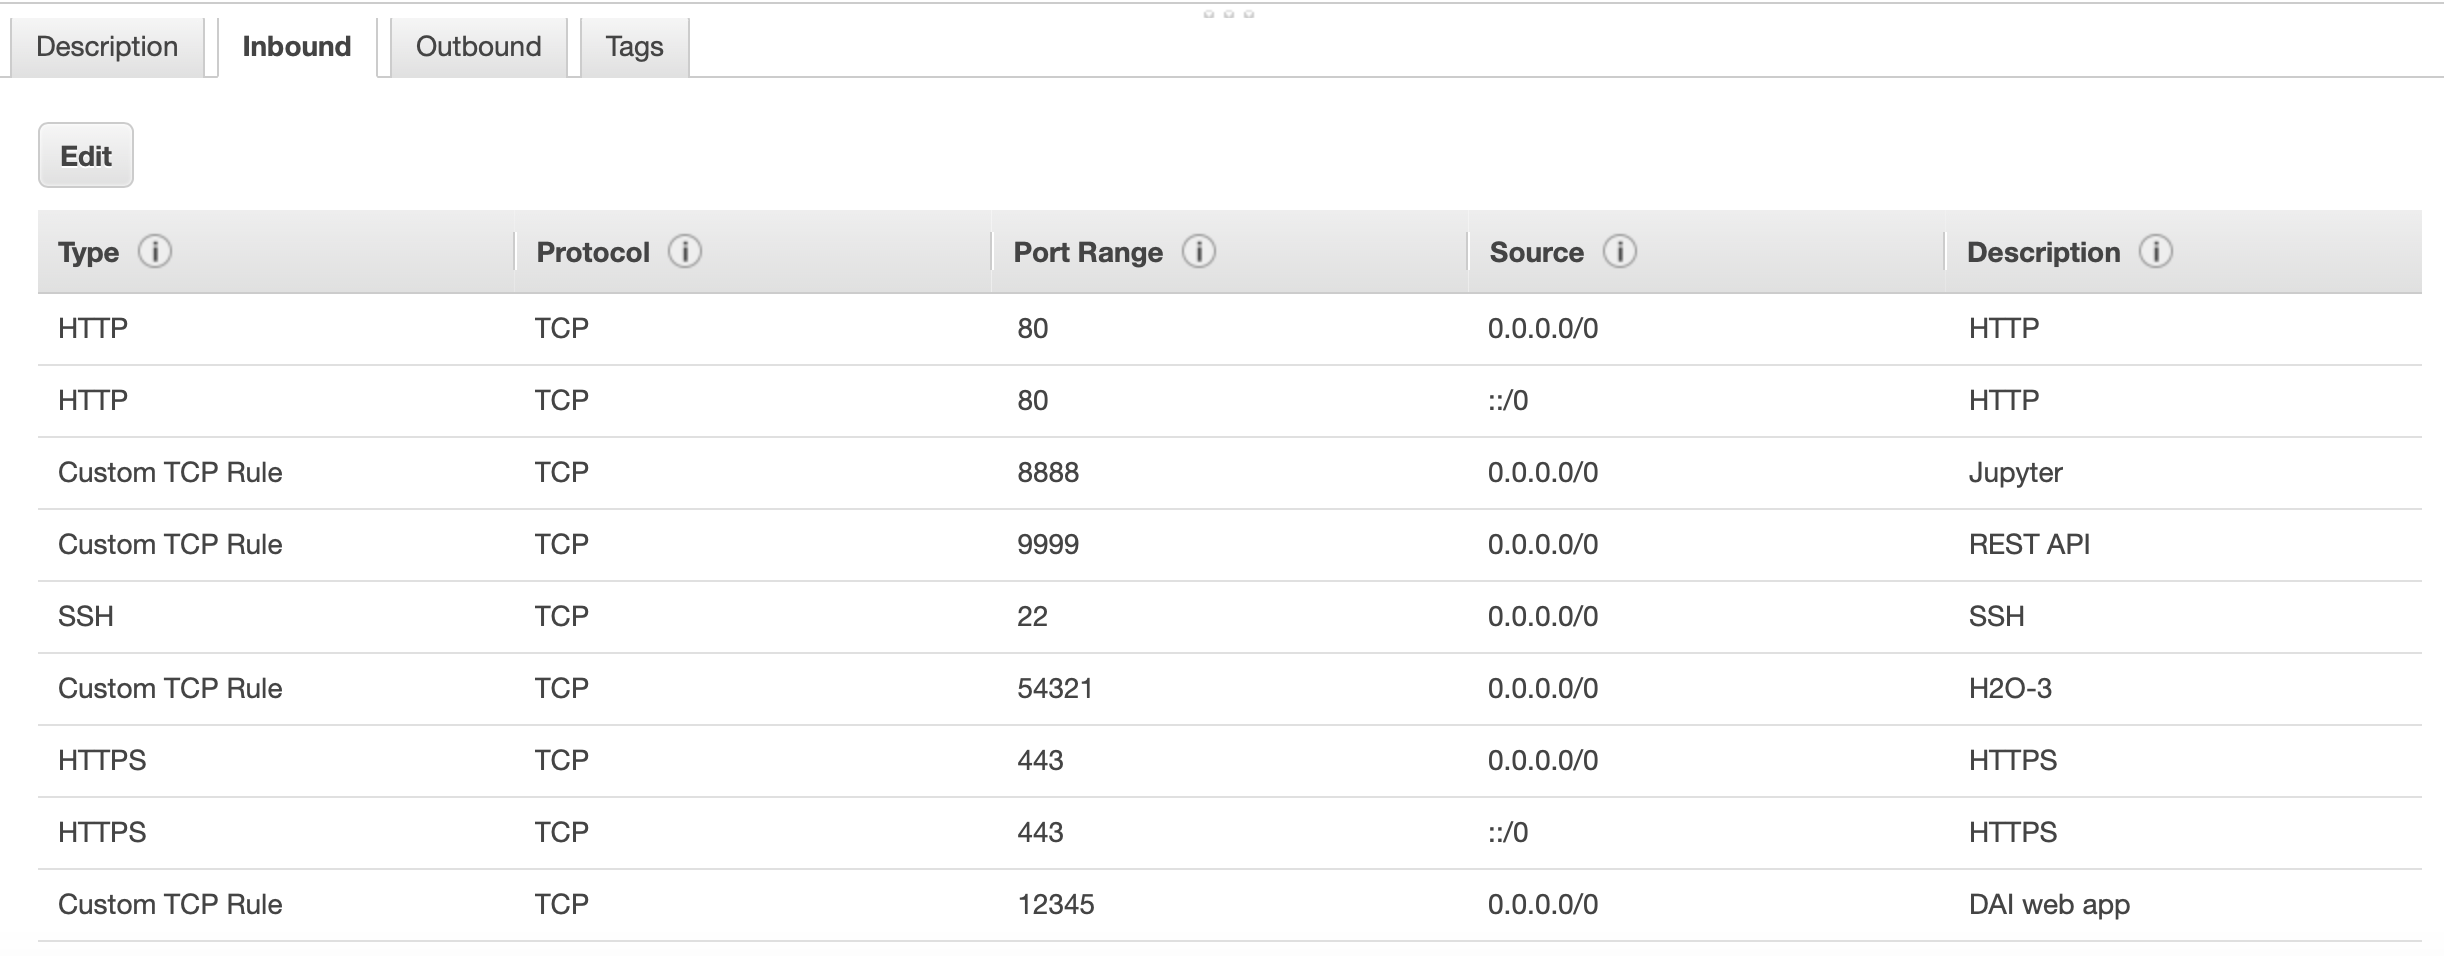
Make note of the Security Group ID because you will need it later. If you plan on deploying a local REST server to serve a model’s scoring pipeline on DAI instances, you should also enable port 8080 in the security group. This is an optional rule.
Puddle AWS EC2 Backend Setup
While the RDS and Redis instances are starting, create a new EC2 instance under the VPC created above. We will not go into detail when it comes to creating an EC2 instance in AWS as it is pretty straightforward. However, we recommend the following configurations for the EC2 instance:
- OS: Ubuntu
- Memory: 8GB minimum
- Storage: 100 GB
Once the instance has been created, associate the second Elastic IP you created to it.
Note: You’ll also have to add an inbound rule to the EC2 instance’s security group to allow incoming TCP traffic.
You’ll also have to attach an IAM role to the instance. Make sure the role has the following policy:
{
    "Version": "2012-10-17",
    "Statement": [
        {
            "Sid": "VisualEditor0",
            "Effect": "Allow",
            "Action": [
                "ec2:AttachVolume",
                "ec2:AuthorizeSecurityGroupIngress",
                "ec2:DeregisterImage",
                "ec2:DeleteSnapshot",
                "ec2:DescribeInstances",
                "ec2:DescribeInstanceAttribute",
                "ec2:CreateKeyPair",
                "ec2:DescribeRegions",
                "ec2:CreateImage",
                "ec2:CopyImage",
                "ec2:ModifyImageAttribute",
                "ec2:DescribeSnapshots",
                "ec2:DeleteVolume",
                "ec2:ModifySnapshotAttribute",
                "ec2:StartInstances",
                "ec2:CreateSecurityGroup",
                "ec2:DescribeVolumes",
                "ec2:CreateSnapshot",
                "ec2:ModifyInstanceAttribute",
                "ec2:DescribeKeyPairs",
                "ec2:DescribeInstanceStatus",
                "ec2:DetachVolume",
                "ec2:TerminateInstances",
                "ec2:ImportKeyPair",
                "ec2:DescribeTags",
                "ec2:CreateTags",
                "ec2:RegisterImage",
                "ec2:RunInstances",
                "ec2:StopInstances",
                "ec2:DescribeSecurityGroups",
                "ec2:CreateVolume",
                "ec2:DescribeImages",
                "ec2:GetPasswordData",
                "ec2:DescribeImageAttribute",
                "ec2:DeleteSecurityGroup",
                "ec2:DescribeSubnets",
                "ec2:DeleteKeyPair"
            ],
            "Resource": "*"
        }
    ]
}
SSH into the instance and run the following commands:
sudo apt update
sudo apt upgrade
sudo apt install -y wget unzip redis-tools postgresql-client
wget https://s3.amazonaws.com/puddle-release.h2o.ai/1.3.0/x86_64-ubuntu18/puddle_1.3.0_amd64.deb
dpkg -i puddle_1.3.0_amd64.deb
At this point, you can test the Redis endpoint:
redis-cli -h xxxxxxxxxxx.cac1.cache.amazonaws.com
Note: You’ll have to use the primary endpoint.
Test and create an extension in RDS database:
psql -U puddle -h xxxxxxxxxxx.ca-central-1.rds.amazonaws.com -p 5432 puddle
CREATE EXTENSION "uuid-ossp";
In order to quit psql use /q.
Install Ansible:
sudo apt install ansible
Puddle Configuration
Before you configure Puddle, you will need a TLS key pair. We recommend getting one from an established certificate authority like Let’s Encrypt.
Though not recommended, you can also create your own self-signed certificate. Run the following command to achieve this:
sudo openssl req -x509 -newkey rsa:4096 -keyout private_key.pem -out cert.pem -days 3650 -nodes
Next, create a folder to hold the key and certificate and move them there:
sudo mkdir /opt/h2oai/puddle/tls
sudo mv cert.pem /opt/h2oai/puddle/tls/
sudo mv private_key.pem /opt/h2oai/puddle/tls/
Make sure your Puddle license is located at opt/h2oai/puddle/license.sig.
You’ll also need a token secret for authentication. Run the following command to generate one and keep it on hand as you’ll need it very soon:
tr -cd '[:alnum:]' < /dev/urandom | fold -w32 | head -nl
Update the Puddle config file located at /etc/puddle/config.yaml. Set the following configurations:
Under Redis:
Under Connections:
- protocol: tcp
- address: xxxxxxxxxxx.cac1.cache.amazonaws.com:6379
- password: (leave empty)
- tls: false
Under db:
Under connection:
- drivername: postgres
- host: xxxxxxxxxxx.ca-central-1.rds.amazonaws.com
- port: 5432
- user: puddle
- dbname: puddle
- sslmode: require
- password: (the password you set for the RDS database)
Under tls:
- certFile: /opt/h2oai/puddle/tls/cert.pem
- keyFile: /opt/h2oai/puddle/tls/private_key.pem
Under license:
- file: /opt/h2oai/puddle/license.sig
Under auth:
Under token:
- secret: (paste the secret you generated above using the
trcommand)
- secret: (paste the secret you generated above using the
Under awsCognito (We only demonstrate how to setup AWS Cognito Auth. You can, however, use LDAP or Active Directory if you choose to):
- enable: true
- userPoolId: us-east-1_xxxxxx
- userPoolWebClientId: (you can get this from the AWS console)
- domain: (the doman you set in the AWS Cognito step above)
- redirectSignIn: https://[Elastic IP of EC2 Instance]/aws-cognito-callback
- redirectSignOut: https://[Elastic IP of EC2 Instance]/logout
- adminsGroup: Administrators
- usersGroup: Users
- implicitGrant: false
Under backend:
baseUrl: https://[Elastic IP of EC2 Instance]
Under connections:
- usePublicIP: true
Under provides:
Under aws:
- enabled: true
- owner: (can be extracted from the panel of the newly created security group)
- pcId: (ID of the VPC created above)
- sgId: (ID of the security group created above)
- subnetId: (public subnet ID of the VPC created above)
- publicIpEnabled: true
- packerInstanceType: (leave empty)
- metadataEndpointIAMRole: http://169.254.169.254/latest/meta-data/iam/info
- suppressIAMRoleCheck: false
Under mailing;
- enabled: false (We disable mailing in this setup)
Proxy Setup
If you’re using a proxy server, you’ll have to set the values for a couple more configurations: specifically, the URL for the proxy server to be used. If you’re using HTTP, then set the value for http_proxy to be the URL of the proxy server. If you’re using HTTPS, then set the value for https_proxy to be the URL of the proxy server. You may also set no_proxy to be the comma-separated list of hosts to be excluded from proxying. For example, you can set no_proxy to be localhost,127.0.0.1.
Restart Puddle
At this point, everything should be properly set up. Restart Puddle with the following command:
sudo systemct1 restart puddle
Verify the logs to ensure no errors occur. If you see errors, please go back and make sure everything was properly set up. You can check the logs using journalctl -u puddle -f. If you do not see any errors, you should be able to access Puddle at https://[Elastic IP of EC2 Instance]. Ignore any TLS warnings.
Puddle Initialization
Now that Puddle is installed and running, you will have to perform certain initialization steps:
- Log in to Puddle as an Administrator.
- Go to Administration > Check Updates.
- Either use the update plan from the default URL location or specify a custom update plan file.
- Click Submit.
- Review the plan and click Apply.
- Go to Administration > Images.
- Build all the images you want to use. (Note that this can take up to 1 hour to complete.)
Upgrading Puddle
Before upgrading Puddle, you’ll want to backup Puddle’s database and Redis. (Note that the upgrade will require a 30 minute downtime for Puddle.) All systems launched from Puddle will not be affected during the upgrade process, so users running DAI experiments can continue to do so without any interruptions.
Start by downloading the binary file that will be executed to back up Puddle’s data. Once you’ve downloaded the file, you’ll want to make it executable. To do so, run the following command:
sudo chmod +x ./puddle-backup
Set an environment variable pointing to Puddle’s config directory. You can achieve this with the following command:
export PUDDLE_CONFIG_DIR=/etc/puddle/
Run the backup job with the following command:
./puddle-backup.1 backup
This will create a file containing the backup archive. Make sure you keep this file in a secure location.
If you installed an older version of Puddle that did not need Ansible, please make sure you install Ansible before upgrading. You can refer to the following docs to install Ansible for your specific environment.
You can now upgrade Puddle by simply installing the newer version.
Puddle Stats Board
Setting up Puddle’s stats board is optional. The installer for Puddle Stats Board is a distributed Python wheel. This means it requires Python 3.6 to be installed on the system. Though not necessary, it is recommended to run the board inside a virtual environment as well.
Start by installing the required dependencies by using one of the following two sets of commands depending on your system.
For Ubuntu:
sudo apt install gcc libpq-dev python3.6-dev python-virtualenv -y
For RHEL:
sudo yum install epel-release -y
sudo yum install gcc postgresql-devel python36-devel python-virtualenv -y
Next, create the virtual environment:
mkdir -p /opt/h2oai/puddle/envs
cd /opt/h2oai/puddle/envs
virtualenv -p python3.6 puddle-stats-env
Note: It is important that you use the exact same name and path as in the snippet above. Otherwise, the systemd script used to manage Puddle Stats Board will not work.
You’re now ready to install Puddle Stats Board:
source /opt/h2oai/puddle/envs/puddle-stats-env/bin/activate
sudo pip install puddle_stats_board-<VERSION>-py3-none-any.whl
(Note that the above commands will also install any necessary dependencies.)
Puddle Stats Board is now installed and can be started with the following command:
sudo systemctl start puddle-dashboard
Puddle Stats Board will be running on port 8050 and will be accessible form the Puddle UI at http://[Puddle Server Address]/board. A link to the stats board is also available in the Administration menu.