
1 January 2018
Revised, 25 January 2018
Copyright © 2017, 2018, Polar3D, LLC, All Rights Reserved
Through OctoPrint's support of the Polar Cloud, you can securely control your 3D printer remotely over the Internet! To see if your 3D printer is supported by OctoPrint, check OctoPrint's supported printers page. This guide assumes that you already have OctoPrint installed and running on some system. For assistance with setting up OctoPrint, please see Section 5.0.
We have also prepared a video covering much of this guide, Put your 3D printers onto the Internet with the Polar Cloud & OctoPrint.
1.0 The Polar Cloud
1.1 Creating a Polar Cloud account
1.2 Finding your account's PIN
2.0 Cloud Enabling OctoPrint
2.1 Install the Polar Cloud plugin
2.2 Configure the Polar Cloud plugin
2.3 OctoPrint printer profile
3.0 Polar Cloud Printer Configuration
3.1 Loading a STL file to your account
3.2 Load an obect to your printer's virtual build plate
3.3 Printer configuration
3.4 Accessing your printers
4.0 Enabling Timelapse Videos
4.1 Camera troubleshooting
5.0 Suggested Raspberry Pi Components
6.0 Acknowledgments
The Polar Cloud provides secure access to your printer from anywhere in the world, using any web browser. The Polar Cloud is even tablet and phone friendly. Chromebooks and even the newest, inexpensive Amazon Fire tablets are supported.
With the Polar Cloud you can securely share your printers with others, granting "queue & view" access to individuals and groups. Or, grant management rights to some individuals. In the Polar Cloud you can store and save STL files as well as find full information on your past prints including the slicing configuration, allowing you to requeue old print jobs.
With Google Drive, BlocksCAD, and Tinkercad, you can send STL files directly to the Polar Cloud. With IFTTT you can receive notifications when prints are queued, started, completed, finished, or even deleted from the queue.
Security is provided using Internet connections secured via SSL/TLS. Each printer further generates its own, unique 2048-bit RSA keypair which is then used for purposes of cryptographically verifying the printer's identity when connecting to the Polar Cloud.
To access the Polar Cloud, you will need an account with Google, Facebook, or Microsoft: the Polar Cloud uses the "login" services of those providers to enhance security.
Note: with Google you will be asked to approve Google Drive access as well as access to Google Classroom. The Google Drive access is to allow you to pull STLs from your Google Drive folders. The Classroom access is for the Polar Cloud's large community of school teachers who use the cloud to facilitate 3D printing activities within their physical classrooms.
If you do not have an account with Google, Facebook, or Microsoft, you will first need to create one. You can associate most any e-mail address of yours with any of those services; you do not, for example, need to create a gmail account with Google. Please refer to this article for help creating an account with one of those three providers.
When you have an account with Google, Facebook, or Microsoft, you're ready to log in to the Polar Cloud. Just navigate to
You will then be presented with a login screen with four login buttons, one for each of the login providers. Click the appropriate one and login.
Your Polar Cloud account will automatically be created for you.
Once logged in you should see the Polar Cloud's home page. On the home page, click your profile image in the upper right corner and select the "Settings" menu item,
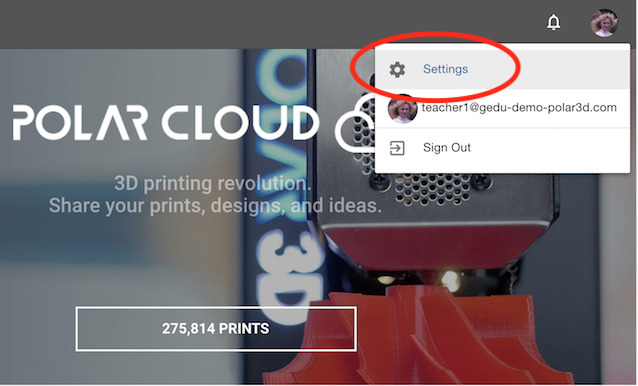
This will take you to your account settings page where you can see (and change) your account's PIN number. It is located near the bottom of the settings page. You will need that PIN number when registering your Octoprint server with the Polar Cloud.
Should you choose to change your PIN, do not forget to click the "SAVE" button near the top right corner of the settings page.
To register an Octoprint server with the Polar Cloud, you will supply Octoprint with the e-mail address associated with your Polar Cloud account as well as your PIN number. Octoprint will connect to the cloud using SSL/TLS and provide your account information as well as a public RSA crypto key it has generated. Once your account is validated by the cloud, a unique serial number will be sent back to Octoprint. Then each time Octoprint connects to the cloud, it will authenticate itself through use of its private RSA crypto key.
Once you have your Polar Cloud account setup, it is time to tie your OctoPrint server to your Polar Cloud account. We have prepared a video on how to do this, Put your 3D printers onto the Internet with the Polar Cloud & OctoPrint. The key steps explained in that video are described below
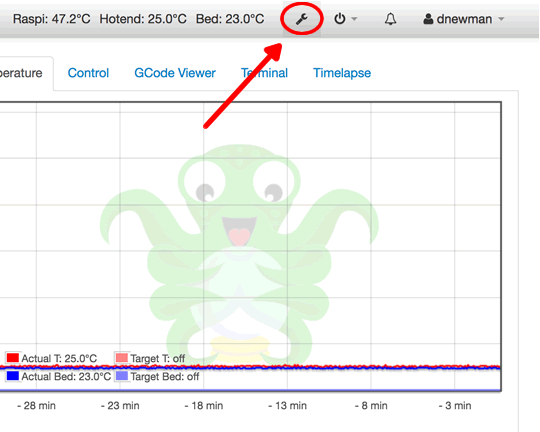
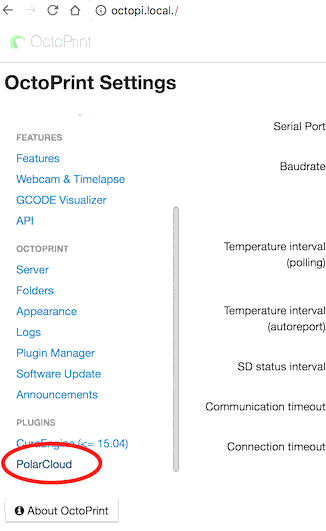
First navigate to OctoPrint's settings menu. From the main OctoPrint web page found at http://octopi.local., click the icon for the OctoPrint Settings page,
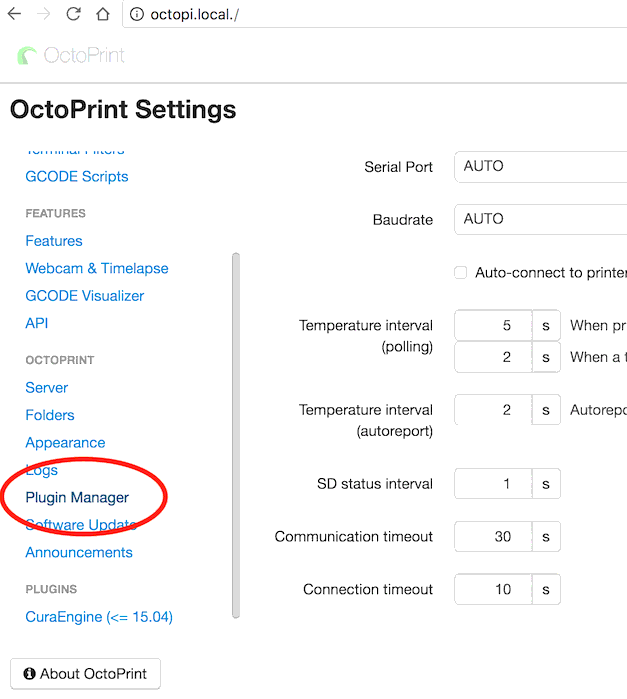
From, the OctoPrint Settings page, select the Plugin Manager,
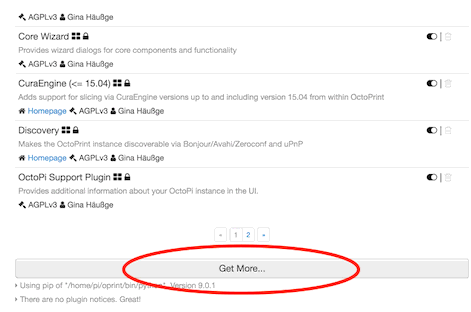
Once you are at the Plugin Manager window, use the "More" button to load the catalog of plugins,
From that catalog, select the Polar Cloud plugin which you can search for using the search term "polar",
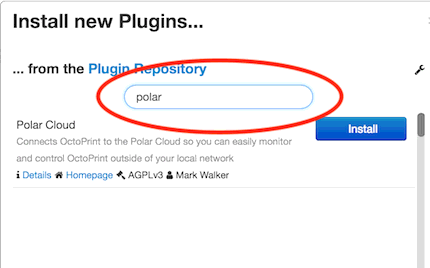
Go ahead and install the plugin and then allow OctoPrint to restart.
From OctoPrint's Settings menu, select the Polar Cloud plugin. It will be near the bottom of the list of menu choices along with any other plugins you have installed.
For the "Machine type", you can simply select either "Cartesian" or "Delta". If you happen to see your specific printer type, you can select that instead.
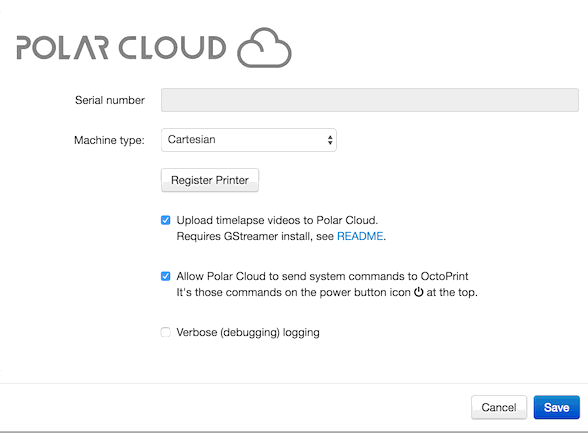
Then click the "Register Printer" button below the "Machine type" field. In the resulting screen, enter your e-mail address and PIN,
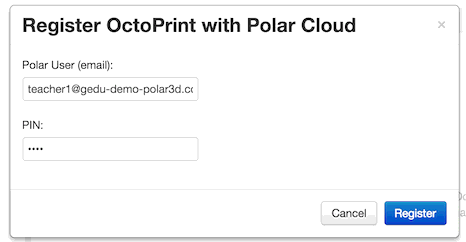
Once you have entered your e-mail address and PIN, click the "Register" button. The plugin will reach out across the Internet to the Polar Cloud and register your printer -- this instance of OctoPrint -- under your Polar Cloud account. You must have Internet connectivity for this step to succeeed.
After your printer has been successfully registered, you will be returned to the plugin's first screen. However, this time you will see a Polar Cloud serial number appearing in the "Serial number" field,
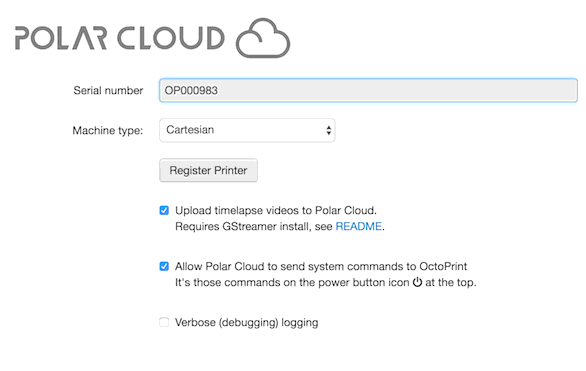
This is your printer's Polar Cloud serial number. Click the "Save" button to save your new registration. Once you have clicked "Save", you are set: your printer is registered to you in the Polar Cloud.
Before returning to the Polar Cloud, you must also configure within OctoPrint a printer profile for your printer. If you have already done that, you may skip the next section and move on to Section 3.0. Otherwise, follow the steps in the section immediately below.
OctoPrint has a printer profile as well which needs to be set up to match your printer. If you have already done this, then you can skip this step. Otherwise, read on.
To access the printer profiles in OctoPrint, click the "Settings" icon near the top right of the OctoPrint web interface as shown in the image below:
Tip: when you are viewing the Polar Cloud in your web browser and you are on the same local network as your OctoPrint server, then you can access the OctoPrint web pages from the Polar Cloud. Navigate to your printer dashboard and click the "Local UI" button near the upper right. That button only appears for the owner and managers of the printer.
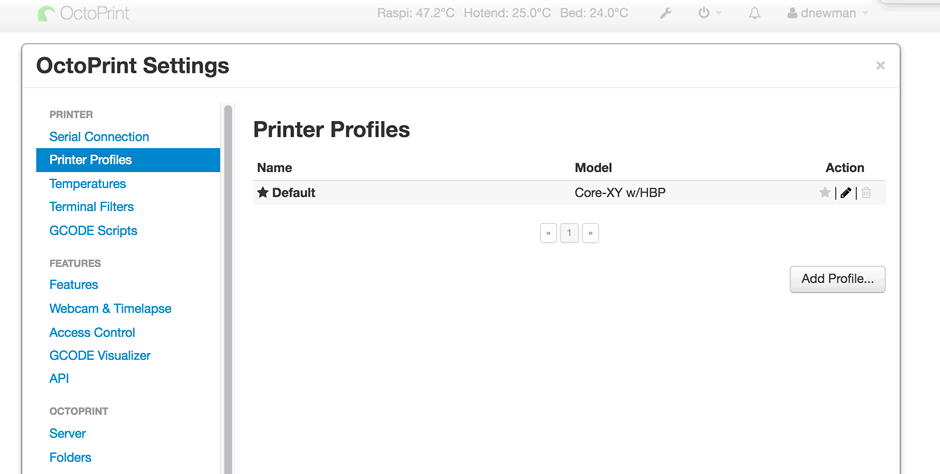
From the OctoPrint settings, select the "Printer Profiles" menu from the list of choices on the far left of the OctoPrint web pages:
Then, from the pop-up window click the "pencil" icon on the right under the "Action" column. That will bring up another window in which you can set printer characteristics such as the build plate geometry:
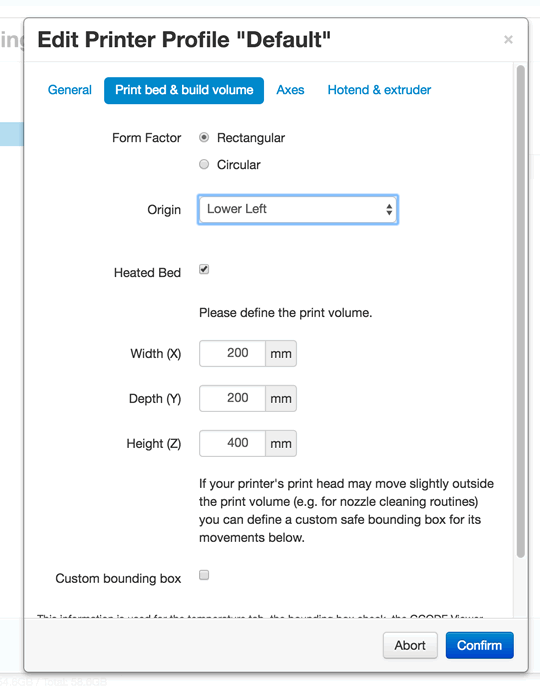
Once the desired settings have been made, click the "CONFIRM" button on the lower right. Then click the "SAVE" button in the lower right of the "Printer Profiles" window. Once you've done that, you've now configured your machine definitions in OctoPrint.
Now that you have your OctoPrint printer registered in the Polar Cloud, it is time to do some printer configuration within the Polar Cloud itself. If, in OctoPrint's Polar Cloud plugin, you registered your printer as a generic Cartesian or Delta printer, then you will need to take the steps outlined in Section 3.3 below. If, however, you used a specific printer make (e.g., Monoprice Select Mini), then you can ignore Section 3.3 below. Indeed, you will not even see the described options of Section 3.3.
Once your printer is registered, you're ready to upload a model to print. Examine the site navigation menu running along the top of the web page,

If you are using a smart phone or small tablet, you will not see this menu bar. Instead you will see in the upper left corner of your screen three horizontal, white lines. Click on those white lines to open up the site navigation menu.
From the navigation menu you can see the printers you own, manage, or have access to. Look under "Make" for the "Printers" item. Or you can go to the pages of public, shared, and private objects as we'll next do. Groups are visited via the "Connect" topic.
To visit the Objects page, click on "Explore",
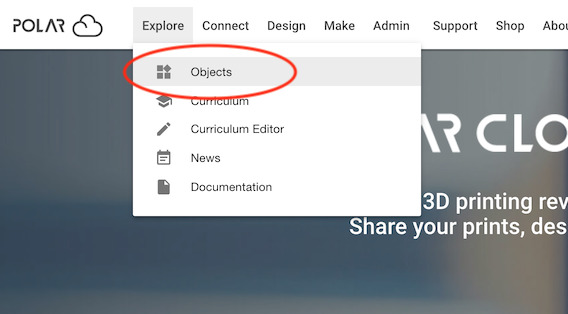
Then select the "Objects" item in the menu which appears.
At the objects page reached via the "OBJECTS" menu item on the hamburger menu, click the UPLOAD button near the upper right,
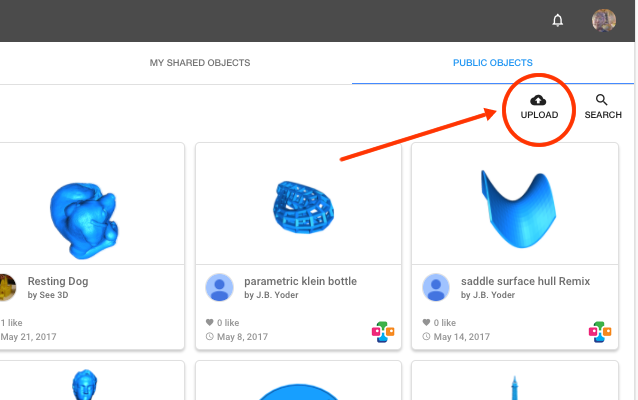
With the resulting upload dialog you can upload one or more STL files. They will be saved to a private object of your own and you will be given the choice of viewing the object or going to the printer's virtual build plate. Choose going to the build plate.
Note that if you logged in using Google, you can choose to load files from Google Drive. Further, when at Google Drive, you can send STL files directly to your printer's virtual build plate by right-clicking on a STL file, selecting "Open with", and then choosing "Polar Cloud".
Note uploaded STL files and the objects created to hold them always begin as private regardless of which tab of the objects page you are on. You must explicitly decide to share them or mark them as public in order for other people to access them. Objects can be shared with individual members or groups. Or they can be marked as public in which case any cloud member may access them.
If, when registering your printer, you selected either the generic Cartesian or Delta printer type, you will want to do a one-time configuration of your printer. This is done by duplicating one of the default slicing profiles, giving it a friendly name, setting some printer characteristics, and then saving the configuration. Each time you then go to the virtual build plate to make a new print job or edit an existing one, your saved configuration will be amongst the configuration choices presented. Your slicer settings are also saved in the configuration. As such, you will likely create many different saved configurations.
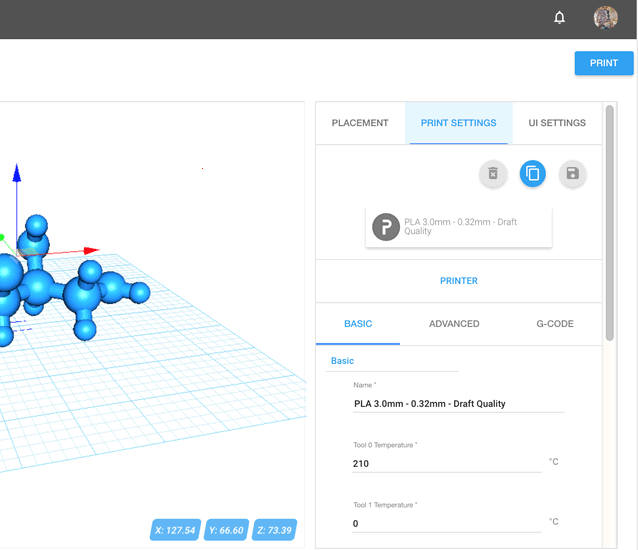
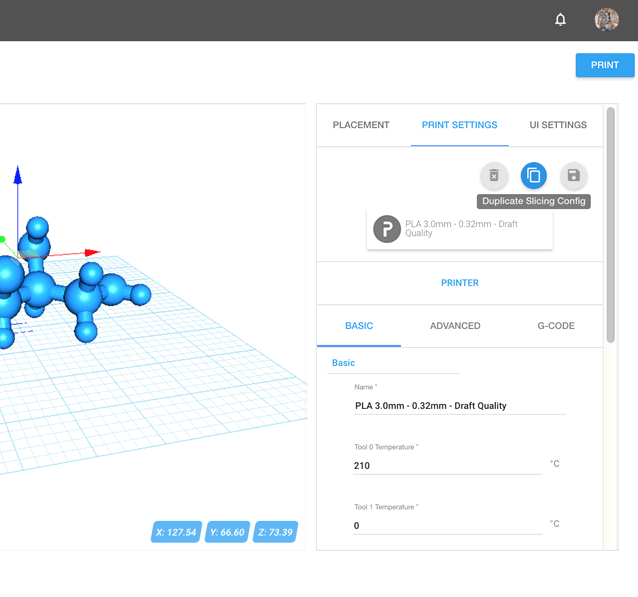
At the virtual build plate, select the Print Settings tab near the upper right,
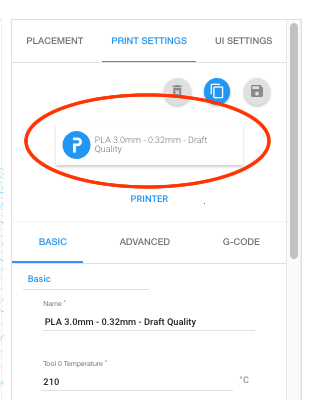
Then click the slicer config button shown circled in red below,
Upon clicking that button, a popup dialog will appear showing the available slicer configurations,
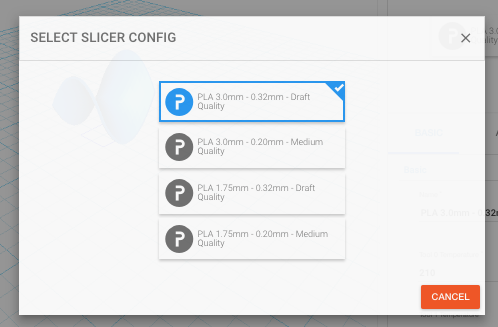
Click the most suitable config. Then back in the print settings, duplicate this config by clicking the duplicate icon near the upper right.
Once the config is duplicated, select the "Name" field under the "BASIC" settings tab and change the configuration's name to something more friendly,

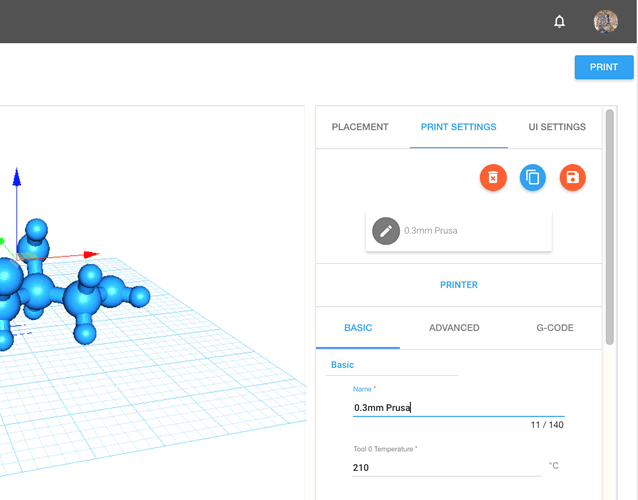
Once you have a reasonable name, click the "PRINTER" tab directly above the "ADVANCED" tab. Once it is clicked, a dialog with printer settings will appear,
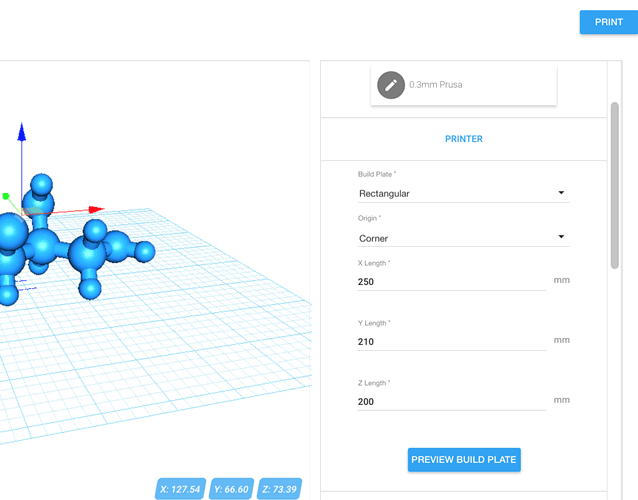
With this dialog you can control the type of build plate (rectangular or circular), the dimensions of the build volume, and whether or not the origin (0,0) in the XY-plane is at a corner of the build plate or at its center.
The Polar Cloud centers models at (0,0). Thus, when the resulting STL is sent to your printer, it is important to know where the origin of your printer's build plate is. If it is at a corner, the Cura "posx" and "posy" settings will be set, respectively, to half the build volume's X and Y lengths.
If you are using OctoPrint for the first time, be sure to set the printer profile in OctoPrint as well.
Once you have made any adjustments to the settings, you can click "PREVIEW BUILD PLATE" button to see the adjusted build plate. Then click the "PRINTER" tab again to dismiss the dialog.
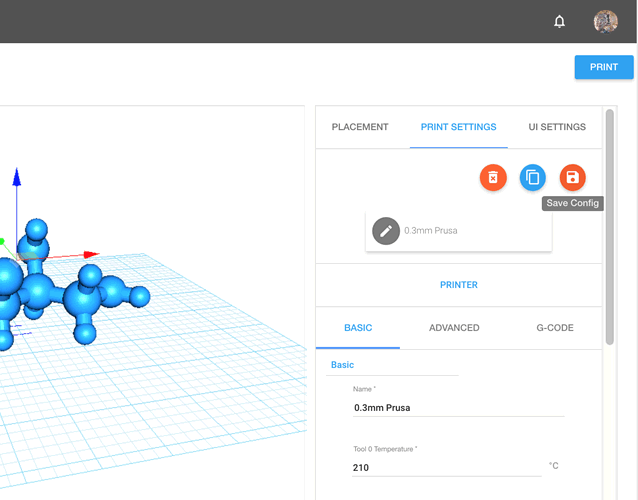
Make changes to other slicer settings as necessary. And adjust your starting and ending gcode under the "GCODE" tab. When you are done, save your configuration by clicking the save icon,
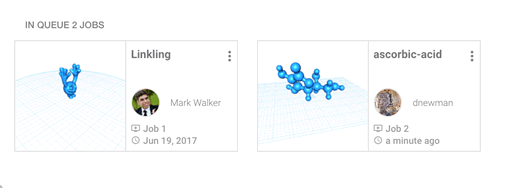
When you've adjusted the model on the build plate and are satisfied, click the "PRINT" button in the upper right. This will generate a single STL file containing all the models on the build plate, a rendering of your build plate, and a Cura slicing configuration. All will be stored in the cloud. The progress is displayed with a spinner in the bottom right of your screen. Once everything has been stored, you will be taken to the printer's "dashboard". From the dashboard you can start, pause, and stop prints. You can also see the queued jobs for the printer,
By clicking on the vertical dots in the upper right of a job "tile", you can perform actions on the job such as editing it to add more objects to it or to change a slicer setting,
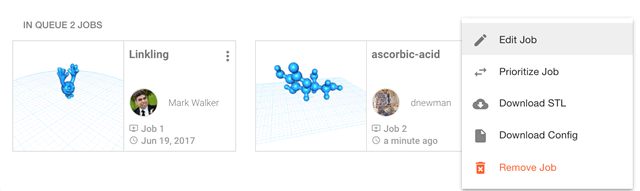
When you edit a job, you can load additional models to it from various sources. You can even load models from another print job, thereby combing two jobs into one.
From the menu bar running along the top of the page, select the "Printers" item under "Make",

This will take you to a page listing each of the printers to which you have access. You can click on any of the listed printers to then go to that printer's dashboard page.
Note: your Octoprint service will be treated in the Polar Cloud as if it is a printer. And it will be identified by its serial number, "OPnnnnnn". You may actually have several physical printers associated with a single Octoprint server. In the Polar Cloud they will all be treated as a single printer.
If you have a camera connected to your OctoPrint server, then you can save camera snapshots and timelapse videos in the Polar Cloud. To enable this capability, you must first login to your OctoPrint server and install some additional software. This additional software is used to encode and compress the videos uploaded to the Polar Cloud.
To login to the server, you must have a Secure Shell ("ssh") program available and know the server's IP address or hostname. On a Mac or Linux system, the ssh program is aptly named "ssh". On a Windows system, install and use the "putty" utility.
You can find OctoPrint's IP address by navigating to your printer's page in the Polar Cloud. Do this by going to https://polar3d.com/printers. Then select your printer from the list you see. On the printer's page, click the "LOCAL UI" button near the upper right of the page. That will take you to your OctoPrint server's web page using the server's own IP address. Note the IP address which appears in your web browser. It will be a string of the form a.b.c.d where a, b, c, and d are all integers. For example, 192.168.0.12. (You may instead see "http://192.168.0.12"; the IP address is still 192.168.0.12 in that case.)
Armed with the IP address of your OctoPrint server, you can now ssh to it. In the example below, we will assume that the IP address is 192.168.0.12. If you are using OctoPi on a Raspberry Pi, then by default the login account name will be "pi" with the password "raspberry". In what follows, it is assumed that OctoPrint is running on a Linux system such as a Raspberry Pi. If you are running OctoPrint on a Mac or Windows system, you will need to use different commands to install the necessary packages.
ssh pi@192.168.0.12
pi@192.168.0.12's password: raspberry
Once logged in, enter the two commands,
sudo apt-get update
sudo apt install gstreamer1.0-tools libx264-dev gstreamer1.0-plugins-good gstreamer1.0-plugins-bad gstreamer1.0-plugins-ugly
The first command will update the server's list of Internet repositories from which to obtain software packages. The second command installs a number of packages used by gstreamer, the video software used by OctoPrint. While the first command is relatively fast, the second command will likely take ten minutes or more.
Once the commands have finished, you can logout of the server. Use the "exit" command on a Raspberry Pu. Note that if you are using the OctoPi image on a Raspberry Pi, it is highly recommended that you change the default password. Use the "passwd" utility before first logging out. E.g.,
pi@octopi:~ $ passwd
Changing password for pi.
(current) UNIX password: raspberry
Enter new UNIX password: MySuperSecretPassword
Retype new UNIX password: MySuperSecretPassword
passwd: password updated successfully
pi@octopi:~ $ exit
Now, from the main OctoPrint web page, select the "Timelapse" tab near the upper right. It's the last tab, next to "GCode Viewer" and "Terminal". From that tab, enable "Timelapse Mode" by selecting any choice other than "Off". Next, near the bottom of the screen, click the "Save changes" button. Once you have done this, OctoPrint will begin to save timelapse videos to your Polar Cloud account after each Polar Cloud print completes successfully. If you go to your profile page and click the "HISTORY" tab, you will see your past print jobs. If you click on one of the tiles, you will see a pop-up window with tabs entitled "DETAILS, "COMMENTS", "SNAPSHOT", and "TIMELAPSE". The snapshot tab displays the final still camera image for the print. The timelapse tab displays the video for the print. Note that it may take OctoPrint a minute or two to upload a video. As such, the video may not immediately appear in the Polar Cloud once a print has finished.
If your Polar Cloud printer page does not show you the live camera image from OctoPrint, then either
To set up an OctoPrint server, it is common to use either a Raspberry Pi 2 or 3. While the Pi 2 series are no longer manufactured, know that you can use one should you or a colleague have one lying about. In general, using a Pi Zero is not recommended: it has insufficient computing power to manage the demands of both a camera and driving a 3D printer.
There are many videos and tutorials to help you get OctoPrint up and running; we recommend Thomas Sanladerer's YouTube video. For information on OctoPrint itself, please visit the OctoPrint website.
With a Raspberry Pi, most people use the OctoPi image maintained by the OctoPrint community and distributed through OctoPrint's download site. That same page also has information on installing the image.
Recommended components for a Raspberry Pi 2 or 3 based OctoPrint server are:
For reference purposes, an Amazon shopping list containing recommended components, both required and optional, is available here. This list was current as of this writing, January 2018.
OctoPrint is Open Source software developed and maintained primarily by Gina Häußge with assistance from the Open Source community. Polar3D remains thankful to Gina for her hard work and committment to developing excellent software for the benefit of the 3D printing community. You can learn more about OctoPrint at the OctoPrint website, octoprint.org.
The Polar Cloud plugin for OctoPrint is written and maintained by Mark Walker who is also a frequent contributor to OctoPrint and the OctoPrint community. Further information on the Polar Cloud plugin may be found here. Polar3D thanks Mark for his hard work and committment to the 3D printing community.