|
Part Centroid |
  
|
|
Part Centroid |
|
Import Part Centroid File. Loads an Ascii file that contains centroid data.
![]()
![]() Note: A centroid file is commonly a comma separated (or tab separated) file.
Note: A centroid file is commonly a comma separated (or tab separated) file.
Command Sequence
1. Select menu: File | Import | Part Centroid
2. Select the Centroid file you want to import, and press "OK".
3. Choose the separation character (comma, tab, etc.), and press OK.
![]() Note: The centroid file will now be imported and displayed in a grid table.
Note: The centroid file will now be imported and displayed in a grid table.
4. Assign the "Ref. Des" column variable, by clicking into a cell that contains the Reference Designators and choose menu item: "Column: Ref. Des"
![]() Note: You will now see at the top of the column a check mark and the title REFDES. This lets you know that the Ref Des column has been assigned .
Note: You will now see at the top of the column a check mark and the title REFDES. This lets you know that the Ref Des column has been assigned .
5. Assign the "Layer" column variable, by clicking into a cell that contains the Layer (usually labeled either: Top or Bottom) and choose menu item: "Column: Layer"
![]() Note: You will now see at the top of the column a check mark and the title LAYER. This lets you know that the Layer column has been assigned .
Note: You will now see at the top of the column a check mark and the title LAYER. This lets you know that the Layer column has been assigned .
6. Assign the "X" column variable, by clicking into a cell that contains the X coordinate and choose menu item: "Column: X Location"
![]() Note: You will now see at the top of the column a check mark and the title X. This lets you know that the X column has been assigned .
Note: You will now see at the top of the column a check mark and the title X. This lets you know that the X column has been assigned .
7. Assign the "Y" column variable, by clicking into a cell that contains the Y coordinate and choose menu item: "Column: Y Location"
![]() Note: You will now see at the top of the column a check mark and the title Y. This lets you know that the Y column has been assigned .
Note: You will now see at the top of the column a check mark and the title Y. This lets you know that the Y column has been assigned .
8. Assign the "Rotation" column variable, by clicking into a cell that contains the part rotation and choose menu item: "Column: Rotation"
![]() Note: You will now see at the top of the column a check mark and the title ROT. This lets you know that the rotation column has been assigned .
Note: You will now see at the top of the column a check mark and the title ROT. This lets you know that the rotation column has been assigned .
9. Assign the "Start Row" column variable, by clicking into a cell that contains the first centroid definition and choose menu item: "Start Row"
![]() Note: You will now see at the left of the row a check mark and the title ST. This lets you know that the start row has been assigned .
Note: You will now see at the left of the row a check mark and the title ST. This lets you know that the start row has been assigned .
10. Assign the "End Row" column variable, by scrolling down & clicking into a cell that contains the last centroid definition and choose menu item: "End Row"
![]() Note: You will now see at the left of the row a check mark and the title END. This lets you know that the start row has been assigned .
Note: You will now see at the left of the row a check mark and the title END. This lets you know that the start row has been assigned .
11. Verify the Import Units (located in the Lower/Left) used for the X,Y Coordinates.
12. Press "OK" to begin importing the centroid file.
13. Once the Centroid loading is complete, a dialog will appear giving you the count & status.
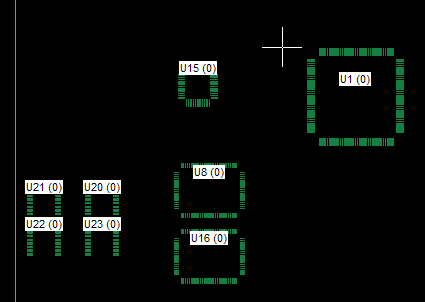
![]() Note: You will now see the external centroid data displayed in the FAB 3000 screen. To control the display of the external centroid files, goto menu: View | External Centroids.
Note: You will now see the external centroid data displayed in the FAB 3000 screen. To control the display of the external centroid files, goto menu: View | External Centroids.
(screen capture with external centroid display)