INSTALLATION
CAUTION:
If the A/C compressor is being replaced, be certain to adjust the refrigerant system oil level
(refer to 24
- HEATING & AIR CONDITIONING/PLUMBING/REFRIGERANT OIL - STANDARD PROCEDURE - REFRIGERANT OIL LEVEL). Failure to properly adjust the refrigerant oil level will prevent the A/C system from operating as
designed and can cause serious A/C compressor damage.
CAUTION:
The A/C receiver/drier must be replaced if an internal failure of the A/C compressor has occurred. Failure to replace the A/C receiver/drier can cause serious damage to
the replacement A/C compressor.
NOTE:
When replacing multiple A/C system components, refer to the Refrigerant Oil Capacities chart to determine how much oil should be removed from the new A/C compressor
(refer to 24 - HEATING & AIR CONDITIONING/PLUMBING/REFRIGERANT OIL - STANDARD PROCEDURE - REFRIGERANT OIL LEVEL).
NOTE:
Replacement of the refrigerant line O-ring seals and gaskets is required anytime a refrigerant line is opened. Failure to replace the rubber O-ring seals and metal gaskets
could result in a refrigerant system leak.
NOTE:
2.8L engine shown in illustrations. 3.8L engine similar.

1.
If the A/C compressor (2) is being replaced, the refrigerant oil in the old compressor must be first drained and measured. Then the oil in the new A/C compressor must be drained. Finally, the
new compressor must be refilled with the same amount of new refrigerant oil that was drained out of the old compressor
(refer to 24 - HEATING
& AIR CONDITIONING/PLUMBING/REFRIGERANT OIL - STANDARD PROCEDURE - REFRIGERANT OIL LEVEL for more information). When replacing multiple A/C system components, refer to the Refrigerant Oil Capacities
chart to determine how much oil should be added to the refrigerant system
(refer to 24 - HEATING & AIR CONDITIONING/PLUMBING/REFRIGERANT
OIL - STANDARD PROCEDURE - REFRIGERANT OIL LEVEL). Use only refrigerant oil of the type recommended for the A/C compressor in the vehicle.
2.
Position the A/C compressor into the engine compartment.
3.
Loosely install the three bolts (1, 3 and 4) that secure the A/C compressor to the engine. Tighten each of the fasteners to 28 Nm (21 ft. lbs.) using the following sequence:
-
The upper bolt at the front of the compressor.
-
The lower bolt at the front of the compressor.
-
The bolt at the rear of the compressor.
4.
On 2.8L equipped models, install the splash shield onto the left front fender
(refer to 23 - BODY/EXTERIOR/SPLASH SHIELD-WHEELHOUSE
- INSTALLATION).
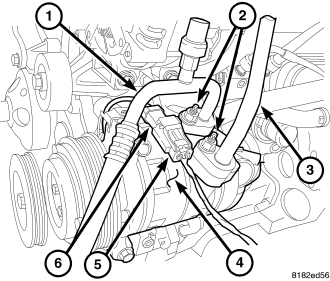
5.
Connect the engine wire harness connector (5) to the field coil connector (6).
6.
Remove the plugs or tape from the opened refrigerant line fittings and compressor ports.
7.
Lubricate new rubber O-ring seals with clean refrigerant oil and install them and new gaskets onto the discharge and suction line fittings. Use only the specified O-rings as they are made of a
special material for the R-134a system. Use only refrigerant oil of the type recommended for the A/C compressor in the vehicle.
8.
Connect the A/C discharge line (1) and A/C suction line (3) to the A/C compressor (4).
9.
Install the nuts (2) that secure the A/C discharge and suction lines to the A/C compressor. Tighten the nuts to 23 Nm (17 ft. lbs.).
10.
On 2.8L equipped models, install the generator
(refer to 8 - ELECTRICAL/CHARGING/GENERATOR - INSTALLATION).
11.
Install the accessory drive belt
(refer to 7 - COOLING/ACCESSORY DRIVE/DRIVE BELTS - INSTALLATION).
12.
On 2.8L equipped models, install the air cleaner housing
(refer to 9 - ENGINE/AIR INTAKE SYSTEM/HOUSING-AIR CLEANER - INSTALLATION).
13.
On 3.8L equipped models, install the coolant recovery container
(refer to 7 - COOLING/ENGINE/COOLANT RECOVERY CONTAINER - INSTALLATION).
14.
Reconnect the negative battery cable.
15.
Evacuate the refrigerant system
(refer to 24 - HEATING & AIR CONDITIONING/PLUMBING - STANDARD PROCEDURE - REFRIGERANT SYSTEM EVACUATE).
16.
Charge the refrigerant system
(refer to 24 - HEATING & AIR CONDITIONING/PLUMBING - STANDARD PROCEDURE - REFRIGERANT SYSTEM CHARGE).