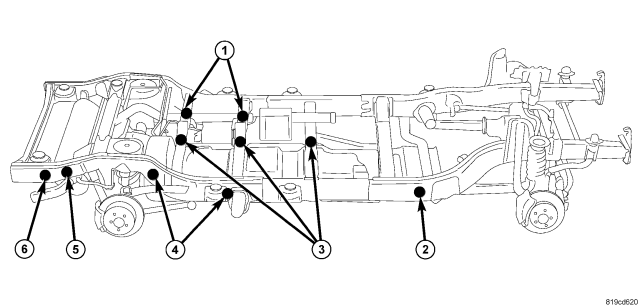
WELD NUT SERVICE


SERVICE LOCATIONS


1 - THREE M10 FUEL VAPOR CANISTER CROSSMEMBER NUTS
– ACCESS HOLES LOCATED ON TOP OF CROSSMEMBERS
2 - TWO M12 TRANSMISSION SKID PLATE CROSSMEMBER NUTS
– ACCESS HOLES LOCATED ON INSIDE OF FRAME RAILS
3 - M12 FUEL TANK CROSSMEMBER NUTS (SWB has 2, LWB has 3)
– ACCESS HOLES LOCATED ON TOP OF CROSSMEMBERS
4 - M12 FUEL TANK FRAME RAIL NUTS
– ACCESS HOLES LOCATED ON OUTSIDE OF FRAME RAIL
5 - TWO M10 REAR STABILIZER NUTS
– ACCESS HOLES LOCATED ON THE OUTSIDE OF FRAME RAILS
6 - FOUR M10 STANDARD REAR BUMPER BRACKET NUTS
– ACCESS THROUGH REAR OF FRAME RAILS
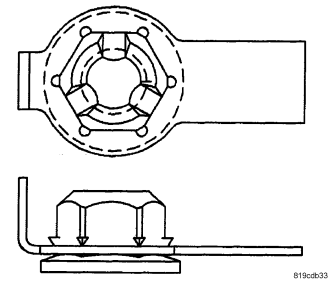

Vapor Canister


TYPE 1 NUT


M10 Locations:
Vapor Canister (1)
M12 Locations:
Fuel Tank Crossmember (3)

NOTE: Refer to (Fig. SERVICE LOCATIONS) for service locations.


1. Using a cut off wheel or equivalent, remove the vapor canister support bolt with the damaged weld nut.
2. Remove the damaged weld nut from the access hole in the top of the crossmember (1).
3. Position a new M10 type 1 nut into the access hole and install the vapor canister bolt, (Refer to 25 - EMISSIONS CONTROL/EVAPORATIVE EMISSIONS/VAPOR CANISTER - INSTALLATION).

Fuel Tank


TYPE 1 NUT


M10 Locations:
Vapor Canister (1)
M12 Locations:
Fuel Tank Crossmember (3)

NOTE: Refer to (Fig. SERVICE LOCATIONS) for service locations.


1. Using a cut off wheel or equivalent, remove the fuel tank support bolt with the damaged weld nut.
2. If necessary remove the damaged weld nut from the access hole in the top of the crossmember (3).
3. If necessary remove the damaged weld nut from the access hole in the frame rail (4).
4. If necessary, position a new M12 type 1 nut into the access hole in the crossmember (3) and install the fuel tank bolt, (Refer to 14 - FUEL SYSTEM/FUEL DELIVERY/FUEL TANK - INSTALLATION).


TYPE 2 NUT


M10 Locations:
Stabilizer bar (5)
M12 Locations:
Fuel Tank Frame Rail (4)
Transmission Skid Plate (2)


5. If necessary, position a new M12 type 2 nut into the access hole in the frame rail (4) and install the fuel tank bolt.

Rear Bumper Bracket


NOTE: Refer to (Fig. SERVICE LOCATIONS) for service locations.


1. Remove the rear bumper, (Refer to 13 - FRAME & BUMPERS/BUMPERS/REAR BUMPER - REMOVAL).
2. Using a cut off wheel or equivalent, remove the rear bumper support bracket bolt (4) with the damaged weld nut.
3. Remove the damaged weld nut from the rear of the frame rail.
4. Install a standard M10 nut into the end of the frame rail using a box end wrench and install the bracket bolt.
5. Tighten the bolt to 55 Nm (40.5 ft. lbs.).
6. Install the rear bumper, (Refer to 13 - FRAME & BUMPERS/BUMPERS/REAR BUMPER - INSTALLATION).

Rear Stabilizer Bar


TYPE 2 NUT


M10 Locations:
Stabilizer bar (5)
M12 Locations:
Fuel Tank Frame Rail (4)
Transmission Skid Plate (2)

NOTE: Refer to (Fig. SERVICE LOCATIONS) for service locations.


1. Using a cut off wheel or equivalent, remove the rear stabilizer bolt with the damaged weld nut.
2. Remove the damaged weld nut from the access hole in the in the frame rail (5).
3. Position a new M10 type 2 nut into access hole in the frame rail and install the stabilizer bar bolt, (Refer to 2 - SUSPENSION/REAR/STABILIZER BAR - INSTALLATION).

Transmission Skid Plate


TYPE 2 NUT


M10 Locations:
Stabilizer bar (5)
M12 Locations:
Fuel Tank Frame Rail (4)
Transmission Skid Plate (2)

NOTE: Refer to (Fig. SERVICE LOCATIONS) for service locations.


1. Using a cut off wheel or equivalent, remove the transmission skid plate bolt with the damaged weld nut.
2. Remove the damaged weld nut from the access hole in the frame rail (2).
3. Position a new M12 type 2 nut into the access hole in the frame rail and install the skid plate bolt, (Refer to 13 - FRAME & BUMPERS/FRAME/TRANSMISSION SKID PLATE - INSTALLATION)