INSTALLATION

NOTE:
If replacing the spare tire pressure sensor, take the time now to write down the tire pressure sensor ID.
NOTE:
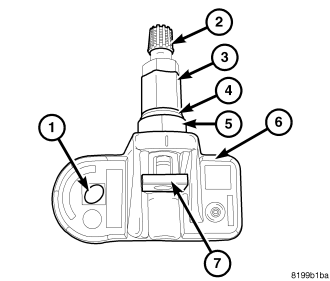
Before reinstalling an existing tire pressure sensor (6), replace valve cap (2), valve core and sensor seal (4) to ensure proper sealing.
NOTE:
The notch/flat should be lined up together and facing towards the wheel during installation.
1.
Wipe area clean around sensor/valve stem mounting hole in wheel. Make sure surface of wheel is not damaged.

2.
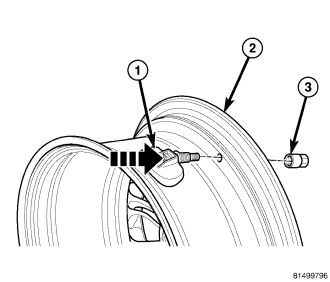
Insert sensor (1) through wheel (2) as shown keeping pressure against rear of metal valve stem (See Arrow). Potted side of sensor is to be positioned toward wheel. Damage to the sensor may occur
if the sensor is installed incorrectly.
NOTE:
A flat on the seal seat is used to key the seat to the sensor housing. The notch/flat should be lined up together and facing towards the wheel during installation.
3.
Install sensor nut (3) and hand tighten.
NOTE:
Before tightening sensor nut, push downward on sensor housing (2) in an attempt to make it flush with interior contour of wheel (1).
4.
While holding sensor in position, tighten sensor nut to 8 Nm (71 in. lbs.).
CAUTION:
Over-tightening the sensor to as much as 10 Nm (88 in. lbs.) may result in sensor separation from the valve stem. Under this condition, the sensor may still function,
however, the condition should be corrected immediately.
5.
Mount tire on wheel following tire changer manufacturer's instructions, paying special attention to the following to avoid damaging tire pressure sensor:
a.

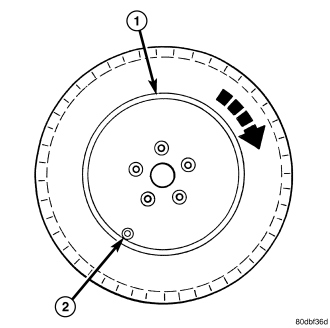
Rotating Wheel Tire Changers- Once the wheel is mounted to the changer, position the sensor valve stem (2) approximately 180 degrees from the head of the changer (located at 1) in
a clockwise direction before rotating the wheel (also in a clockwise direction) to mount the tire. Use this procedure on both the upper and lower tire beads.
b.

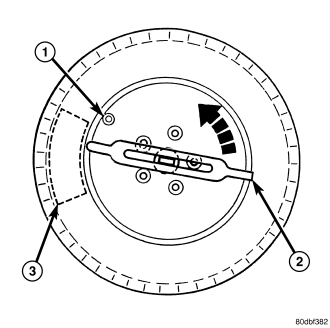
Rotating Tool Tire Changers - Position the wheel on the changer so that the sensor valve stem (1) is located approximately 180 degrees clockwise from the installation end of the mounting/dismounting
tool (2) once the tool is mounted for tire installation. Make sure the sensor is clear of the lower bead breaker area (3) to avoid damaging the sensor when the breaker rises. Rotate the tool (2) in a counterclockwise
direction to mount the tire. Use this procedure on both the upper and lower tire beads.
6.
Adjust air pressure to that listed on Tire Inflation Pressure Label (Placard) provided with vehicle (usually applied to driver's side B-pillar). Make sure original style valve stem
cap is securely installed to keep moisture out of sensor.
7.
Install tire and wheel assembly on vehicle
(Refer to 22 - TIRES/WHEELS/WHEELS - STANDARD PROCEDURE).
8.
Lower vehicle.
9.
If the vehicle has been stationary for more then 20 minutes, drive the vehicle for a minimum of 10 minutes while maintaining a continuous speed above 15 mph (24 km/h). During this time, the system
will learn the new sensor ID.
NOTE:
If a sensor cannot be trained, refer to appropriate diagnostic information.
SPARE TIRE SENSOR REPLACEMENT
NOTE:
When the spare tire sensor is replaced on vehicles equipped with a Tire Pressure Monitoring System (TPMS) and a full-sized matching spare tire and wheel assembly, a diagnostic
scan tool MUST be used to run a routine that will program the new pressure sensor ID into the Wireless Control Module (WCM), commonly referred to as the Sentry Key Remote Entry Module (SKREEM). Please copy
the ID number off of the new pressure sensor before installing it into the spare tire. Then follow the programming steps outlined in the diagnostic scan tool for: “Learn Spare Tire Sensor ID”
under Miscellaneous Functions for the (WCM) Wireless Control Module menu item as appropriate. If a TPM-RKE Analyzer special tool is available, put the new spare tire pressure sensor into “Park”
mode. If a TPM-RKE Analyzer special tool is not available, rotate the spare tire with one of the road tires.


