HOUSING-HVAC
NOTE:
If the A/C evaporator is being replaced, add 50 milliliters (1.7 fluid ounces) of refrigerant oil to the refrigerant system. Use only refrigerant oil of the type recommended
for the A/C compressor in the vehicle.
NOTE:
Make sure that the evaporator drain within the HVAC housing is clean and unrestricted and that the insulator is properly positioned.
NOTE:
LHD model with A/C shown in illustrations. RHD and heater-only models similar.
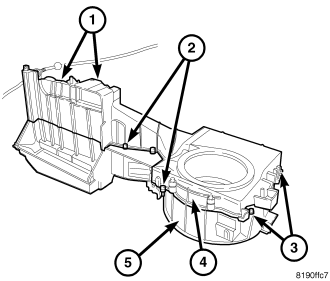
1.
Install the two halves of the HVAC housing (4 and 5) together and engage the eight plastic retaining tabs (4). Make sure the retaining tabs are fully engaged.
2.
Install the ten screws (2) and two metal clips (1) that secure the two halves of the HVAC housing together. Tighten the screws to 1.2 Nm (10 in lbs.). Make sure the metal clips are fully
engaged to the housing halves.
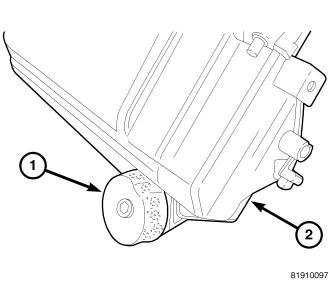
NOTE:
If the foam seal for the condensate drain is deformed or damaged, it must be replaced.
3.
If removed, install the foam seal (1) around the condensate drain located on bottom of the HVAC housing (2).
NOTE:
If the foam insulator for the evaporator is deformed or damaged, it must be replaced.
4.
Install the A/C evaporator (1) into the HVAC housing (3). Make sure that the evaporator drain within the HVAC housing is clean and unrestricted and that the insulator (2) around the A/C evaporator
is properly positioned.
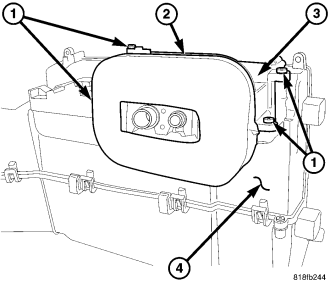
5.
Install the flange (3) onto the top of the HVAC housing (4).
6.
Install the four screws (1) that secure the flange to the HVAC housing. Tighten the screws to 1.2 Nm (10 in lbs.).
NOTE:
If the foam seal for the flange is deformed or damaged, it must be replaced.
7.
Install the foam seal (2) onto the flange.
8.
Install the A/C expansion valve onto the A/C evaporator
(refer to 24 - HEATING & AIR CONDITIONING/PLUMBING/VALVE-A/C EXPANSION
- INSTALLATION).
9.
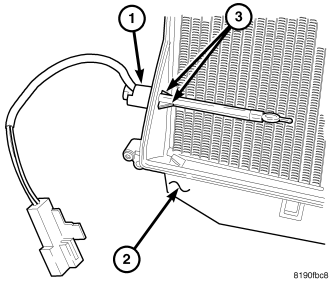
Install the evaporator temperature sensor (1) into the driver side of the HVAC housing (2) . Make sure the retaining tabs (3) are fully engaged to the housing.
10.
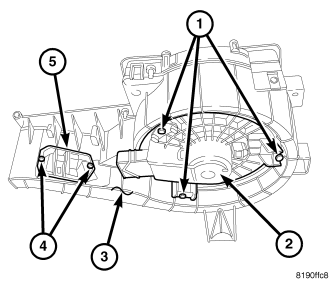
Position the blower motor (2) into the bottom of the HVAC housing (3).
11.
Install the three screws (1) that secure the blower motor to the HVAC housing. Tighten the screws to 1.2 Nm (10 in. lbs.).
12.
Position the blower motor resistor (5) into the HVAC housing.
13.
Install the two screws (4) that secure the blower motor resistor to the HVAC housing. Tighten the screws to 1.2 Nm (10 in. lbs.).
14.
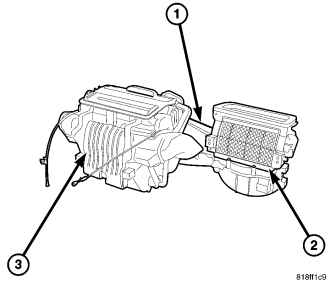
Install the air inlet housing (2) onto the HVAC housing (1)
(refer to 24 - HEATING & AIR CONDITIONING/DISTRIBUTION/HOUSING-HVAC
- HOUSING- AIR INLET - INSTALLATION).
15.
Install the air distribution housing (3) onto the HVAC housing
(refer to 24 - HEATING & AIR CONDITIONING/DISTRIBUTION/HOUSING-HVAC
- HOUSING-AIR DISTRIBUTION - INSTALLATION).
NOTE:
If the heater core is being replaced, flush the cooling system
(refer to 7 - COOLING - STANDARD PROCEDURE - COOLING
SYSTEM CLEANING/REVERSE FLUSHING).
16.
Install the HVAC housing assembly
(refer to 24 - HEATING & AIR CONDITIONING/DISTRIBUTION/HOUSING-HVAC - HOUSING-HVAC ASSEMBLY
- INSTALLATION).