HOUSING-AIR DISTRIBUTION
NOTE:
The air distribution housing must be removed from the HVAC housing and disassembled for service of the blend-air and mode-air doors.
NOTE:
Whenever the control cables are removed from the HVAC housing, new cables must be installed. Failure to replace the control cables when required can result in selected temperatures
and operating modes not properly obtained.
NOTE:
LHD model with A/C shown in illustrations. RHD and heater-only models similar.
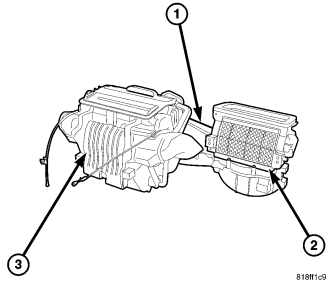
1.
Remove the HVAC housing assembly and place it on a workbench
(refer to 24 - HEATING & AIR CONDITIONING/DISTRIBUTION /HOUSING-HVAC
- HOUSING-HVAC ASSEMBLY - REMOVAL).
2.
Remove the air distribution housing (3) from the HVAC housing (1)
(refer to 24 - HEATING & AIR CONDITIONING/DISTRIBUTION/HOUSING-HVAC
- HOUSING-AIR DISTRIBUTION - REMOVAL).
3.
Remove the heater core from the air distribution housing
(refer to 24 - HEATING & AIR CONDITIONING/PLUMBING/CORE HEATER - REMOVAL).
4.
If equipped with the 2.8L diesel engine, remove the electric positive temperature coefficient (PTC) heater unit from the air distribution housing
(refer
to 24 - HEATING & AIR CONDITIONING/CABIN HEATER/HEATER UNIT - REMOVAL).
5.
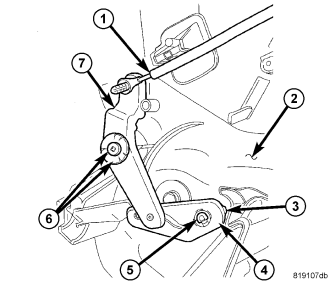
Remove the temperature control cable (1) from the left side of the air distribution housing (2) and discard the cable
(refer to 24
- HEATING & AIR CONDITIONING/CONTROLS/CABLE-TEMPERATURE CONTROL - REMOVAL).
6.
Remove the screw and washer (6) that secures the blend door cable lever (7) to the air distribution housing and remove the cable lever.
NOTE:
To remove the blend door pivot lever, disengage the retaining tab and pull the lever straight off of the blend door pivot shaft.
7.
Remove the blend door pivot lever (4) and washer (3) from the end of the blend door pivot shaft (5).
8.
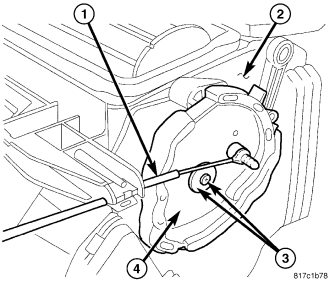
Remove the mode door cable (1) from the right side of the air distribution housing (2) and discard the cable
(refer to
24 - HEATING & AIR CONDITIONING/CONTROLS/CABLE-MODE DOOR - REMOVAL).
9.
Remove the screw and washer (3) that secure the mode door cam (4) to the air distribution housing and remove the cam.
NOTE:
If any foam seal on the air distribution housing outlets is deformed or damaged, the seal must be replaced.
10.
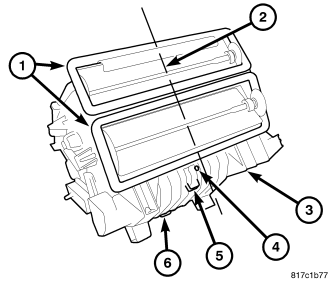
Carefully cut the foam seals (1) along the parting line (2) of the two halves of the air distribution housing (3). If a seal is deformed or damaged, it must be replaced.
11.
Remove the five screws (4) and one metal clip (5) that secure the two halves of the air distribution housing together.
12.
Disengage the three plastic retaining tabs (6) that secure the two halves of the air distribution housing together and carefully separate the housing.
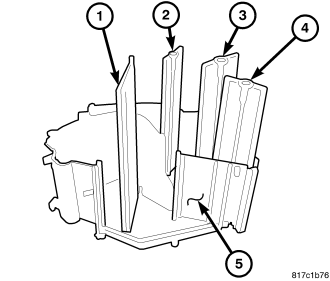
NOTE:
If a seal on an air door is deformed or damaged, the air door must be replaced.
13.
Disengage the air door(s) (1, 2, 3 and 4) from the mode door levers and remove the air doors from the air distribution housing (5).
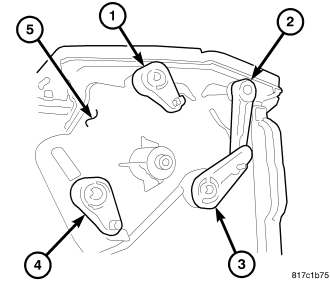
NOTE:
To remove the mode door levers, disengage the lever retaining tabs located on the inside of the air distribution housing and pull the levers straight out of the housing.
14.
Remove the four mode door levers (1, 2, 3 and 4) from the right side of the air distribution housing (5).


