INSTALLATION
NOTE:
Whenever the temperature control cable is removed from the HVAC housing, a new cable must be installed. Failure to replace the temperature control cable when required
can result in selected temperatures not properly obtained.
NOTE:
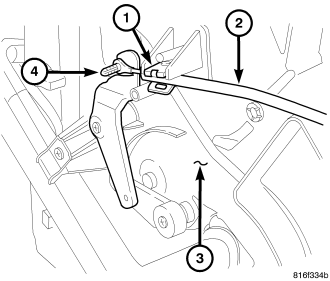
Illustration shown with instrument panel removed for clarity.
NOTE:
LHD model shown. RHD model similar.
1.
Position a new temperature control cable (2) to the left side of the HVAC air distribution housing (3) through the opening in the instrument panel support.
2.
Connect the temperature control cable to the blend door pivot lever (4).
3.
Engage the metal retaining clip (1) to the left side of the air distribution housing. Make sure the retaining clip is fully engaged to the housing.
4.
Connect the temperature door control cable to the A/C-heater control and install the instrument panel center bezel (refer to 23 - BODY/INSTRUMENT PANEL/BEZEL-CENTER - INSTALLATION).
5.
Visually verify that the blend door pivot lever moves from the full hot position to the full cold position and then back to the full hot position using the temperature control knob on the A/C-heater
control. If OK, go to step 10. If not OK, proceed to step 6.
NOTE:
Failure to adjust the temperature control cable can result in full heating or cooling capabilities not properly obtained.
6.
Disengage the temperature control cable from the metal retaining clip located on the left side of the HVAC housing.
7.
Turn the temperature control knob on the A/C-heater control to the full hot position.
8.
Reach behind the instrument panel and move the blend door pivot lever forward until it stops in the full hot position and engage the temperature control cable to the metal retaining clip. Make
sure the lever is in the full hot position and that the cable is fully engaged to the retaining clip.
9.
Verify that the blend door pivot lever moves from the full hot position to the full cold position and then back to the full hot position, as selected with the temperature control knob on the A/C-heater
control. If not, repeat steps 6 thru 9.
10.
On RHD models, install the glove box (refer to 23 - BODY/INSTRUMENT PANEL/GLOVE BOX - INSTALLATION).
11.
Reconnect the negative battery cable.