
Tires that are out-of-round, or wheels that are unbalanced, will cause a low frequency vibration.
Brake drums/rotors that are unbalanced will cause a harsh, low frequency vibration.
Driveline vibration can also result from loose or damaged engine mounts.
Propeller shaft vibration increases as the vehicle speed is increased. A vibration that occurs within a specific speed range is not usually caused by a propeller shaft being unbalanced. Defective universal/CV joints, or an incorrect propeller shaft angle, are usually the cause of such a vibration.
|
Drive Condition |
Possible Cause |
Correction |
|
Propeller Shaft Noise |
1) Undercoating or other foreign material on shaft. |
1) Clean exterior of shaft and wash with solvent. |
|
2) Loose flange bolts. |
2) Install new bolts and tighten to proper torque. |
|
|
3) Loose or bent flange or excessive runout. |
3) Install new flange. |
|
|
4) Incorrect driveline angularity. |
4) Measure and correct driveline angles. |
|
|
5) Worn U-joint/CV bearings. |
5) Install new propeller shaft. |
|
|
6) Propeller shaft damaged or out of balance. |
6) Install new propeller shaft. |
|
|
7) Broken rear spring. |
7) Install new rear spring. |
|
|
8) Excessive runout or unbalanced condition. |
8) Re-index propeller shaft, test, and evaluate. |
|
|
9) Excessive drive pinion gear shaft runout. |
9) Re-index propeller shaft and evaluate. |
|
|
10) Excessive axle flange deflection. |
10) Inspect and replace flange if necessary. |
|
|
12) Excessive transfer case runout. |
12) Inspect and repair as necessary. |
|
|
Universal Joint /CV Noise |
1) Loose clamping bolts. |
1) Install new bolts and tighten to proper torque. |
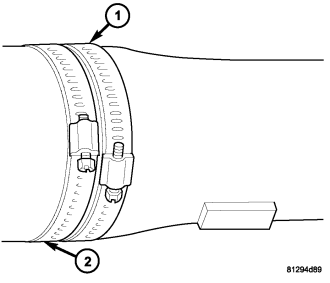
If propeller shaft is suspected of being out of balance, use the following procedure.
NOTE: Indexing propeller shaft 180 degrees relative to the yoke may eliminate some vibrations.
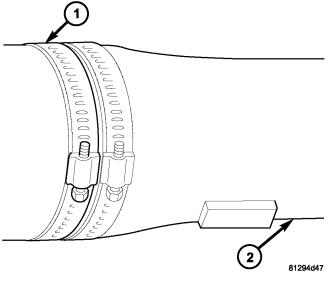
NOTE: If there is no difference in vibration at this positions, the vibration may not be the propeller shaft.
|
Front of Shaft |
0.020 in. (0.50 mm) |
|
Center of Shaft |
0.025 in. (0.63 mm) |
|
Rear of Shaft |
0.020 in. (0.50 mm) |
|
NOTE: Measure front/rear runout approximately 3 inches (76 mm) from the weld seam at each end of the shaft tube for tube lengths over 30 inches. For tube lengths under 30 inches, the maximum allowed runout is 0.020 in. (0.50 mm) for the full length of the tube. |
|