Flight users in your organization must be assigned a product license in order to view content for any Heinemann product. As an administrator, you can view a list of all your organization's Heinemann products and assign (or unassign) licenses to users (and to yourself, if needed).
You have two options for assigning licenses, depending on how you want to search for users:
– To assign (or unassign) licenses by searching for users within a selected school (school administrators, teachers, and students) or within a selected district (district administrators), see the instructions below.
– To assign licenses by searching for users across all schools within your district, see the instructions in the Use Quick Assign to Assign Product Licenses topic.
Note: ● To renew subscriptions for your organization's products, contact Customer Service or your Heinemann Account Executive (AE).
● Teacher licenses can be assigned to teachers, school administrators, and district administrators.
● When an administrator receives a product license, that does not grant the administrator permissions that are reserved for the teacher user role.
|
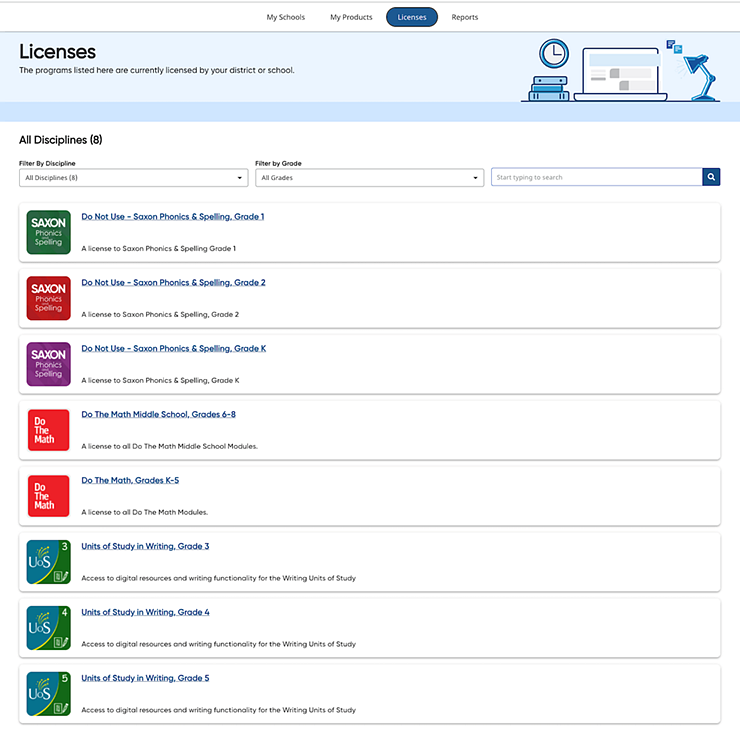
1. In the banner, click the Licenses tab. The Licenses page appears. All the Heinemann products purchased by your organization appear on this page, displayed as individual cards.
2. Locate a specific product using any of the following options:
– Scroll through the alphabetical list of products.
– (If needed) Use the forward and back arrows to navigate from page to page.
– In the Filter by Discipline list, select a discipline. The product list narrows to show only products for the selected discipline.
Note: The number of products available for each discipline is listed on the filter.
– In the Filter by Grade list, select a grade. The product list narrows to show only products for the selected grades.
– In
the search field, type a product name or keyword and click the search
icon  . The product list narrows to all products matching
your search criteria.
. The product list narrows to all products matching
your search criteria.

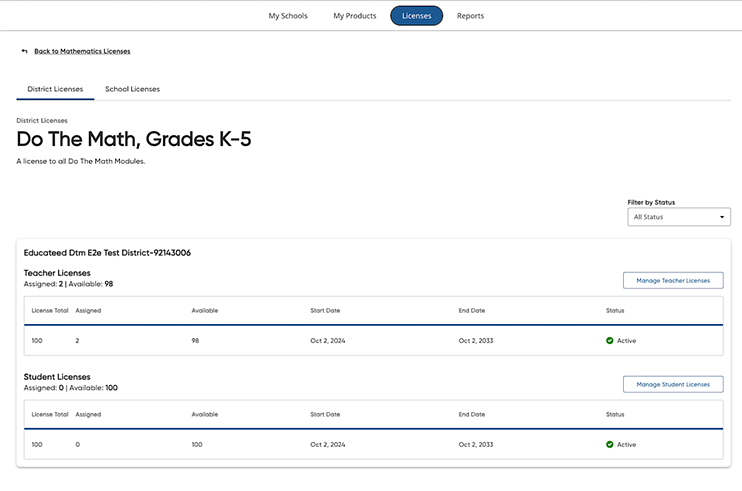
3. Click a title on a product card to view and manage licenses for that product. The District Licenses tab appears.
If you are a district administrator, you can view and assign district or school licenses across your district. If you are a school administrator, you can view and assign school licenses purchased for your school only.
4. If needed, click School Licenses tab. The School Licenses page for the product appears.
The District/School Licenses page displays two tables—Teacher Licenses and Student Licenses; each table shows the total number of teacher/student licenses for the selected product, the breakdown of assigned and available licenses, the end dates for those licenses, and the status of each license.
5. Depending on the user's role of the license you want to manage, do either of the following:
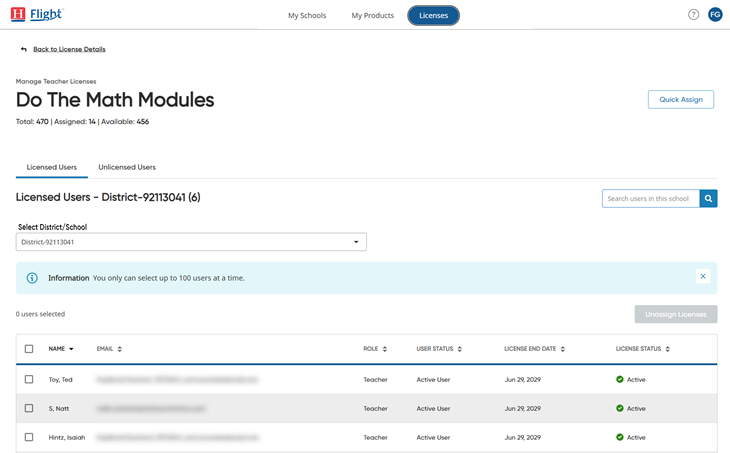
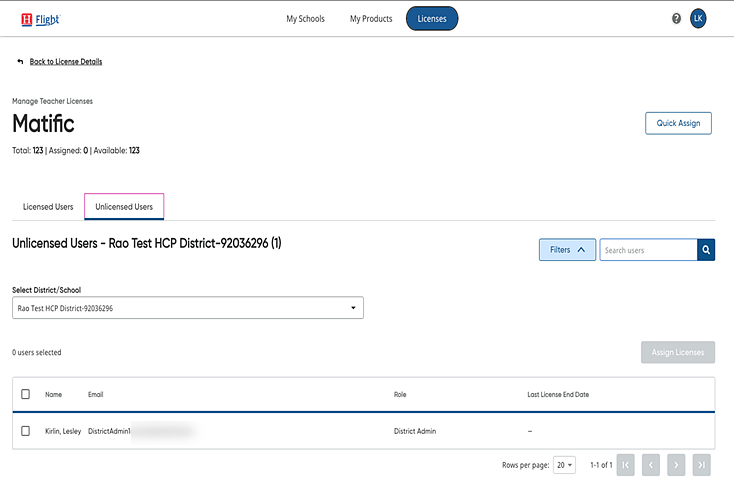
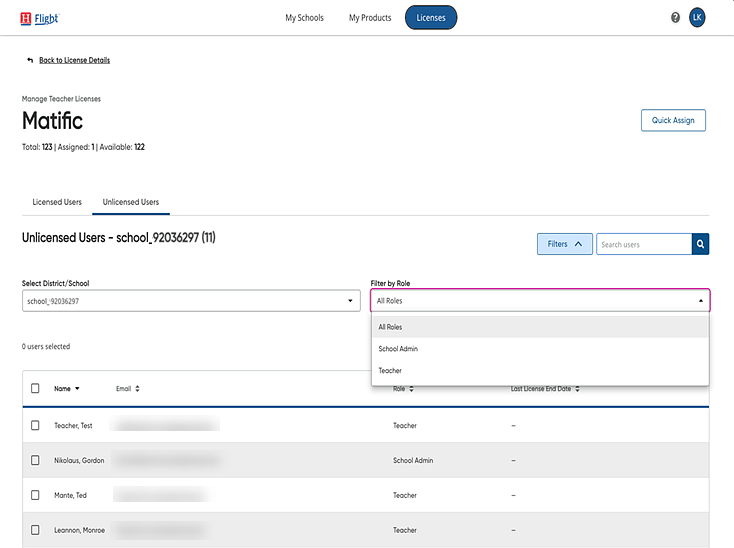
– For teachers and administrators, click the Manage Teacher Licenses button. The Manage Teacher Licenses page appears showing the teachers and school administrators for the first school listed in separate tabs—one for Licensed Users and one for Unlicensed Users.
Note: You
can view up to 100 rows on the Manage Teacher Licenses and Manage Student
Licenses pages. To adjust the number of rows that appears, scroll to the
bottom of the page and select a Rows
per page option.

○ If you are assigning licenses to a district administrator, click the Select District/School list and select the district. The list of user accounts with district administrator roles associated with the selected district appears.
○ If you are assigning licenses to teachers or school administrators, click the Select District/School list and select the school from the list. The list of users changes to display the teachers and school administrators associated with the selected school.
You can further filter the list by clicking the Filter by Role list and selecting a user role (All Roles, School Admin, Teacher) from the list. The list narrows to show the user accounts that match the selected user role.
Note: If you are viewing the Manage Teacher Licenses page and have a district selected, only user accounts with district administrator roles appear on the page, so the Filter by Role list does not appear.
– For student licenses, click the Manage Student Licenses button. The Manage Student Licenses page appears showing the students for the first school listed in separate tabs—one for Licensed Users and one for Unlicensed Users.

Note: You
can view up to 100 rows on the Manage Teacher Licenses and Manage Student
Licenses pages. To adjust the number of rows that appears, scroll to the
bottom of the page and select a Rows
per page option.
○ Click the Select School list and select the school from the list. The list of users changes to display the students associated with the selected school.
You can further filter the list by clicking the Filter by Grade list on the Manage Student Licenses page and then selecting a grade level. The list of students changes to display only students in the selected grade level.
6. Click the Licensed Users or Unlicensed Users tab to view the list of user accounts within each of these license categories.
Note: ● Users who have an expired license or do not have a license assigned for the selected product appear in the Unlicensed Users list.
● Users who have been inactivated through rostering and who have an active program license appear in the Licensed Users list. When this occurs, you will receive a warning at the top of the page alerting you that your organization has inactive users with active licenses.
You can identify the inactive users from the Licensed Users list and remove their licenses; the license will then be returned to the "available" list.
|
7. If necessary, filter or sort the list using any of the following methods:
– In
the search field, enter all or part of the user name and click the search
icon  . The list narrows to the user accounts that
matches your entered criteria.
. The list narrows to the user accounts that
matches your entered criteria.
– Click a column title to sort the list by that column.
8. Depending on the action you wish to take, do either of the following:
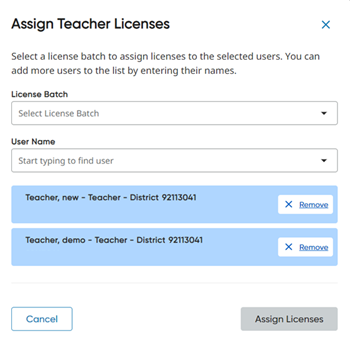
– In the Unlicensed Users list, select the check box for the user account(s) to be assigned licenses and then click the Assign Licenses button.
– In the Licensed Users list, select the check box for the user account(s) to be unassigned licenses and then click the Unassign Licenses button.

An Assign Teacher/Student Licenses or Unassign Teacher/Student Licenses dialog box appears.
 |
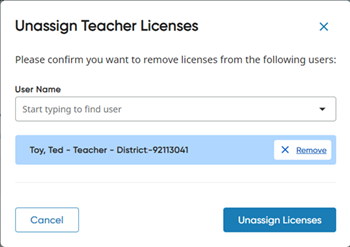 |
Note: You can select up to 100 users at a time, and you can only assign as many licenses as are available.
9. Click the Assign Licenses or Unassign Licenses button to verify action for the listed user(s). The selected users now have access to (or no longer have access to) the selected product.
