
You can access the student settings for Placement Settings, Multilingual Learner Options, Accessibility Supports, Writing Options, Assessments and Quizzes, and Segment Manager as detailed below.
1. From the Home page, click View Class on the class card.
2. On the left panel of the Class Overview page, click Students.
3. In
the row of the selected student, click the vertical ellipsis  button in the Actions
column.
button in the Actions
column.

4. From the list, select Edit Student Settings.

The Student Settings page opens.
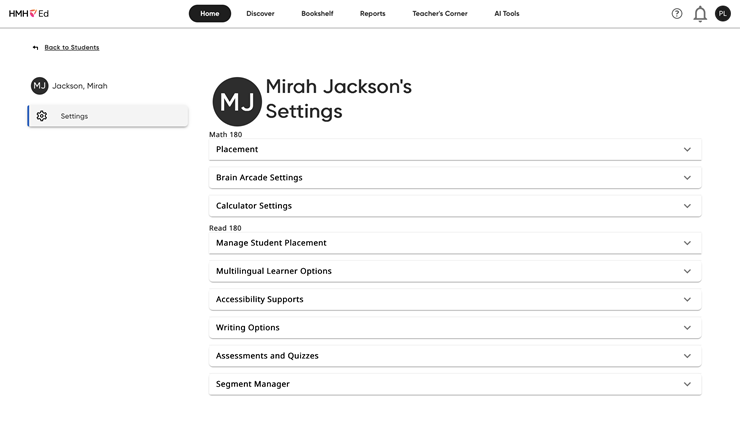
See below for instructions on Placement Settings, Multilingual Learner Options, Accessibility Supports, Writing Options, Assessments and Quizzes, and Segment Manager.
1. Click the Manage Student Placement tab.

From the Placement page, teachers can do any of the following:
– Turn automatic initial placement on or off using the linked settings.
– Review and adjust student’s placement recommendations.
– View the Placement Chart to better understand placement recommendations.
2. To turn off automatic placement for Read 180, do the following:
a. Click the To turn off automatic initial placement, click here link the introductory paragraph.

The Automatic Initial Placement dialog box appears.

b. Select the No option to turn off automatic placement (or to retain the default, select Yes).
c. Click Save to save the settings or Cancel to close the dialog box without saving the changes.
3. In the Placement method list, edit students’ placements in Read 180 by selecting MAP Growth Assessment by NWEA or HMH Growth Measure to place using either of these data or select Manual Placement.

Note: Selections in this list are limited to the district’s purchases. (Districts that have not purchased HMH Growth Measure do not see that on the list of options.)
– If you selected MAP Growth Assessment by NWEA from the Placement method list, the table expands to include columns for RIT Score, the date the assessment was taken, and the New Placement column, which features a list that allows you to select the student’s new placement.

To save these new settings, click Save Placement. To discard the new placement, click Cancel and then in the Discard New Placement dialog box, click Continue Without Saving to return to the Placement home page or click Close to stay on the current page.

– If you selected HMH Growth Measure (if it is available to the district) from the Placement method list, the table expands to include Lexile Score, the date, and the New Placement column.

To save these new settings, click Save Placement. To discard the new placement, click Cancel and then in the Discard New Placement dialog box, click Continue Without Saving to return to the Placement home page or click Close to stay on the current page.
– If you selected Manual Placement from the Placement method list, the table populates with a New Placement column. You can select the student’s new placement from the list in that column.

To save these manual placement settings, click Save Placement. To close the manual placement page without saving manual placements, click Cancel .
Clicking the Multilingual Learner Options bar opens these settings.

Click the option button to select language supports for the class.
Click the Accessibility Supports tab to open these settings.

– Accuracy Only Scoring removes the time element from Read 180 activities for the class.
– Enable Larger Text allows for text in reading passages to appear larger if students require this.
– Enable Captioning allows students to select closed captioning for audio and video.
– Enable Button Rollover allows students to scroll over a button and see its function.
– Require Student Recording allows teachers to choose to require students to record their activities to complete segments and topics.
– Enable Instruction Autoplay allows the student to turn on this function.
Click the Writing Options bar to open these settings.

– Click the buttons to turn the Writing Zone on or off. Turning it off means the class will not see the Writing Zone in their segments.
– Click the Assign Writing Zone buttons to choose whether the class sees the Writing Zone on every segment or every other segment.
– Click the Rubric buttons to choose which rubric to use.
Click the Assessments and Quizzes bar to open these settings.

You can set how many attempts students have at
Reading ![]() quizzes, minimum passing scores for each type of quiz, and whether students
see the Mindset Scan
quizzes, minimum passing scores for each type of quiz, and whether students
see the Mindset Scan ![]() at first
login.
at first
login.
The Segment Manager allows teachers to customize which segments students will see as they are working in the Student App. The default setting has all segments visible; teachers can click the check box to remove segments from a students’ view.
Click the Segment Manager bar to open these settings.

Select which segments will be visible to the class by selecting the stage from the list, and then clicking the check box next to the segment.