1. On the Home page, click the Manage Roster button. The Roster page appears.
2. Locate the class to which you want to create groups and open the class by clicking the class name link in the CLASSES column. The Students page appears, showing class information and the list of students currently enrolled in the class.

3. On the left panel, click Groups. The Group Sets page appears.
– If you have no saved groups, the following page appears.

– If you have previously created and saved groups, they appear on the page as group cards.

4. Click Create a Group Set. The Create a Group Set page appears. A list of the students for the selected class appears on the left side of the page. By default, three empty group cards appear.

5. Refer to the following table for details about naming and managing groups.
Action |
Steps |
Describe the groups |
➔ In the Description of Groups field, type a name or description to identify the groups. Note: If you have multiple groupings for the same class, the Group Description allows you to quickly differentiate between them. |
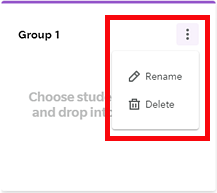
Rename groups |
➔ Click
the or ➔ Click
the |
Add more groups |
➔ Click the Add Group button. A new group card appears. |
Delete groups |
➔ Click
the |
6. Group the students as follows:
– Add
students to groups by ![]() selecting
one or more student name(s) from the Students
list and dragging the name(s) to the desired group card.
selecting
one or more student name(s) from the Students
list and dragging the name(s) to the desired group card.
– Move
a student or students from one group to another by ![]() clicking
the student name(s) and then dragging the selected name(s) to the desired
group.
clicking
the student name(s) and then dragging the selected name(s) to the desired
group.
– Remove
students from groups by ![]() clicking
the student name(s) and then dragging the name(s) to the left Students
panel.
clicking
the student name(s) and then dragging the name(s) to the left Students
panel.

7. Click Save & Done to save the groups. Newly created saved groups display on the Groups page along with all the previously saved groups for the selected class.

Note: Each group card displays the number of saved groups, the number of students in groups, and the date the groups were created, and the data, if any used to create the group. This last section, Created Using, identifies the assessment (if any) that was used to sort the students for this group. If this section states "No data," then the group was created by sorting students manually. |
When you create assignments, your groups are available in the Create Assignment dialog box. You can assign content to an entire collection of groups or individual groups by selecting the group(s) in the View By area.

See Also: