
As an administrator, you can view and assign Coachly program licenses to teachers and administrators in your districts and schools by school (detailed in this topic)or by searching users across all schools within your district, which is detailed in the Use Quick Assign to Assign Coachly Licenses topic.
Note: ● To renew subscriptions for your organization's products, contact Customer Service or your HMH Account Executive (AE).
● Teacher licenses can be assigned to teachers, school administrators, and district administrators.
● District administrators can assign licenses to themselves, as well as teachers, school administrators, and district administrators within their district.
● School administrators can assign licenses to themselves, as well as teachers and school administrators within their school. |
1. In the banner, click the Licenses tab. The Licenses page appears. All the HMH products and Coachly programs purchased by your organization appear on this page displayed as individual cards.
2. Locate a specific Coachly program card using any of the following options:
– Scroll through the alphabetical list.
– Use the forward and back arrows to navigate from page to page.
– In the Filter by Discipline list, select a discipline. The product list narrows to show only products for the selected discipline.
Note: The number of products available for each discipline is listed on the filter.
– In the Filter by Grade list, select a grade. The product list narrows to show only products for the selected grades.
– In
the search field, type a product name or keyword and click the search
icon  . The product list narrows to all products matching
your search criteria.
. The product list narrows to all products matching
your search criteria.
3. Click a title on a Coachly program card to view and manage teacher licenses. The Manage Access tab for the Coachly program appears showing the list of users in your district and each user's access status to the selected Coachly program.
If you are a district administrator, you can view and assign district or school licenses across your district. If you are a school administrator, you can only view and assign school licenses purchased for your school.
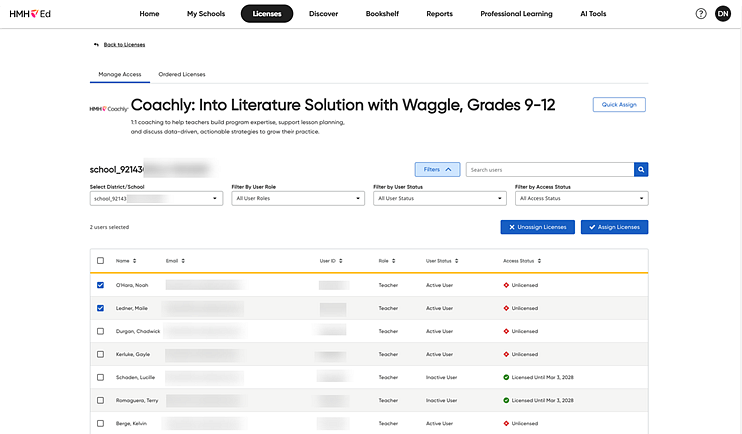
4. Locate users or filter the list in any of the following options:
– Scroll through the alphabetical list of users.
– (If needed) Use the forward and back arrows to navigate from page to page.
Note: You
can view up to 100 rows on this page. To adjust the number of rows that
appears, scroll to the bottom of the page and select a Rows
per page option.

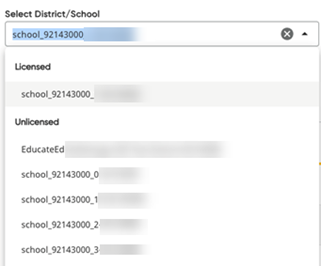
– In the Select District/School list, select a district or school.
Note: ● The District/School list is divided into two sections—Licensed and Unlicensed.
● If no users are licensed in a district or school, that district/school appears in the Unlicensed area.
● If at least one user is licensed in a district or school, that district/school appears in the Licensed area.
● The district appears at the top of either the Licensed or Unlicensed section. If you select the district in the District/School list, you will see all the district administrators of your district. ● The schools appear below the district in the list. If you select a school, you will see all the teachers and school administrators in that school. |
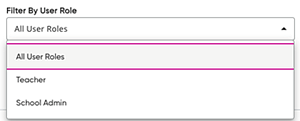
– In the Filter by User Role list, select the user role you want to see.
Note: When the district is selected in the Select District/School list, you can filter by district administrators; when you select a school in the Select District/School list, you can filter by teacher or school administrator.
– In the Filter by User Status list, select the user status you want to see.
– In the Filter by Access Status list, select the access status you want to see. The list narrows to show only users for the selected access status.

5. Assign (or unassign) licenses by doing the following:
a. Select the check box for the user(s) to get licenses or remove licenses and click the Assign Licenses (or Unassign Licenses) button. An Assign Teacher Licenses or Unassign Teacher Licenses dialog box appears.


 |


|
Note: You can select up to 100 users at a time, and you can only assign as many licenses as are available.
b. Click the Assign Licenses or Unassign Licenses button to verify the action for the listed user(s). A confirmation success message appears on the page, and the selected users now have access to (or no longer have access to) the selected Coachly program.
6. To view the district and school-level license status of the selected Coachly program, do the following:
a. Click the Ordered Licenses tab.
The Ordered Licenses tab displays a table showing each district/school's licenses for the selected Coachly program. The table breaks down the Teacher licenses for each district or school by license total, start date, end date, and status.
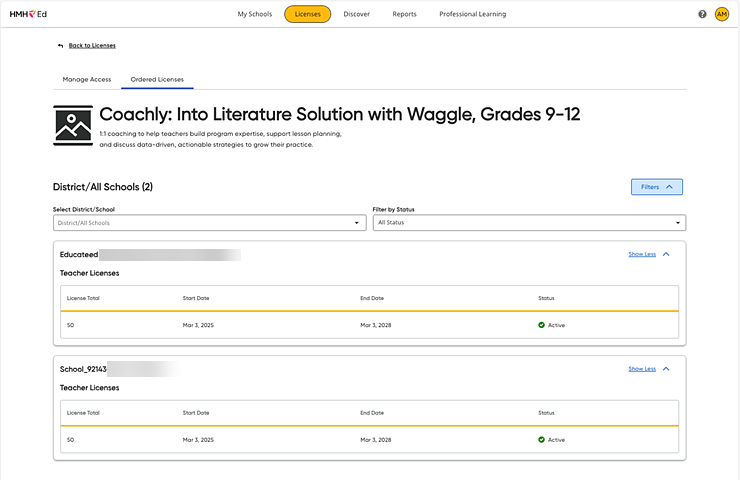
b. Use any of the options to filter or view the license information on this tab:
○ Use the Show More or Show Less arrows to view or hide the content for a district or school.
○ In the Select District/School list, select a district or school. The list narrows to show only licenses for the selected district/school.
○ In the Filter by Status list, select a status. The list narrows to show only licenses with the selected status.