
The My Milestones feature helps you monitor events, deadlines, and testing windows throughout the school year by providing a centralized space to track and manage key dates, powering a personalized countdown widget to keep you organized and proactive.
1. In the HMH Ed™ banner, click the Home tab and then in the My Milestones card, click the Start button.
The My Milestones page appears.
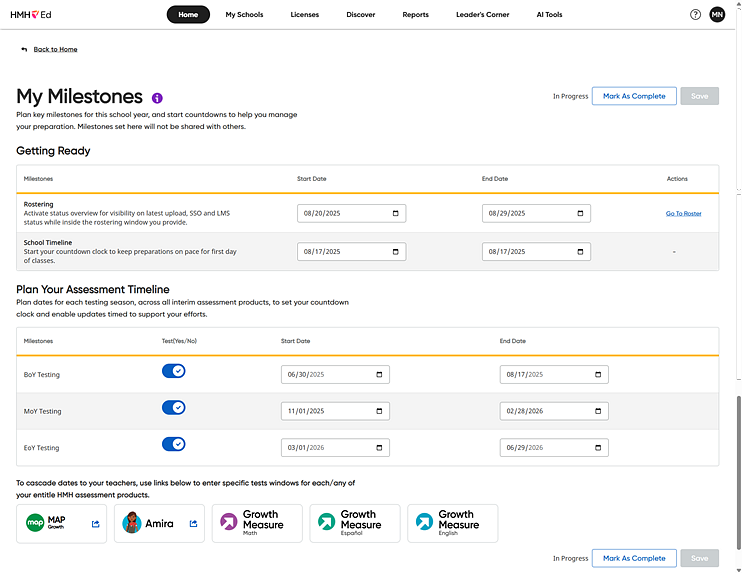
2. In the Getting Ready section, do the following:
– For Rostering, use the Start Date and End Date fields to specify dates for rostering.
– If you have rights to roster, use the Go To Roster link to open the rostering tools. (See Import a Roster for further details.)
– For School Timeline, use the Start Date and End Date fields to specify the dates to set up for your school year.
3. In the Plan Your Assessment Timeline section, do the following:
– Note that the rows for testing are abbreviated as follows: BoY = Beginning of Year, MoY = Middle of Year, EoY = End of Year
– For each of the rows, set the Yes/No option button to specify if the test will be administered.
– Use the Start Date and End Date fields to specify dates for testing.
Note: These timeline settings are for your own planning purposes. To set the testing windows for your organization, use the links at the bottom of the page.
4. When you have set your milestone selections, do any of the following:
– Click the Save button to apply the changes and update the status to "In Progress.” The Countdown Clock on your Home page displays the timelines that you have set.
– Click the Mark as Complete button to apply the changes and update the status to “Completed”. The Countdown Clock on your Home page displays the timelines that you have set.
– Once an item is completed, click the Edit Milestone button (if necessary) to update your dates.
Note: You can reopen an information card by clicking Resume or (if marked as complete) View.
5. To open and configure the program settings for any HMH assessment programs for which you are entitled, scroll to the bottom of the page and click a program link.

Each link opens the program settings page for that program. For further details about program settings, see the following:
– For
MAP Growth Testing, see MAP
Help Center: Choose Dates for Testing ![]() .
.
– For HMH Growth Measure Testing, see Set Growth Measure Testing Schedules.
– For
Amira, see Amira Help: How do I plan for my annual
testing schedule? ![]()