Push Install Windows and Mac Agents
Rather than install the Windows or Mac Agent onto each device manually (or via Group Policy for Windows), we have included the option to Push Install the Monitoring Agent to the target device selection directly from the Dashboard. Dashboard 6.12.6 and later for Windows, from Dashboard 6.20 for Mac computers running 10.9 (Mavericks) or later.
Push Install is available through Network Discovery, utilizing technology included in the Windows Discovery Agent (originally included from Windows Monitoring Agent 9.9.0 RC). Windows installations are supported from Discovery Agent version 15, version 22 and later support Mac deployments. Discovery Agents update independently of the Windows Monitoring Agent to ensure they are always the latest version.
Once the Push Install selection is made, the Discovery Agent downloads the installation package, begins the deployment process to the selected devices on the network and applies the Monitoring Template policy (where configured).
Push Install deploys the latest General Availability version of the Monitoring Agent.
Target Device Requirements
|
General |
|
|---|---|
|
Online |
Push Install does not incorporate a queuing or scheduling mechanism, as such the selected devices must be online when the Push Install is attempted. |
|
Windows |
|
|
Domain or Admin Shares remotely accessible |
Push Install only deploys on devices that are part of a Domain or have Admin Shares remotely accessible. |
|
File and Printer Sharing: |
Target device's local firewall should be configured to allow File and Printer Sharing. |
|
Mac |
|
|
Remote Login |
Configured either through the Terminal or System Preferences Sharing, this setting enables standard SSH login for remote terminal access. |
Discovery Agent Version Identification
Display the Network's Current Discoverer
- Log into the Dashboard
- Access the Networks tab
- Choose the target online network in the north pane
- Go to the south pane Summary tab
- The network's Current Discovery Agent (current discoverer device) appears under Network Details
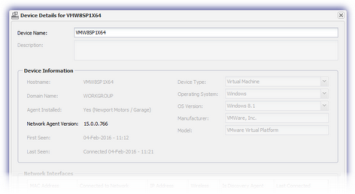
Check the Current Discovery Agent Version
- Navigate to the Connected Devices tab
- Search for the Current Discovery Agent (current discoverer device)
- Right-click on the device and select Edit Device (also available from the Device drop-down)
- The Network Agent Version (Discovery Agent Version) appears under Device Information in the Device Details dialog
| Push Install to | Minimum Discovery Agent |
|---|---|
| Windows | 15 |
| Mac | 22 |
Push Install
- Log into the Dashboard
- Access the Networks tab
- Choose the target network in the north pane
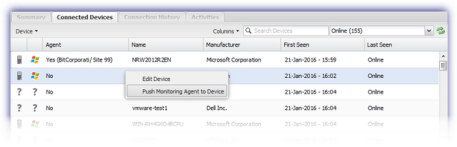
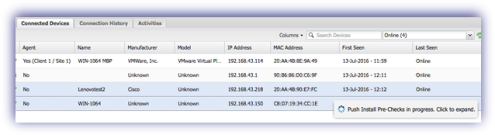
- Go to the Connected Devices tab
- Make the device selection. For easy identification, the Agent column denotes whether a Monitoring Agent is installed, along with the Client and Site it is registered under
- Right-click on the target device in the south pane
- Select Push Monitoring Agent to Device
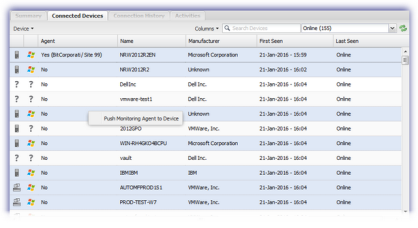
- Select the target device(s) in the south pane. Use Shift and left-click to choose a range of devices or Control and left-click for specific machines
- Right-click on one of the selection
- Select Push Monitoring Agent to Device
Single Device
This option is only available for Devices running supported versions of Windows or Mac without a Monitoring Agent. Where these conditions are not met, only Edit Device is selectable.
Multiple Devices
When using multi-select, the option to Push Monitoring Agent to Device is selectable. However, the Monitoring Agent is only pushed to eligible devices running supported versions of Windows or Mac without a Monitoring Agent.
Single Device
Multiple Devices
Configure Push Install Settings
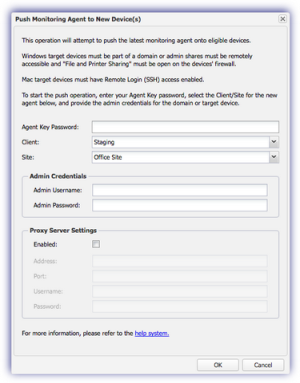
Regardless of the selection method used, the next stage is to enter the credentials and information required to push the Agent to the device(s). Please note that where different devices have different credentials or are to be registered under different Clients or Sites they must be pushed separately.
|
Field |
Note |
|---|---|
|
Agent Key Password |
The deployment package installs using the Agent Key username and password. Enter the Agent Key Password to validate this installation. |
|
Client |
The Client the Device will appear under on the Dashboard |
|
Site |
The Site the Device will appear under on the Dashboard |
|
Admin Credentials |
|
|
Admin Username |
Windows Administrative username for the domain or device |
|
Admin Password |
Windows Administrative password for the domain or device For security all password are transmitted in an encrypted state via SSL protected protocols. |
|
MacPush commands require the login credential of a user with administrative privileges capable of executing sudo commands via terminal |
|
|
Proxy Server Settings |
|
|
Enabled |
Enable where the device connects to the internet through a proxy |
|
Address |
Enter the IP address, not the NetBIOS name |
|
Port |
Enter the port the connection is going through. |
|
Username |
The username the proxy requires for authentication. Please ensure the selected user has sufficient privileges to use the proxy. The Username should be in the format DOMAIN\username |
|
Password |
The password the proxy requires for authentication. |
Run Preliminary Checks - from Network Discovery Agent version 26
After entering these details, and before attempting the installation, we run preliminary checks on the selection to ensure they meet the eligibility criteria and are setup correctly for Push Install.
Whilst running, a real-time progress bar is displayed providing information on the number of devices checked as well as the current Pass / Fail / Unknown totals.
To allow you to continue working. minimize the progress bar. The minimized progress indicator then appears in the lower right corner of the Networks tab's south panel, click on this indicator to display the full progress bar at any time.
The preliminary checks continue to run on the selection even if you log out of the Dashboard or refresh you window.

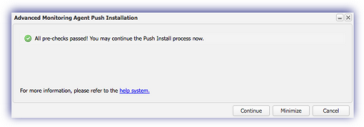
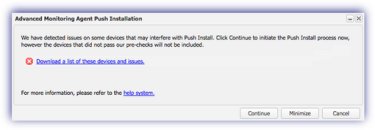
After completion, a summary of the results indicates whether the pre-checks passed or failed (issues were discovered that may prevent a successful Push Install).
Where the pre-checks failed, you can opt to download a list of devices and their corresponding issues to investigate the cause of the failure. After resolving these issues, you can then rerun Push Install on those devices.
Choose Continue to proceed with the installation on those devices where the preliminary checks passed.
If all devices failed these checks the Continue option is unavailable.
Windows - Admin Share Troubleshooting Steps
Verify the device’s Admin Share is accessible from the Discovery Agent by connecting to the \\TARGET_COMPUTER_NAME\admin$ share on the target system.
Where problems are experienced when connecting to the share verify that:
- File and Printer Sharing is allowed through the local firewall
- Simple file sharing is disabled (Tools > Folder Options > View - remove check from the Use Sharing Wizard box and OK to apply)
- Admin shares are present and are remotely accessible (Start > compmgmt.msc > Shared Folders > Shares look for ADMIN$). Causes of the Access Denied messages when attempting to connect to an Admin Share on a workgroup computer are covered in the section Admin Share - Access Denied.
- The entered account has the necessary administrative credentials to remotely access the selected computers
- The RPC service is running on the target system (Start > services.msc look for Remote Procedure Call (RPC) Service and start if necessary)
Mac - Enable Remote Login
Remote Login for Mac may be enabled in one of two ways:
Terminal Commands
Open a Terminal session on the target Mac device (available in the Utilities folder Shift+Command+U)) then as an administrator enter the following commands to enable and configure Remote Login:
Enable Remote Login:
systemsetup -setremotelogin on
Create the com.apple.access ssh group:
dseditgroup -o create -q com.apple.access_ssh
Add the administrator group to com.apple.access_ssh
dseditgroup -o edit -a admin -t group com.apple.access_ssh
Sharing Preferences
- On the target Mac computer:
- Open Sharing preferences (Apple menu, System Preferences)
- Tick the checkbox against Remote Login to enable
- Choose Allow access for settings; for security we would suggest using the Only these users to limit remote access; for example to Administrator users
Deployment
Once complete the Discover Agent retrieves the installation package, begins the deployment process and applies the Monitoring Template policy (where configured).
It may take several minutes for the installation to complete and for the Connected Devices tab and Activities tab to indicate an Agent was successfully installed.
Where the install was successful, the device appears in the Servers or Workstations section of the Dashboard (depending on the device type) under the selected Client and Site.
Please be aware that the Windows Monitoring Agent installs in the default mode for the device type (Server Mode on servers, Workstation Mode on workstations). The option to install the Agent in Server Mode is only available when manually installing the Agent.
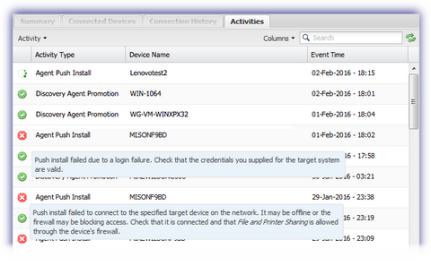
Activities Tab
The current status of the install is displayed against the device in the Activities south pane.
Please be aware that the Activities tab does not automatically refresh, simply click the reload button beside to refresh the south panel.
Three indicators for the current installation status are returned.
|
Icon |
Note |
|---|---|
|
Timer |
Active installation |
|
Green Tick |
Successful installation |
|
Red Cross |
Installation failed. Hover over the Agent Push Install error for details of potential causes of the failure, for example login or firewall issues |