Archive Service
Retaining an archive backup may not simply be best practice, so there is a snapshot of your customers data available from outside of the retention period you can restore from, but it can be an industry or regulatory requirement.
In addition to specifying archives for the Files and folder backups in the Backup & Recovery Policy dialog, you can configured archiving for all data sources in the devices Backup Manager.
Open the Backup Manager, either on the device itself or from the Dashboard:
Device
- Log on to the device
- Click the Backup Manger icon on the desktop (where available)
or
- Go to Start > All Programs > Backup & Recovery Backup Manager
Dashboard
- Right-click on the target device in the north panel of the Dashboard (or from the Server, Workstation or Mixed drop-down)
- Choose Backup & Recovery
- Click Open Backup Manager
Manage Archiving
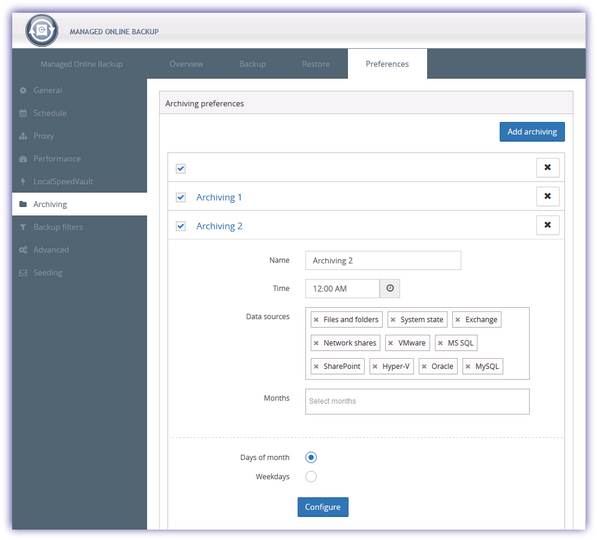
- Navigate to Preferences in the Backup Manager
- Go to Archiving
- Click Add Archiving (where enabling archiving)
- Enter or edit the archiving information
- Click Save to apply
- Untick the Archive box to disable
- Click the X button against the archive to delete its schedule
| Name | Enter an archive name for identification. |
| Time |
Select the archive time from the drop-down. The next successful backup that runs for the data source after the selected time is marked as the Archive Batch Backup. As such we suggest ensuring the entered Day of the Month and Time is set to run before the desired archive backup. For example if the backup runs at 02:00 configure the archive Time to run: for 01:45. |
| Data sources | This dialog displays all Data Sources, click the x against to deselect any Data Sources from this archiving set. |
| Months | Click in the Select Months box and choose the required month from the drop-down. Repeat this process to add additional months. |
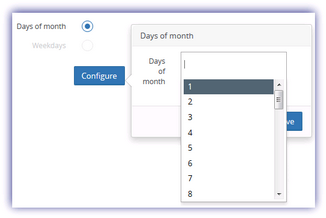
| Days of month^ |
Tick Days of the month and choose Configure. Click in the Days of the month box to display a list of days and select the required day, repeating this process to add additional days. Once complete click Save to apply. When choosing the Day of the Month we would suggest taking into consideration months where the date does not exist as the archive will not run on these date, for example the 30 th February, 31st April etc.
|
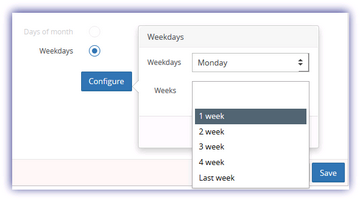
| Weekdays^ |
Tick Weekdays, choose Configure select the day from the Weekdays drop-down. Click in the Select weeks box to display a list of weeks for selection and select the required week, repeating this process to add additional weeks Once complete click Save to apply.
|
|
^ Important: Please ensure that either the Days of month or Weekdays are configured. Although the selection will be accepted if these are not set, the archive will never run. |
|
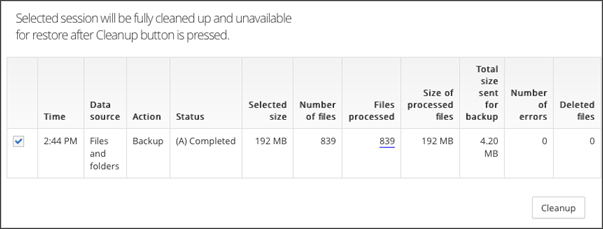
Cleaning up unneeded archiving sessions
If you no longer want to store an archived session, you can remove it from storage in the Backup Manager. Launch the Backup Manager from the Dashboard or directly on the remote computer.
- Launch the Backup Manager from the Dashboard or directly on the remote computer.
- Go to Preferences > Archiving.
- Click Cleanupto view the list of all archived sessions that have passed their retention periods.
- Select the sessions to clean up.
- Click the Cleanup button at the bottom.
- Confirm your intention to clean up the selected sessions.
This action removes the archived (A) mark from the session. The session is then cleared from storage and is no longer available for recovery.
From Windows Monitoring Agent 10.9.7 we automatically remove archive backup records in the Dashboard when deleted in Backup Manager.
Archiving is not available for workstations or laptops using Backup & Recovery Documents.