Configure Take Control Policies
Take Control policies were introduced in Dashboard 6.29 and consolidate the options that were previously configured at the Client, Site or Device level in the Settings dialog into easily deployed and managed policies. These policies are not only designed to control the end user's interaction with Take Control, but also contain connection performance and security settings; from user authorization for incoming sessions to the ability to open a connection to a locked device.
We realize that you may have already setup Take Control to precisely match each Client's connection requirements and to make the migration to this new policy system as easy as possible, we have analyzed all of your pre-Dashboard 6.29 Settings and created corresponding policies to precisely match their configuration (down to the System Tray password) with these automatically mapped to any entities where this configuration applied.
Please be aware that multiple entities may use exactly the same configuration (System Tray Password Settings and Connection Settings) and rather than create multiple identical policies - which may prove time-consuming to manage - we will only create one policy containing these settings. However, if any element is different, for example the password, then a unique policy is created and applied.
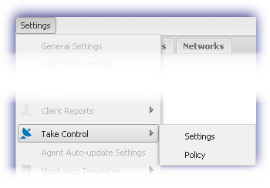
In addition to the default and system generated migration policies, we have included the facility to create and manage your own custom Take Control Policies from the Dashboard via Settings, Take Control and Policy. For example, we use a numeric naming convention for the system generated migration policies (Policy 1, Policy 2 etc) and the Take Control Policies dialog may be used to change the Policy Name to something more meaningful.
New Policy
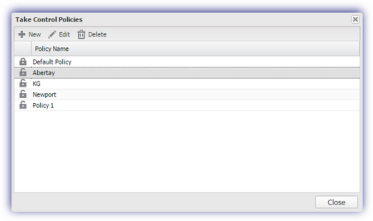
To create a policy, click New, enter the Policy Name to identify the policy on the Dashboard and choose the existing policy to Base policy on. Click Add then configure the settings as required.
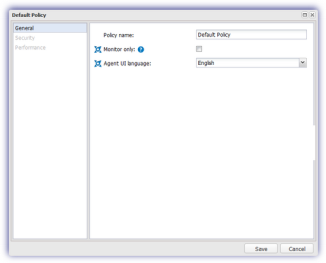
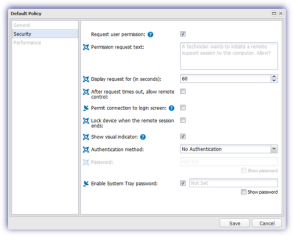
The policy is divided into three sections: General, Security and Performance.
General |
|||
|---|---|---|---|
|
Policy Name |
Name used to identify the policy on the Dashboard. |
||
|
Monitor Only |
|
Runs the connection in display-only mode. In this mode the technician can only view the remote device’s screen, the input controls are disabled so the technician cannot perform any actions. |
|
|
Agent UI Language |
|
Specifies the language of the Take Control host on the remote machine. |
|
|
|
|||
Security |
|||
|
Request User Permission |
Requires the end user to authorize the Take Control connection to their device. |
||
|
Permission Request text |
|
Text displayed to the end user when requesting permission to establish a connection to their device. |
|
|
Display request for (in seconds) |
|
Length of time the permission request is displayed to the end use, from 1 to 1800 seconds. |
|
|
After request times out, allow remote control |
|
Permits connection to the device when no response is received to the permission request within the specified time limit. If unselected and authorization is not received, the remote connection is not permitted. |
|
|
Permit connection to login screen |
|
Allows a Take Control connection to the login screen of a locked device. |
|
|
Lock device when the remote session ends |
|
Automatically locks the remote device when the session ends. |
|
|
Show visual indicator |
|
Displays an indicator to the end user to make them aware that their device is under remote control. |
|
|
Authentication method |
|
Choose the method for authentication: No Authentication, Preset Password or OS Authentication |
|
|
Password |
|
Password required for authentication Once set, select Show Password to view. |
|
|
Enable System Tray Password |
|
Requires the end user to enter a password to gain access to the Take Control host via the System Tray icon. |
|
|
Password |
|
Password required for authentication Once set, select Show Password to view. |
|
|
|
|||
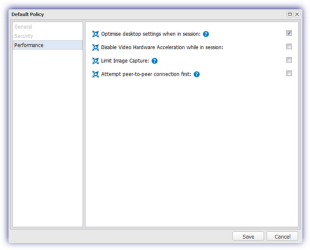
Performance |
|||
|
Optimize desktop settings when in a session |
|
Removes the desktop background, disable themes and other graphics for better performance and lower bandwidth utilization. Please note that this behavior will be visible to the user on the target machine. |
|
|
Disable Video Hardware Acceleration while in a session |
|
Disables advanced display options (temporarily disabling the video hardware acceleration) to achieve the best performance in capturing the image. This setting may be used for troubleshooting purposes, or on systems where graphics acceleration may present a problem. |
|
|
Limit Image Capture |
|
Reduces the screen capture rate based on system resource utilization. |
|
|
Attempt peer-to-peer connection first |
|
Attempts to make a P2P UDP connection to the device. Please be aware that in a situation where UDP is not allowed (for example, because of firewall permissions), this setting can add up to three (3) seconds to your connection time. |
|
|
|
|||
|
Option only available for SolarWinds engine |
|
||
|
Option only available for TeamViewer engine |
|
||
Edit Policy
Highlight the target policy in the Take Control Policies dialog then Edit to display the policy's configuration screen. Click Save after amending the policy to apply.
Once the changes to the policy are saved they are downloaded and applied on each device running the policy the next time it reports back to the Dashboard.
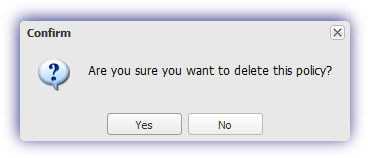
Delete Policy
Where a non-default policy is no longer required it can be removed from the Take Control Policies dialog. Simply highlight the target policy click Delete then Confirm the policy's removal when prompted.
Any policies currently in use by devices are unavailable for deletion.
Any changes to a Take Control Policy are included in the User Audit Report, available from the Reports menu.
Refer to the Feature Policy Report for a list of all of the policies currently in use across your policy supporting features.