Driverless AI 独立 Python 评分管道
如前所述,在成功完成实验后可以使用评分管道。在此包中,包含有导出的模型和 Python 3.6 源代码示例(展示在生产环境中执行利用 H2O Driverless AI 构建的模型)。
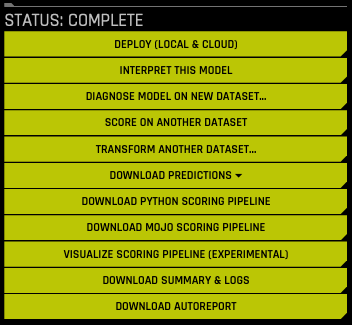
此包中的文件允许您以多种不同的方式对新数据进行转换和评分:
从 Python 3.6 版本开始,您可以导入评分模块,然后使用该模块对新数据进行转换和评分。
通过其他语言和平台,您可以使用此包附带的 TCP/HTTP 评分服务,通过远程程序调用 (RPC) 来调用该评分管道模块。
请注意 目前不支持 Python 3.7 及更高版本。若要在 Python 3.7 或更高版本中使用管道,我们建议使用 tar.sh method (因为其会提供 DAI 自带的 Python 3.6 环境。)
请注意自定义插件和 Python 评分管道:在默认情况下,如果已将某个自定义插件上传到 Driverless AI 中,但之后在实验中并没有使用该自定义插件,Python 评分管道仍将包含 H2O 插件服务器。如果之后将此管道部署在容器中,H2O 插件服务器会导致管道增大很多。另外,还必须在该容器中安装 Java,这会进一步增大运行时存储和内存需求。解决办法是在运行 Python 评分管道之前设置以下环境变量:
export dai_enable_custom_recipes=0
Python 评分管道文件
scoring-pipeline 文件夹中包含以下值得注意的文件:
example.py:演示如何导入新记录并进行评分的 Python 脚本示例。
run_example.sh:运行 example.py(也将通过相关库(先决条件)安装 virtualenv)。
tcp_server.py:用于托管评分服务的独立 TCP 服务器。
http_server.py:用于托管评分服务的独立 HTTP 服务器。
run_tcp_server.sh:运行 TCP 评分服务(运行 tcp_server.py)。
run_http_server.sh:运行 HTTP 评分服务(运行 http_server.py)。
Example_client.py:演示如何与评分服务器通信的 Python 脚本示例。
run_tcp_client.sh:演示如何通过 TCP 与评分服务通信(运行 example_client.py)。
Run_http_client.sh:演示如何通过 HTTP (使用 curl)与评分服务通信。
快速入门
有两种用于启动 Python 评分管道 的方法。
快速入门 – 推荐方法
此方法是运行 Python 评分管道的推荐方法。在以下情况中,可使用此方法:
您的环境已隔离,未接入互联网。
您正在运行 Power。
您想使用快速入门方法。
先决条件
Driverless AI 许可证密钥有效。
Driverless AI 实验已完成。
已下载 Python 评分管道。
运行 Python 评分管道 – 推荐
请注意:必须通过 scoring-pipeline tmp 文件夹的工作目录运行使用自定义插件的评分器。
通过 https://www.h2o.ai/download/ 下载 TAR SH 版本的 Driverless Ai(适用于 Linux 或 IBM Power)。
使用 Bash 编译器执行下载。这将创建一个新的 dai-<dai_version> 文件夹,其中, <dai_version> 表示您的 Driverless AI 的版本,例如 1.7.1-linux-x86_64 。
将目录更改为 Driverless AI 文件夹。(将以下
<dai_version>更换为在第 2 步中创建的版本。)
cd dai-<dai_version>
运行以下命令以更改权限:
chmod -R a+w python
针对已完成的 Driverless AI 实验,运行以下命令以安装 Python 评分管道:
./dai-env.sh pip install /path/to/your/scoring_experiment.whl
通过
scoring-pipeline目录运行以下命令:
DRIVERLESS_AI_LICENSE_KEY="pastekeyhere" SCORING_PIPELINE_INSTALL_DEPENDENCIES=0 /path/to/your/dai-env.sh ./run_example.sh
快速入门 – 替代方法
本节介绍运行 Python 评分管道的替代方法。此版本要求接入互联网。Power 主机也不支持此版本。
先决条件
只有在安装了 Python 3.6 和 OpenBLAS 的 Linux 上才支持评分模块和评分服务。
评分模块和评分服务在安装时会下载其他的包,并要求接入互联网。根据您的网络环境,您可能需要通过代理接入互联网。
有效的 Driverless AI 许可证。Driverless AI 要求指定许可证,以运行 Python 评分管道。
Apache Thrift (用于在 TCP 模式下运行评分服务)
Linux 环境
Python 3.6
Libopenblas-dev(H2O4GPU 要求)
OpenCL
以下是为满足上述先决条件而需进行的安装示例:
安装 Python 3.6
在 Ubuntu 16.10+ 上安装 Python 3.6 和 OpenBLAS
sudo apt install python3.6 python3.6-dev python3-pip python3-dev \
  python-virtualenv python3-virtualenv libopenblas-dev
在 Ubuntu 16.04 上安装 Python 3.6 和 OpenBLAS
sudo add-apt-repository ppa:deadsnakes/ppa
sudo apt-get update
sudo apt-get install python3.6 python3.6-dev python3-pip python3-dev \
  python-virtualenv python3-virtualenv libopenblas-dev
安装 Conda 3.6:
您可以使用 Anaconda 或 Miniconda 安装 Conda。更多信息,请点击以下链接:
Miniconda - https://docs.conda.io/en/latest/miniconda.html
安装 OpenCL
在 RHEL 上安装 OpenCL
yum -y clean all
yum -y makecache
yum -y update
wget http://dl.fedoraproject.org/pub/epel/7/x86_64/Packages/c/clinfo-2.1.17.02.09-1.el7.x86_64.rpm
wget http://dl.fedoraproject.org/pub/epel/7/x86_64/Packages/o/ocl-icd-2.2.12-1.el7.x86_64.rpm
rpm -if clinfo-2.1.17.02.09-1.el7.x86_64.rpm
rpm -if ocl-icd-2.2.12-1.el7.x86_64.rpm
clinfo

mkdir -p /etc/OpenCL/vendors && \
    echo "libnvidia-opencl.so.1" > /etc/OpenCL/vendors/nvidia.icd
在 Ubuntu 上安装 OpenCL
sudo apt install ocl-icd-libopencl1

mkdir -p /etc/OpenCL/vendors && \
    echo "libnvidia-opencl.so.1" > /etc/OpenCL/vendors/nvidia.icd
指定许可证
Driverless AI 要求指定许可证,以运行任何 Python 评分管道。可通过 Python 中的环境变量指定许可证:
# Set DRIVERLESS_AI_LICENSE_FILE, the path to the Driverless AI license file
%env DRIVERLESS_AI_LICENSE_FILE="/home/ubuntu/license/license.sig"


# Set DRIVERLESS_AI_LICENSE_KEY, the Driverless AI license key (Base64 encoded string)
%env DRIVERLESS_AI_LICENSE_KEY="oLqLZXMI0y..."
以下示例使用的是 DRIVERLESS_AI_LICENSE_FILE . 使用 DRIVERLESS_AI_LICENSE_KEY 的情况与此类似。
安装 Thrift 编译器
若要在 TCP 模式下运行评分服务,必须先安装 Thrift,但是如果要运行评分模块,则并不要求。可在 Thrift 文档资料 (https://thrift.apache.org/docs/BuildingFromSource <https://thrift.apache.org/docs/BuildingFromSource>`__ ) 中查看以下步骤。
sudo apt-get install automake bison flex g++ git libevent-dev \
  libssl-dev libtool make pkg-config libboost-all-dev ant
wget https://github.com/apache/thrift/archive/0.10.0.tar.gz
tar -xvf 0.10.0.tar.gz
cd thrift-0.10.0
./bootstrap.sh
./configure
make
sudo make install
运行以下命令,以在安装 Thrift 后刷新共享的运行时:
sudo ldconfig /usr/local/lib
运行 Python 评分管道 – 替代方法
在“已完成的实验”页面上,点击**下载 Python 评分管道**按钮,将用于此实验的 scorer.zip 文件下载到本地计算机。
解压评分管道文件。
下载并解压管道文件后,您将能运行评分模块和评分服务。
通过 Python 程序进行评分
如果您想通过 Python 程序进行评分,可运行评分模块示例。(需要 Linux 和 Python 3.6。)
export DRIVERLESS_AI_LICENSE_FILE="/path/to/license.sig"
bash run_example.sh
使用 Web 服务进行评分
如果您想使用 Web 服务进行评分,可运行 HTTP 评分服务器示例。(需要 Linux x86_64 和 Python 3.6。)
export DRIVERLESS_AI_LICENSE_FILE="/path/to/license.sig"
bash run_http_server.sh
bash run_http_client.sh
使用 Thrift 服务进行评分
如果您想使用 Thrift 服务进行评分,可运行 TCP 评分服务器示例。(需要 Linux x86_64、Python 3.6 和 Thrift。)
export DRIVERLESS_AI_LICENSE_FILE="/path/to/license.sig"
bash run_tcp_server.sh
bash run_tcp_client.sh
请注意:默认情况下,上述 run_*.sh 脚本将通过使用 virtualenv 和 pip 创建虚拟环境,并在其中执行 Python 代码。这些脚本也可以利用 Conda (Anaconda/Mininconda) 创建 Conda 虚拟环境,并安装所需的依赖包。需使用的包管理器将作为参数提供给脚本。
# to use conda package manager
export DRIVERLESS_AI_LICENSE_FILE="/path/to/license.sig"
bash run_example.sh --pm conda

# to use pip package manager
export DRIVERLESS_AI_LICENSE_FILE="/path/to/license.sig"
bash run_example.sh --pm pip
如果在运行以上任何脚本时出现错误,请进行检查以确保系统已经正确安装和配置了 Python 3.6。请参阅 Python 环境故障排除 一节,以了解如何使用纯净版 Ubuntu 16.04 虚拟机设置和测试评分模块。
Python 评分模块
评分模块是被捆绑到独立 wheel 文件(名称为 scoring_*.whl)中的 Python 模块。“requirements.txt”文件中列出了评分模块正常工作所需的全部先决条件。若要使用评分模块,您只需创建一个 Python virtualenv、安装作为先决条件的各种包并按照如下方法导入和使用评分模块:
# See 'example.py' for complete example.
from scoring_487931_20170921174120_b4066 import Scorer
scorer = Scorer()       # Create instance.
score = scorer.score([  # Call score()
    7.416,              # sepal_len
    3.562,              # sepal_wid
    1.049,              # petal_len
    2.388,              # petal_wid
])
评分器实例提供了以下方法(还有其他一些方法):
score(list):对某一行进行评分(值列表)。
score_batch(df):对 Pandas 数据帧进行评分。
Fit_transform_batch(df):对 Pandas 数据帧进行转换。
get_target_labels():获取目标列标签(用于分类问题)。
导入和使用评分模块的流程通过 Bash 脚本 run_example.sh 演示,该脚本将有效执行以下步骤:
# See 'run_example.sh' for complete example.
virtualenv -p python3.6 env
source env/bin/activate
pip install -r requirements.txt
export DRIVERLESS_AI_LICENSE_FILE="/path/to/license.sig"
python example.py
评分服务
评分服务将评分模块作为 HTTP 或 TCP 服务托管。这样就能通过远程过程调用 (RPC) 公开评分模块的所有函数。实际上,此机制让您能在相同计算机上通过非 Python 语言调用评分函数,或从共享网络或互联网上的其他计算机调用。
评分服务可通过两种方式启动:
在 TCP 模式下,评分服务将利用二进制线路协议通过 Apache Thrift (https://thrift.apache.org/) 提供高性能的 RPC 调用。
在 HTTP 模式下,评分服务将提供由 Tornado (http://www.tornadoweb.org) 服务的 JSON-RPC 2.0 调用。
可对各行(逐行)或在批处理模式(一次多行)下执行评分操作。
评分服务 – TCP 模式 (Thrift)
TCP 模式让您能通过 Thrift 支持的任何语言使用评分服务,这些语言包括 C、C++、C#、Cocoa、D、Dart、Delphi、Go、Haxe、Java、Node.js、Lua、perl、PHP、Python、Ruby 和 Smalltalk。
若要在 TCP 模式下启动评分服务,您需要一次性生成 Thrift 绑定,然后运行服务器:
# See 'run_tcp_server.sh' for complete example.
thrift --gen py scoring.thrift
python tcp_server.py --port=9090
请注意,只在构建时要求使用 Thrift 编译器。其并不依赖运行时,也就是说一旦构建和测试评分服务,您就不需要在被用于部署评分服务的计算机上重复此安装过程。
若要调用评分服务,需使用您选择的语言生成 Thrift 绑定,然后利用 Thrift 的缓冲传输和其二进制协议通过 TCP 套接字进行 RPC 调用。
# See 'run_tcp_client.sh' for complete example.
thrift --gen py scoring.thrift

# See 'example_client.py' for complete example.
socket = TSocket.TSocket('localhost', 9090)
transport = TTransport.TBufferedTransport(socket)
protocol = TBinaryProtocol.TBinaryProtocol(transport)
client = ScoringService.Client(protocol)
transport.open()
row = Row()
row.sepalLen = 7.416  # sepal_len
row.sepalWid = 3.562  # sepal_wid
row.petalLen = 1.049  # petal_len
row.petalWid = 2.388  # petal_wid
scores = client.score(row)
transport.close()
您可以使用其他语言(如 Java)得到完全相同的结果:
thrift --gen java scoring.thrift

// Dependencies:
// commons-codec-1.9.jar
// commons-logging-1.2.jar
// httpclient-4.4.1.jar
// httpcore-4.4.1.jar
// libthrift-0.10.0.jar
// slf4j-api-1.7.12.jar

import ai.h2o.scoring.Row;
import ai.h2o.scoring.ScoringService;
import org.apache.thrift.TException;
import org.apache.thrift.protocol.TBinaryProtocol;
import org.apache.thrift.transport.TSocket;
import org.apache.thrift.transport.TTransport;
import java.util.List;

public class Main {
  public static void main(String[] args) {
    try {
      TTransport transport = new TSocket("localhost", 9090);
      transport.open();

      ScoringService.Client client = new ScoringService.Client(
        new TBinaryProtocol(transport));

      Row row = new Row(7.642, 3.436, 6.721, 1.020);
      List<Double> scores = client.score(row);
      System.out.println(scores);

      transport.close();
    } catch (TException ex) {
      ex.printStackTrace();
    }
  }
}
评分服务 – HTTP 模式 (JSON-RPC 2.0)
HTTP 模式让您能通过利用纯文本 JSON-RPC 调用来使用评分服务。与 Thrift 相比,此方法的性能通常更低,但是有一个优势,即可使用您选择的语言通过任何 HTTP 客户端库使用该评分服务,并不依赖 Thrift。
有关 JSON-RPC 的文档资料,请访问 http://www.jsonrpc.org/specification。
在 HTTP 模式下启动评分服务:
# See 'run_http_server.sh' for complete example.
export DRIVERLESS_AI_LICENSE_FILE="/path/to/license.sig"
python http_server.py --port=9090
若要调用评分方法,可编辑 JSON-RPC 消息,并按如下方法向 http://host:port/rpc 发送 HTTP POST 请求:
# See 'run_http_client.sh' for complete example.
curl http://localhost:9090/rpc \
  --header "Content-Type: application/json" \
  --data @- <<EOF
 {
  "id": 1,
  "method": "score",
  "params": {
    "row": [ 7.486, 3.277, 4.755, 2.354 ]
  }
 }
EOF
类似地,您也可以使用任何 HTTP 客户端库重现以上结果。例如,通过 Python,您可以使用如下请求模块:
import requests
row = [7.486, 3.277, 4.755, 2.354]
req = dict(id=1, method='score', params=dict(row=row))
res = requests.post('http://localhost:9090/rpc', data=req)
print(res.json()['result'])
Python 评分管道常见问题解答
在我运行 Python 评分管道时,为什么会收到 “TensorFlow is disabled” 消息?
如果在启用 TensorFlow 时运行实验,之后又尝试运行 Python 评分管道,您可能会收到与以下消息类似的消息:
TensorFlow is disabled. To enable, export DRIVERLESS_AI_ENABLE_TENSORFLOW=1 or set enable_tensorflow=true in config.toml.
若要成功运行 Python 评分管道,您必须启用 DRIVERLESS_AI_ENABLE_TENSORFLOW 标志。例如:
export DRIVERLESS_AI_LICENSE_FILE="/path/to/license.sig"
DRIVERLESS_AI_ENABLE_TENSORFLOW=1 bash run_example.sh
Python 环境故障排除
以下说明描述介绍了设置纯净版 Ubuntu 16.04 虚拟机以测试此评分管道是否正常工作。
先决条件:
安装 Virtualbox:sudo apt-get,安装 Virtualbox。
安装 Vagrant:https://www.vagrantup.com/downloads.html。
为 Vagrant 创建配置文件。
bootstrap.sh:包含用于设置 Python 3.6 和 OpenBLAS 的命令。
Vagrantfile:包含用于 Vagrant 和 VirtualBox 的虚拟机配置指令。
----- bootstrap.sh -----

#!/usr/bin/env bash

sudo apt-get -y update
sudo apt-get -y install apt-utils build-essential python-software-properties software-properties-common zip libopenblas-dev
sudo add-apt-repository -y ppa:deadsnakes/ppa
sudo apt-get update -yqq
sudo apt-get install -y python3.6 python3.6-dev python3-pip python3-dev python-virtualenv python3-virtualenv

# end of bootstrap.sh

----- Vagrantfile -----

# -*- mode: ruby -*-
# vi: set ft=ruby :

Vagrant.configure(2) do |config|
  config.vm.box = "ubuntu/xenial64"
  config.vm.provision :shell, path: "bootstrap.sh", privileged: false
  config.vm.hostname = "h2o"
  config.vm.provider "virtualbox" do |vb|
    vb.memory = "4096"
  end
end

# end of Vagrantfile
启动 VM 和 SSH。请注意,我们也将评分管道放置于同一目录中,以便以后可以在 VM 中访问它。
cp /path/to/scorer.zip .
vagrant up
vagrant ssh
测试虚拟机内的评分管道。
cp /vagrant/scorer.zip .
unzip scorer.zip
cd scoring-pipeline/
export DRIVERLESS_AI_LICENSE_FILE="/path/to/license.sig"
bash run_example.sh
此时,您应能看到终端上打印出的评分。如果没有看到这些评分,请通过 support@h2o.ai 联系我们。