How To
Render A Turntable In UDK
Table Of Contents
Step 01 – Exporting your
models/textures
Step 02 – Importing your models/textures
into UDK
Step 03 – Setting Up Your Morph Targets And MorphTargetSet
Step 04 – Setting Up Your AnimSet
Step 05 – Setting Up Your AnimTree
Step 06 – Adding a light to your scene
Step 07 – Adding A
Base (Static Mesh) To Your Scene
Step 08 – Animating A
Static Mesh In Kismet/Matinee
Step 09 – Animating A
Camera In Kismet/Matinee
Step 10 – Kismet (Playing Matinee Sequence With Level Start Up)
Step 11– Adding Key-Frames To Your Skeletal Mesh Through Kismet/Matinee
Step 12-Capture Your Animation As Single
Frame BMP Files
___________________________________________________
Step 01 – Exporting your models/textures .
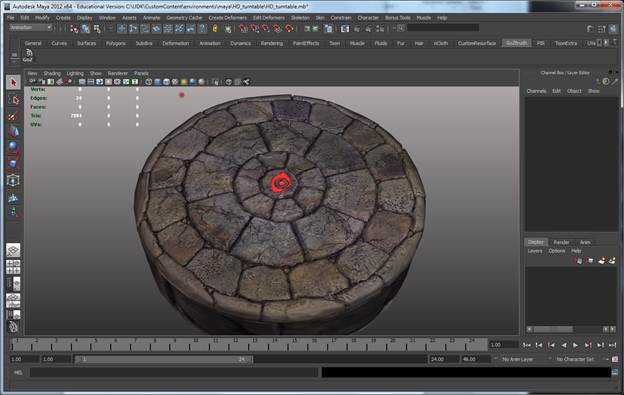
We will be exporting our model, skeleton, morph targets and temporary shaders/materials from Maya using the FBX exporter. Make sure you have the latest exporter. (Click here to download the latest tool.)
Select all the pieces that you would like to export, in my case I am exporting animations along with morph targets so I have created a special “selection set” in Maya called UDK_Export_Set. If I use this set to select my objects for export, I never have to worry about missing something important if I need to re -export. This set contains all my meshes geometry, the blendshapes/morph targets and my animation skeleton.
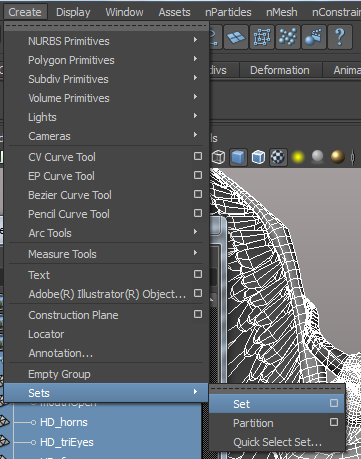
Creating the selection set is very easy, just select all your pieces and then go Create>Sets>Sets>option box.
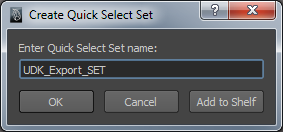
From here just give your set a name.
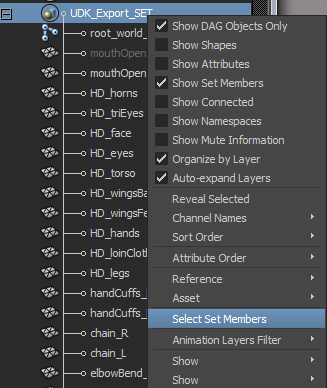
When I am ready to export I just need to right click on my selection group and use the “Select Set Memebers” option.
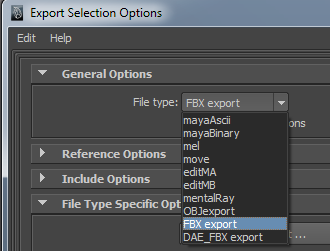
Now that you have your selection made go File>Export Selection>Option Box

Choose FBX as your File Type (If you don’t see it as an option you will need to load it in the plug-ins manager. (Go Windows>Settings/Preferences>Plugin Manager)
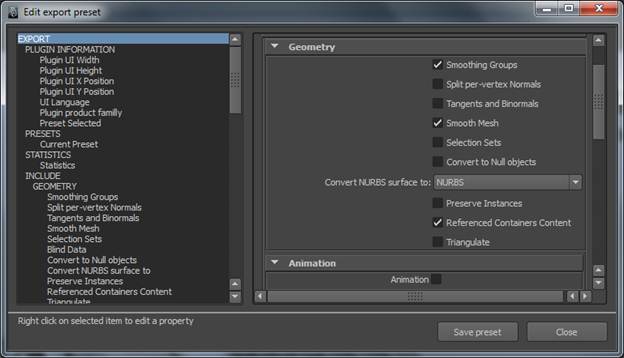
If this is your first time exporting a skeletal mesh you may want to use the “Edit Preset” button.
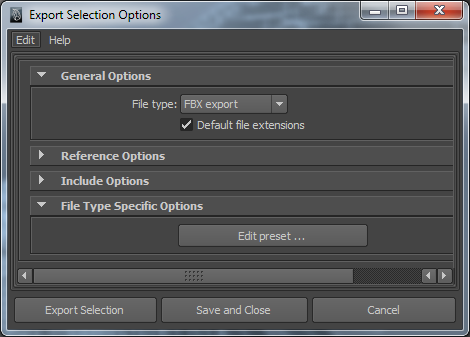
To export a skeletal mesh these are the options that I was using. This will export the model information, skeletal information, animation and morph targets.
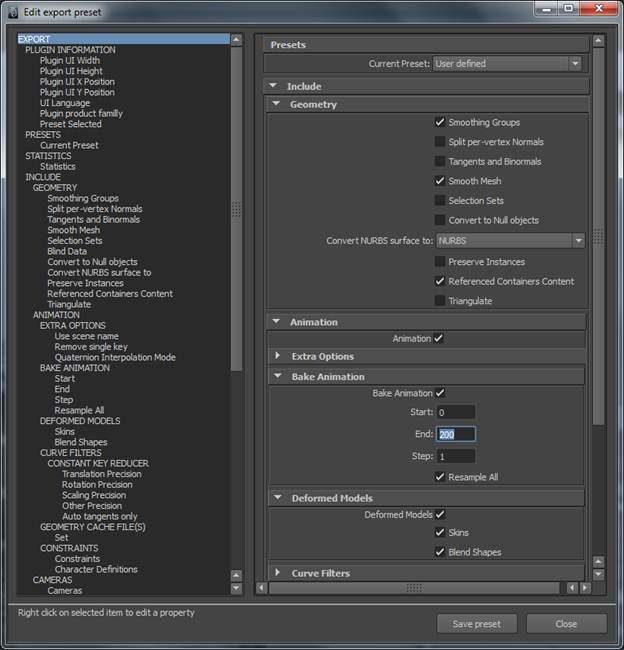
Once you find the correct export settings for your needs you may want to use the “Save Preset” button at the bottom of the FBX edit export preset window.
___________________________________________________
Step 02 – Importing your models/textures
into UDK .
Now let’s move over to UDK an import in our character. If you are loading UDK for the first time you will need to look for UDKLift.exe in this area (C:\UDK\”current build number”\Binaries)
Make a shortcut on your desktop, right click the shortcut and go to the properties of the shortcut.
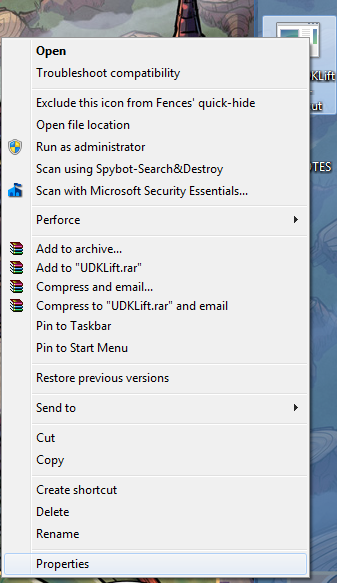
Add “editor” at the end of the Target path in the shortcut section.
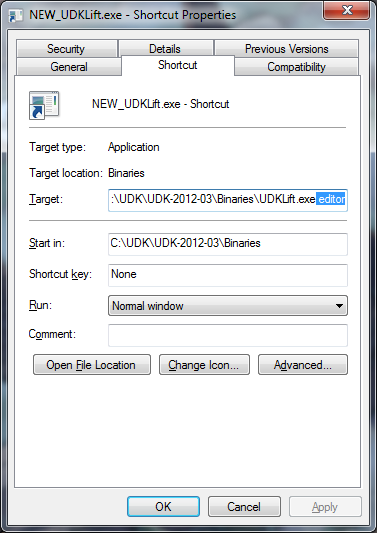
Now UDK should load in the editor mode for you.
When I load UDK I will use the “New Map” option to make a new map.
From here I will choose the Blank Map option to make a new map scene file.
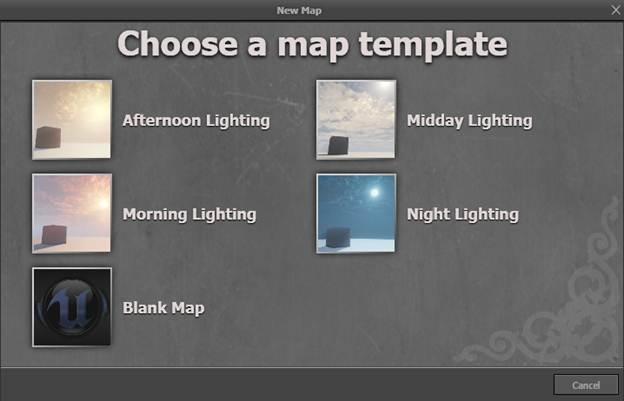
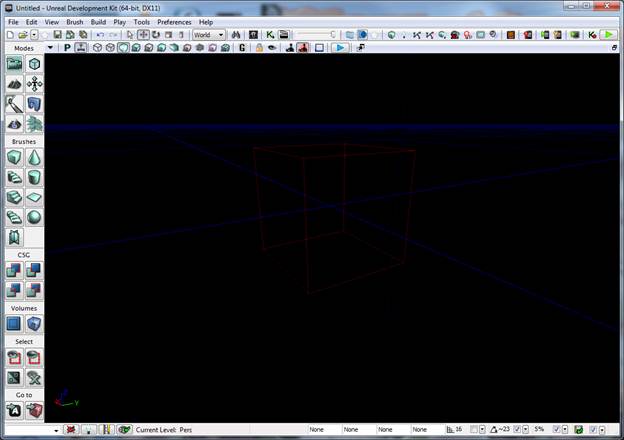
Here is what your new scene should look like: (Tab B to turn on and off the red “builder brush” box in the center of the screen.)
Let’s open the Content Browser to import our character into UDK. Go View>Browser Windows>Content Browser. (Or hit CTRL+Shift+F)

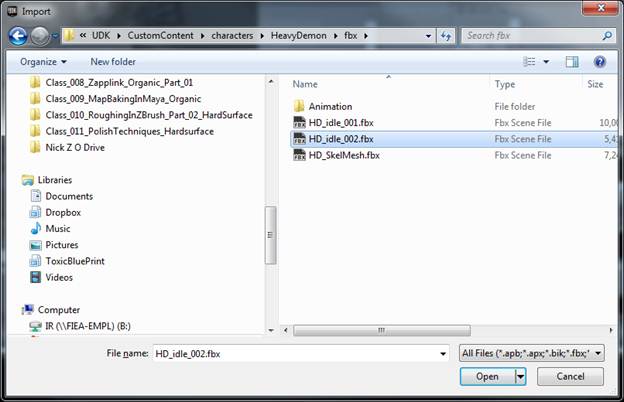
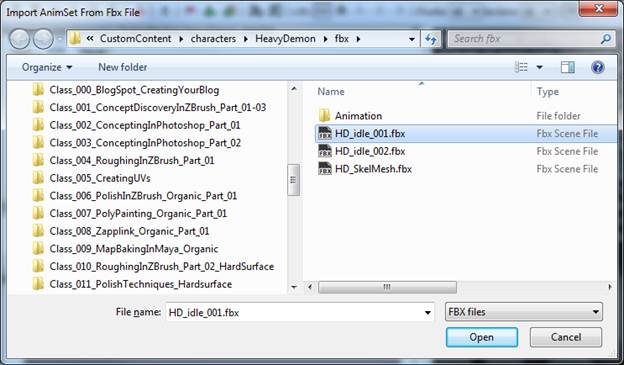
Click the Import button at the bottom of the Content Browser and navigate to your FBX File:
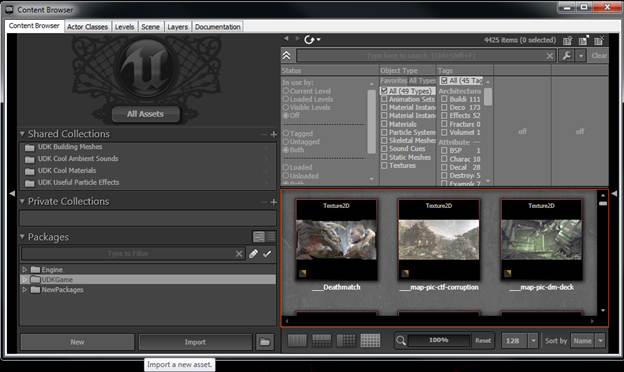
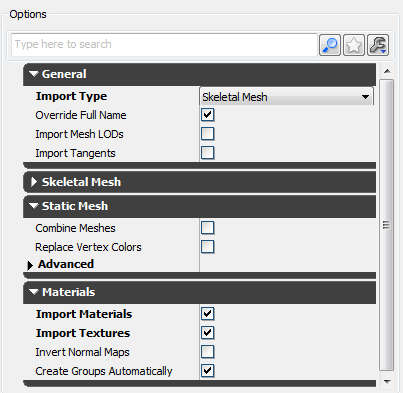
From here choose (or name your Package) you can also give a name for the grouping for your asset and also change the name of your asset.
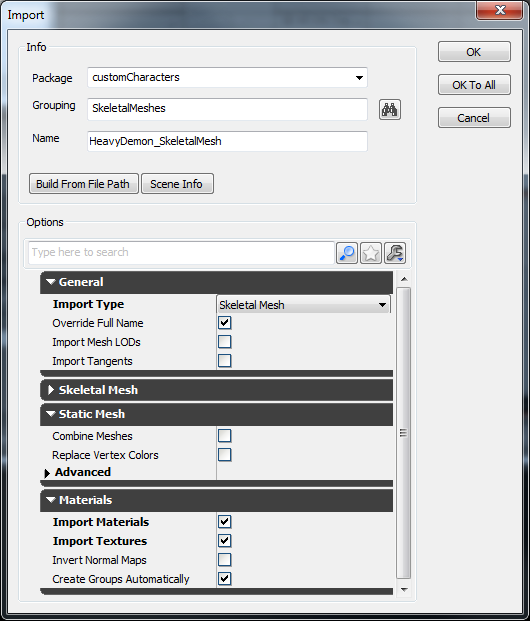
I’m going to use the “Import Materials” and “Import Textures” options in the Materials tab to automatically use the materials and textures that I have pre set up in Maya. (Make sure you have a good folder structure set up for you assets and don’t change their location. UDK uses this file location if you want to update your textures or your models.)
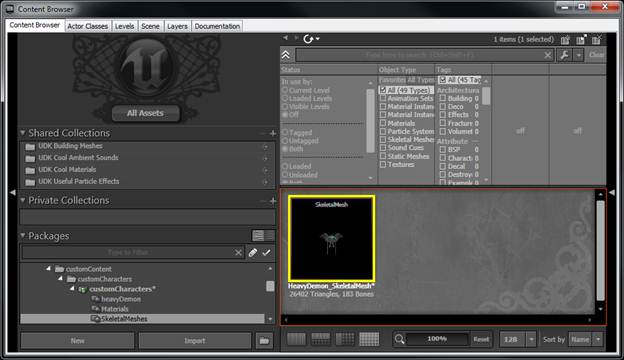
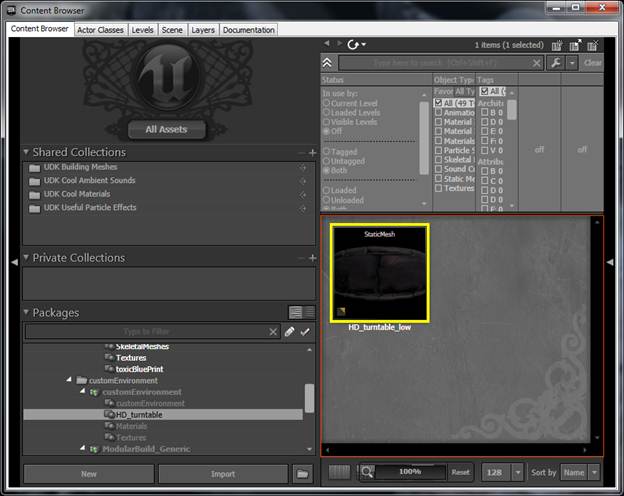
You should now see your skeletal Mesh inside of the Content Browser Window along with the new Package and Grouping that you have made.
___________________________________________________
Step 03 – Setting Up Your Morph Targets And MorphTargetSet .
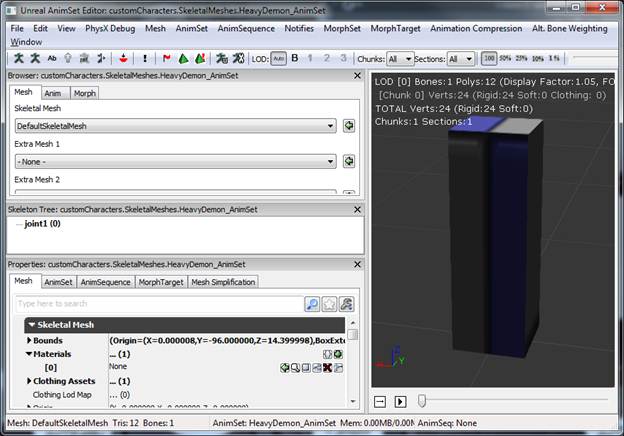
Double click on the skeletalMesh icon to open the AnimSet Editor Window
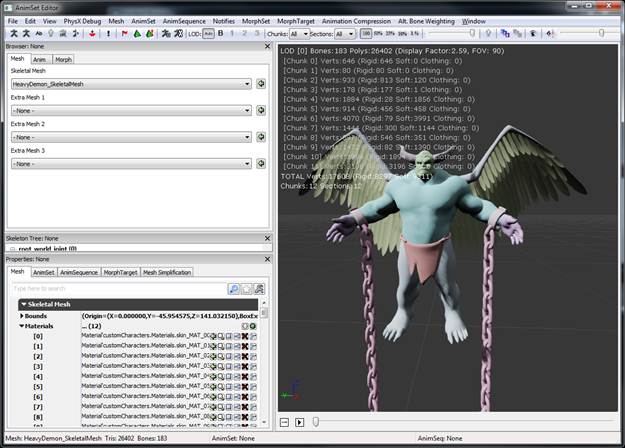
From here you can create a new morphTarget set. Go File>New MorphTargetSet
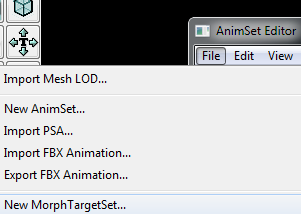
Here is the name I used for mine:

If you look in the Content Browser Window you should see your new Morph Target Set that you created, double click on that to open your AnimSet Editor window for the MorphTargetSet. In the AnimSet Editor window go File>Import Morph Target
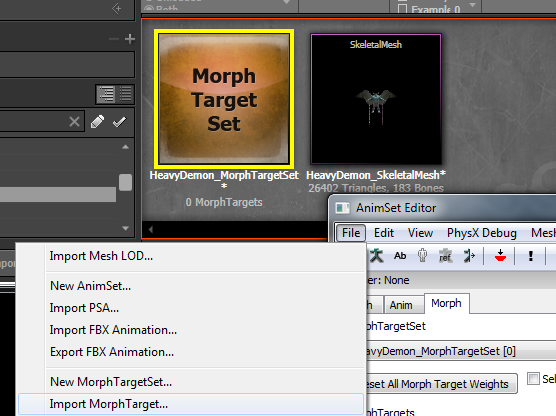
Navigate to your FBX file and import the morph targets in. You should now see your morphTargets listed in the AnimSet Editor window.
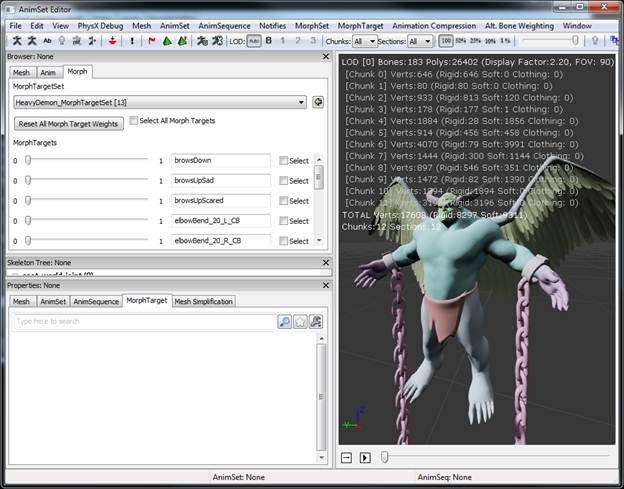
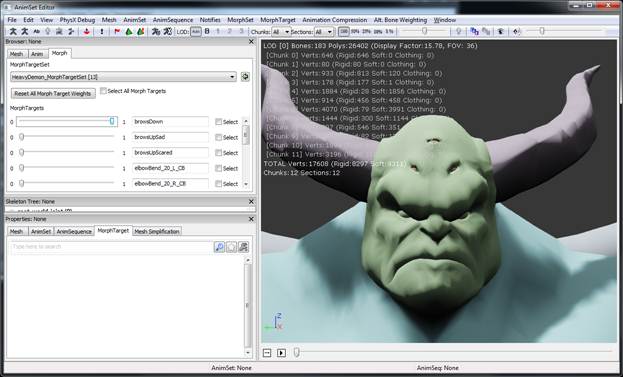
You should now be able to change the morph target values and see them update in this window.
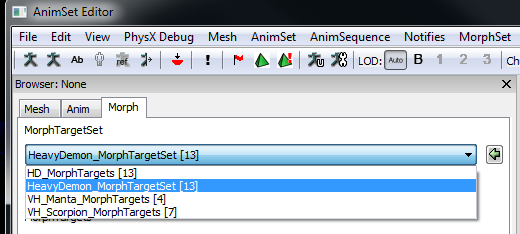
Just to double check I’m going to go back to the Content Browser Window and double click on my SkeletalMesh and open the AnimSet Editor window to view it and check that the MophTagetSet is selected and being used for my character.

If you don’t have your sliders and can change morph target values then you will need to use the drop down list to select your MorphTargetSet.
I’m going to go into the Content Browser Window and select my SkeletalMesh and Left mouse drag it into the UDK editor window.
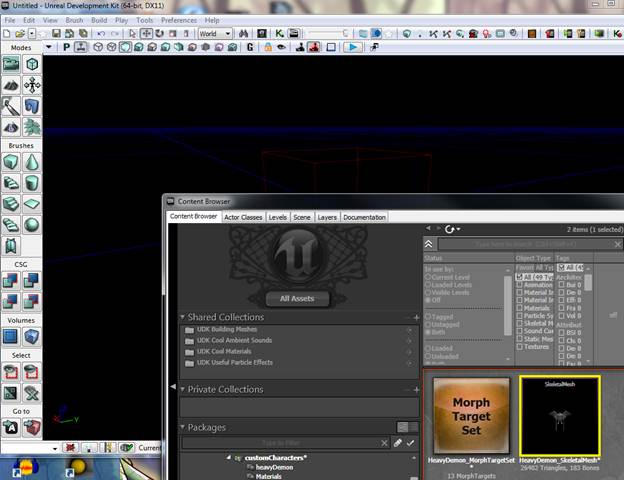
This should place your character into the world.

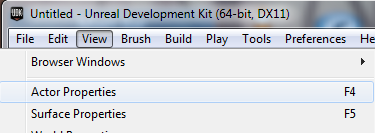
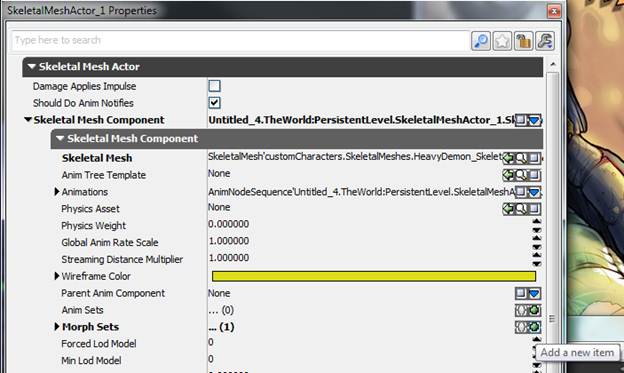
From here make sure your character is loaded (should be a blue highlight color) and hit f4 to bring up the Actor Properties window. (Or go Vew>Actor Properties.)
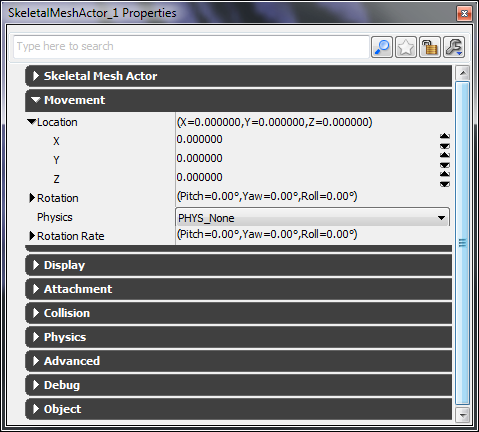
While we are here we might as well center our character in the world. Open the Movement tab and then expand the Location section, then zero out the X, Y and Z channels.
Then Go to the SkeletalMesh Actor Tab>SkeletalMesh Component>Morph Sets and click the green plus icon to “Add a new item”
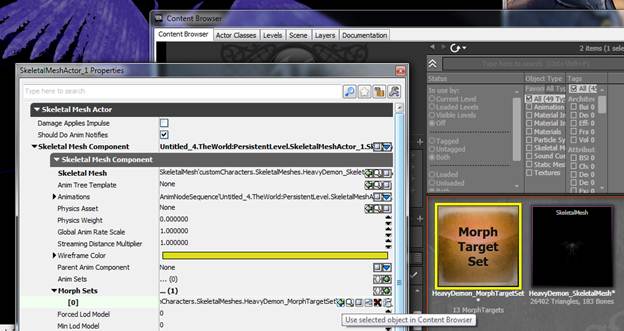
From here, select your MorphTargetSet in the Content Browser Window and then plug that into the new slot you created in the Morph Sets area. (Just click the little green arrow icon to plug in the MorphTargetSet)
___________________________________________________
Step 04 – Setting Up Your AnimSet .
In the Content Browser Window right click your mouse in the an open area of the red highlighted area where your SkeletalMesh and MorphTargetSet sit.
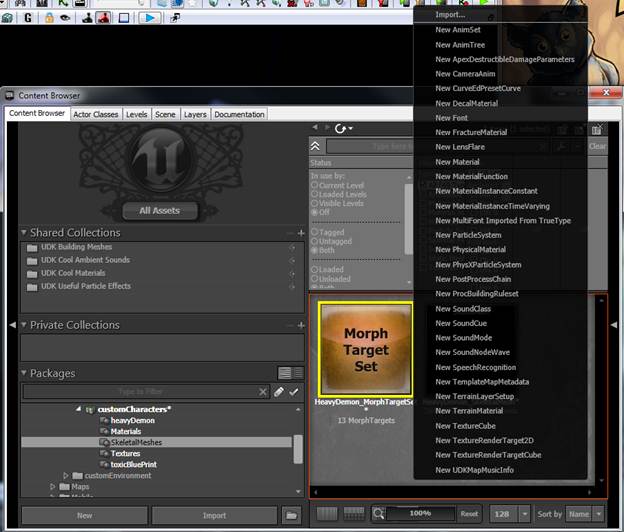
At the top you will see a New AnimSet, click on that to add a new animSet.
Here is the name that I gave mine.
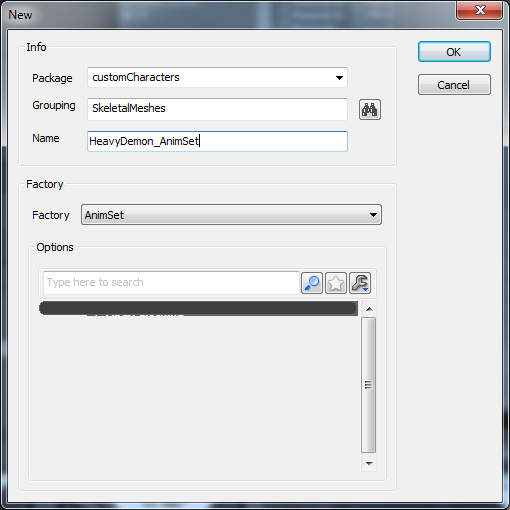
As soon as you click OK a new AnimSet Editor window will pop up.
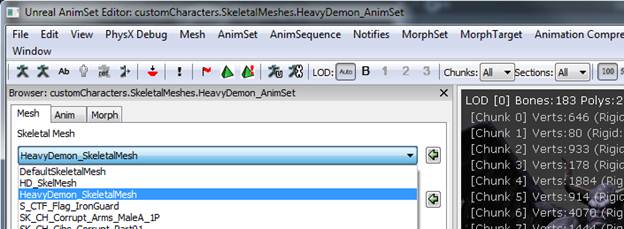
And your model will not be what you would expect. We need to tell UDK what SkeletalMesh we would like to use as our preview model. Use the drop down list to choose what SkeletalMesh you would like to work with.
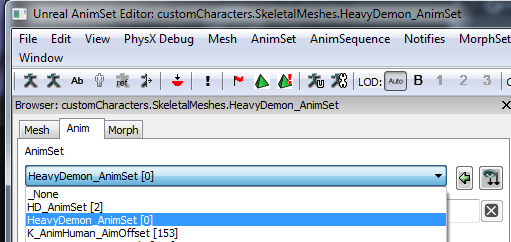
Now go to the Anim tab and select your AnimSet from the list (Should list [0] at the end of the name to tell you there are currently 0 animations.
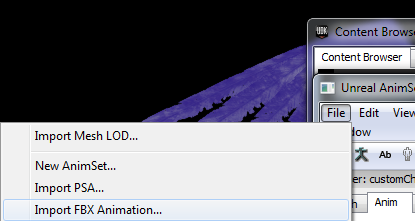
Now that you have your AnimSet selected we can start to import in animations. Go File>Import FBX Animation and select your FBX file.
You should now be able to use the play animation button along with the loop toggle button at the bottom of the screen to test out your animation.
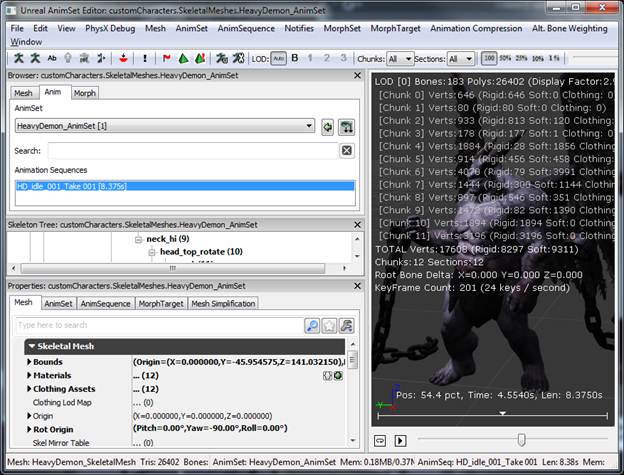
You can see that my animations do not look correct. The chains are not attached to his wrist as we would expect. That is because we need to tell UDK to use translation and rotation on our animation.
To do this go to the AnimSet tab at the bottom of the window and click off the “Anim Rotation Only.”
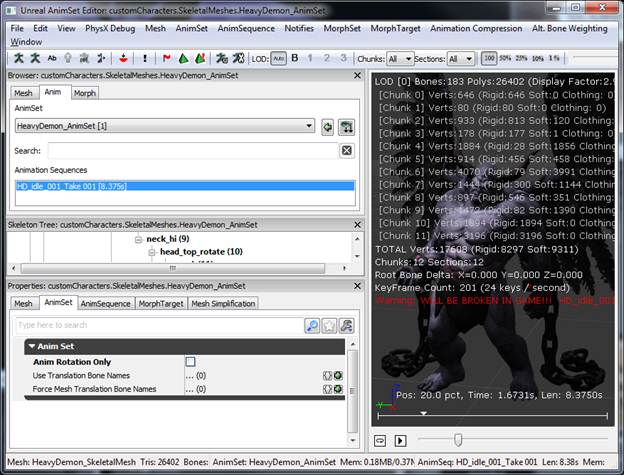
You should see the animation is playing correctly, it did give me an error but I will ignore that for now.
___________________________________________________
Step 05 – Setting Up Your AnimTree .
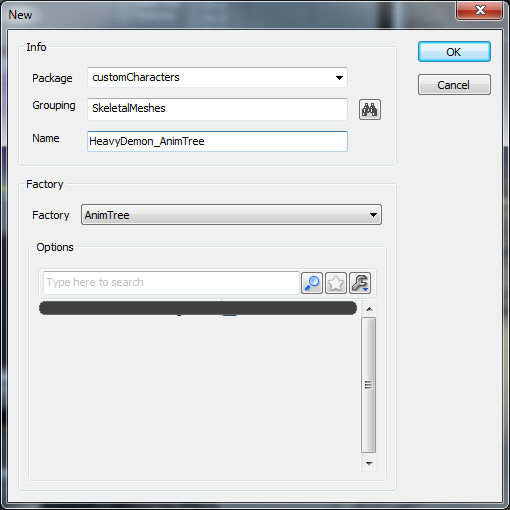
Right click in an open area in the Content Browser Window and use the New AnimTree option to create your AnimTree Node.
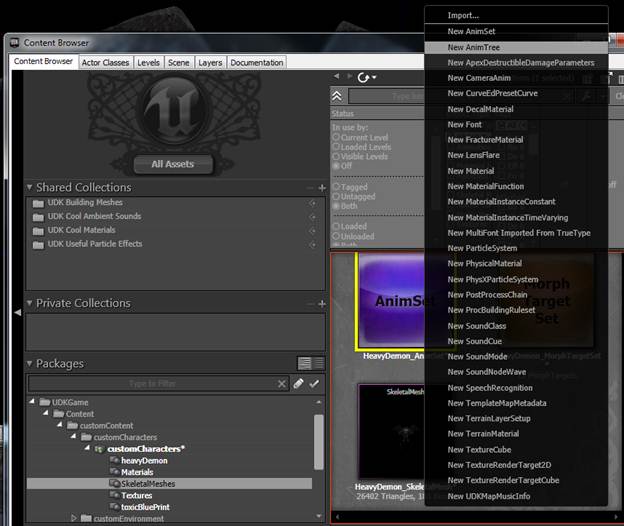
Here are the names that I used.
This will open a blank window. You will need to click on the AnimTree node in the working window off to the right. Then open the Anim Tree tab and go to the Preview Mesh List area and expand that. From there you need to click the green plus icon to add a Preview Skel Mesh and Preview Morph Sets.
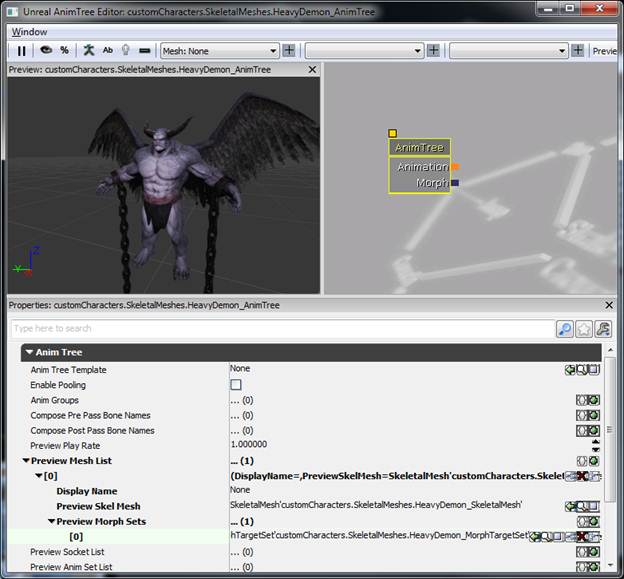
Once the slots are made and open, go into the Content Browser Window and select the SkeletalMesh node and plug it into the new slot that you opened up. Do the same for the MorphTargetSet.
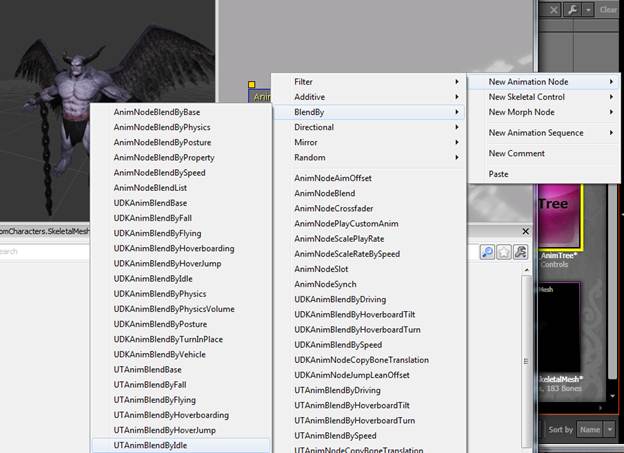
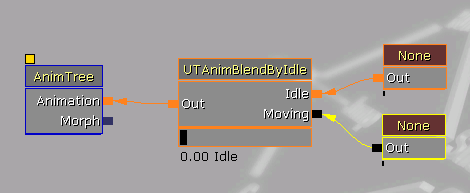
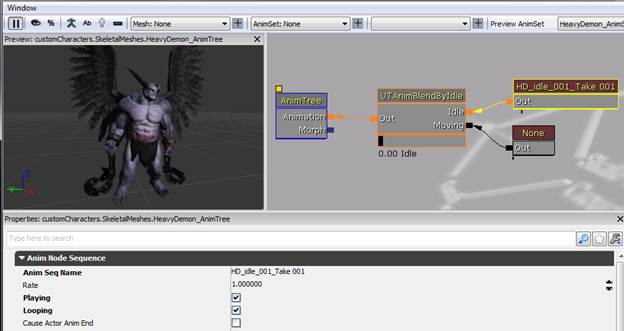
I only have 2 animations, an idle and a faster movement type idle. So I’m going to right mouse click in the open work area and go New Animation Node>BlendBy>UTAnimBlendByIdle.
Now I will right mouse click and add a New Animation Sequence>AnimNodeSequence.
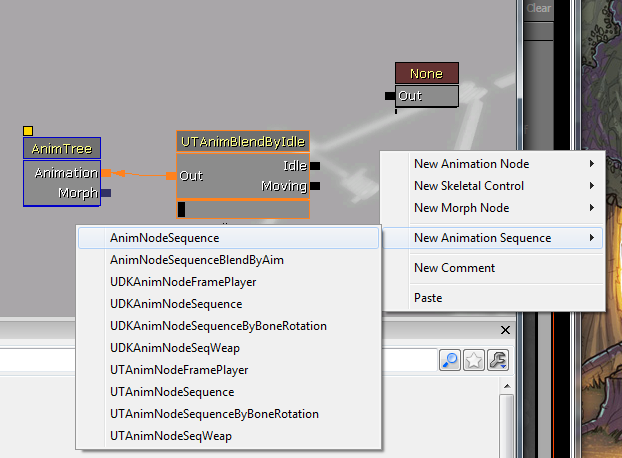
I will also connect the Out of the UTAnimblendbyIdle to the AnimTree Animation slot. I will also take the newly created AnimNodeSequence and copy and paste it and then hook the outs, one to Idle and the other to Moving.
Now I need to select one of the AnimNodeSequence nodes and plug in what animation I want to use.
To do this I need to steal the name from the animSet window. You can right click on the animation name and use the Copy Sequence Name To Clipboard to steal the name.
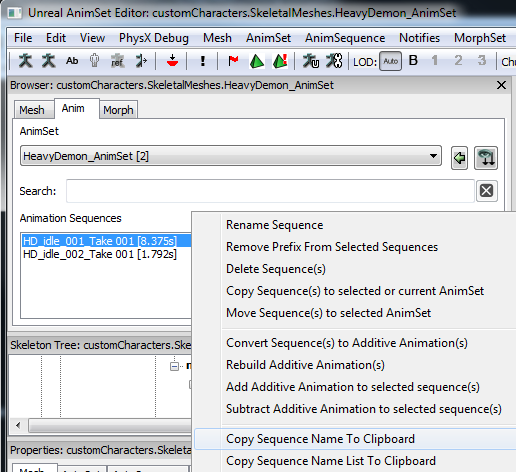
You can now plug this into the Anim Seq Name in the Anim Tree window.
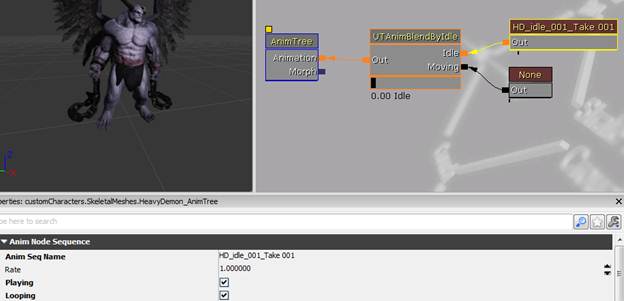
I noticed that my animation isn’t playing, I forgot to plug in my animSet node into the preview area in the animTree. This will be necessary for me to preview the animations in this window.
Plug in your animSet into the Preview Anim Set List. You will need to create a new slot by clicking on the little green icon. Now I can click the pause icon in the upper left hand corner to start the animation playing.
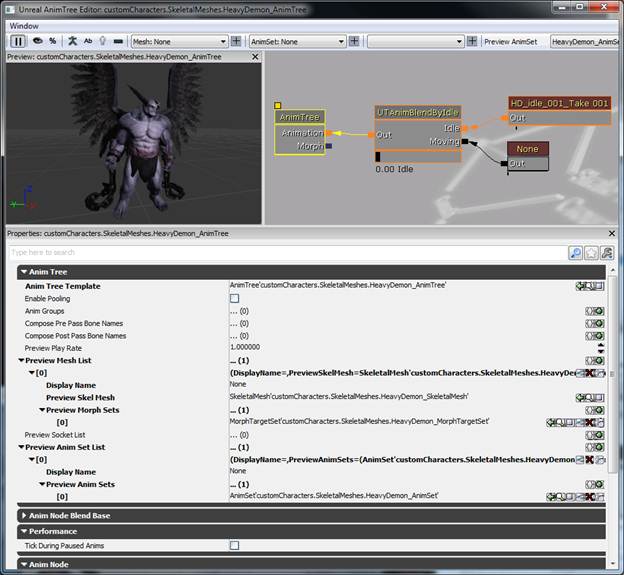
I’m also going to select my animation sequence and turn on Playing and Looping.
Now I will just add my second animation sequence the same way I added the first.
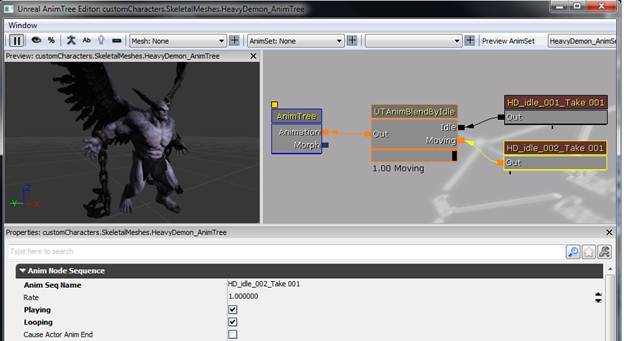
Now if I use the UTAnimBlendByIdle slider I can blend between the two animations.
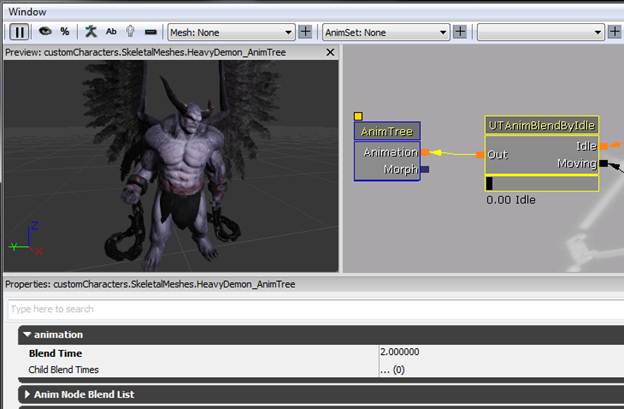
If I want to effect the blend times between the blending of the animations I can click on the UTAnimBlendByIdle node and change the “Blend Time” in the Animation tab.
___________________________________________________
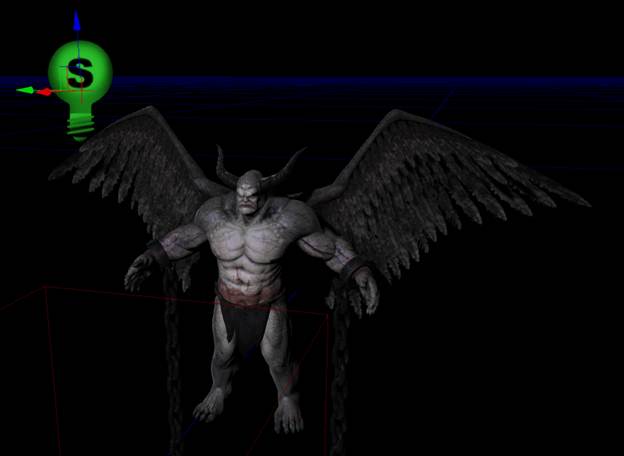
Step 06 – Adding a light to your scene .
So far we have been viewing our model in no lighting, shaded only mode (Unlit Alt+3).
![]()
But if we use the lit mode (Alt+4) you will see there is no light on our character.
![]()
Hold down the L key and click on an area of the viewport where you would like to place your light.
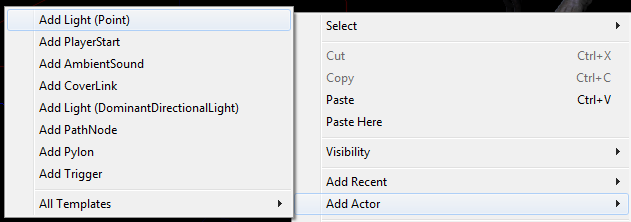
Another way to add a light is to right click in the viewport area and go Add Actor>Add Light (Point)
Once you have placed a light you will be able to move it in position. (If you cannot see the transform manipulator, tap the letter G to go into game mode, you may need to tap spacebar to cycle between translate, rotate and scale mode.)
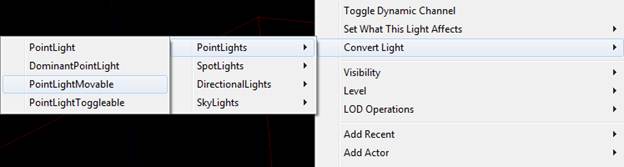
At any time you can convert your light type by selecting your light and right-clicking on it and go Convert Light>Point Lights>choose your light type.
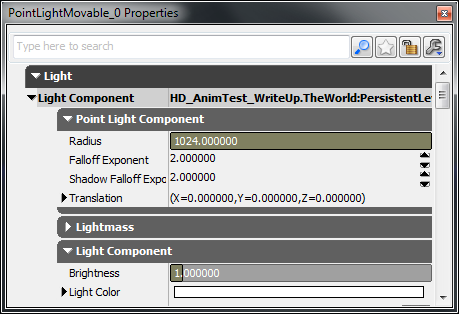
Use this process to add as many lights as needed to your scene. I would advise playing with the radius, color and brightness of each light to get the desired lighting look that you are going for.
___________________________________________________
Step 07 – Adding A Base (Static Mesh) To
Your Scene
.
Use the same export process that you previously used for the skeletal mesh, but this time we will turn off all options for animation in the FBX export settings.

Make sure to use the Import Materials and Import textures option when importing in your FBX. UDK will then create texture and materials for you. (This is a nice little time saver.)
You will also need to set your package and group names for this asset. You can follow the examples for the skeletal mesh talked about earlier in this write up to get an understanding of what to use.
After importing in your FBX, models and textures you should see in the content browser window (Shift+Ctrl+F) your new static mesh.
Double click on the static mesh icon to open the static mesh editor window. Let’s add some simple collision for this object. Go Collision>18DOP simple collision. You might want to try some of the different settings to find the best fit for your model. (In order to see the collision mesh as the green wireframe overlay, use the show collision mesh icon that is located directly below the “window” menu text.)

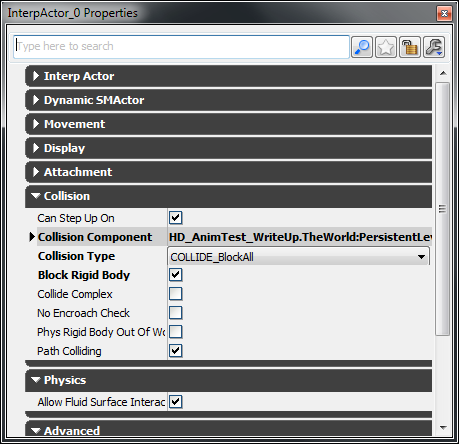
We will also need to change the collision type in the actor properties. Select the mesh and hit F4.
No open the Collision tab and change the Collision type to COLLIDE_BlockAll.
Let’s now add this object to the world. You can click drag the icon from the content browser window into the editor window. Or you can select the icon and right click in the editor window and use the Add InterpActor: (your mesh name) option.
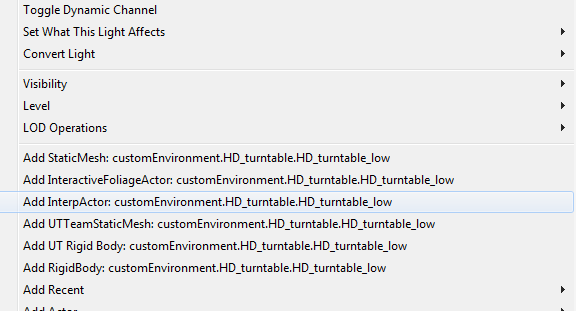
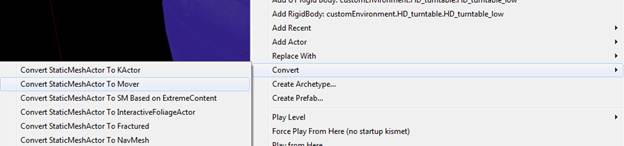
If added your mesh to the world by dragging it by the content browser, we will need to change its actor type. You will need to right click your model in the editor/world and use the Convert options. I’m going to convert my model to a StaticMeshActor to Mover option.
Your static mesh should now be set up and ready to animate using Kismet and Matinee.
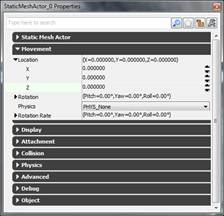
Make sure to zero out the movement/position for your model. (Use the actor properties window F4)
___________________________________________________
Step 08 – Animating A Static Mesh In Kismet/Matinee .
Let’s start with a simple example first. First we will open Kismet. Kismet is UDK’s area where we can tie nodes together with different instructions and functions. This is a very powerful system to achieve programming/scripting type actions in an artist/designer friendly environment.
![]() To
open Kismet click on the icon in the tool bar area:
To
open Kismet click on the icon in the tool bar area:
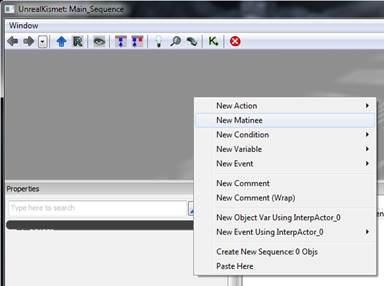
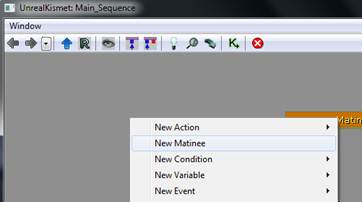
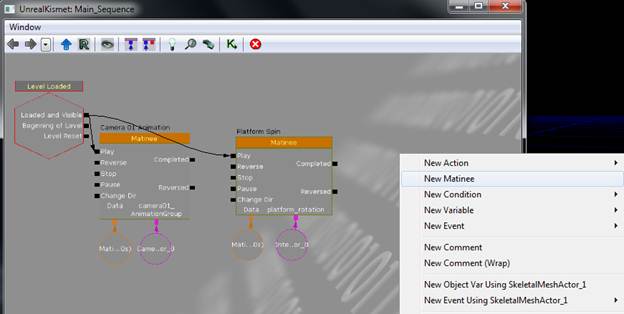
Select your static mesh (the base that my character is standing on in my case.) and right click in the Kismet window’s empty working area. Now use the “New Matinee” function.
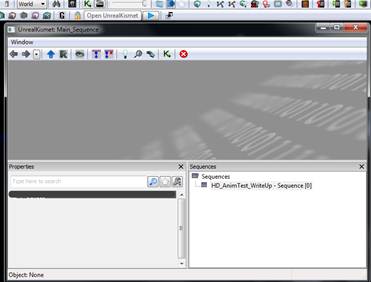
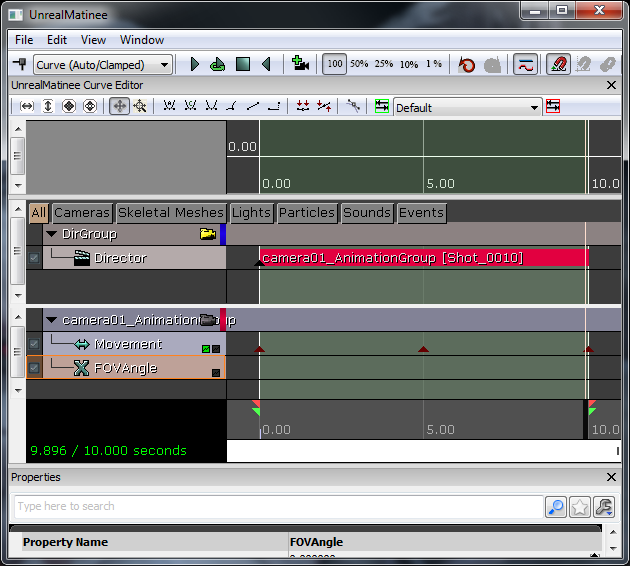
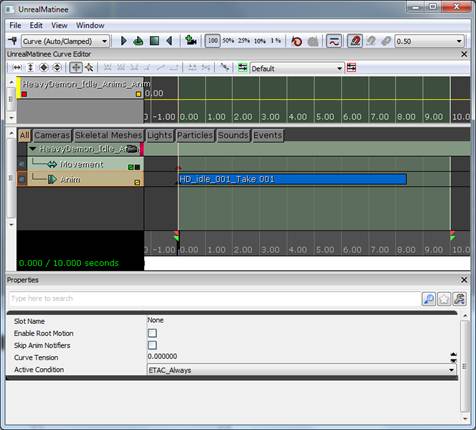
Once your Matinee node is created, double click it to open the unreal matinee window. (This is the area where we will add key frames for our animation.)
To add our current static mesh mover to matinee right click in the lower left hand area and use the Add New Empty Group function.
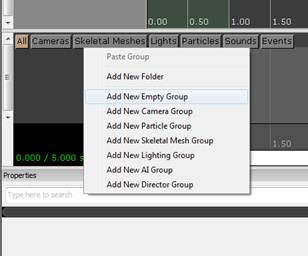
I will give this group a name.

After the group is created I will right click on it and add a new movement track.
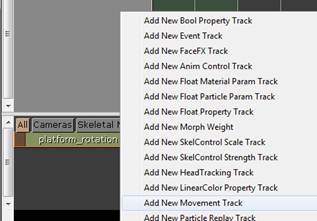
Here are some hints on navigating in this window. Middle mouse scroll up and down will zoom in and out, tap A to frame all in the window, click drag in the lower grey area with the black vertical bar to change your animation time. If you click drag the little red arrow in the lower grey area you can change the end time of your animation. If you drag the little far right green triangle you can change the animation looping area. If you click the add key-frame button (hot key Enter)in the upper left hand corner of the window you can add a key-frame for your currently selected track in the window.
![]()
![]()
![]()
Using the Enter key or add key-frame button while the movement track is selected I will add a key-frame to the beginning of the time slider. (Make sure you have your time slider black bar all the way to the far left to of your animation time line.
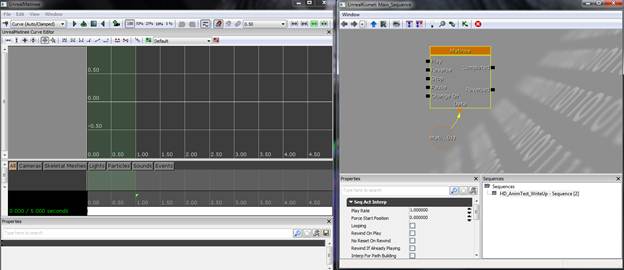
The last thing I will do is select the Matinee node and set the animation to looping. (Seq Act Interp>Looping)

![]()
![]()
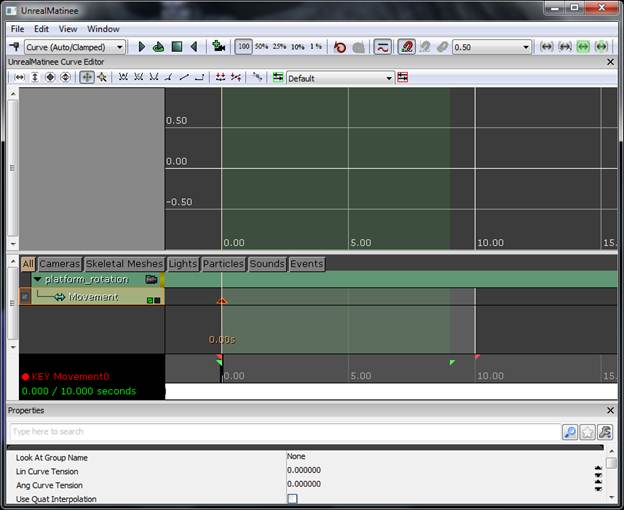
I’m going to drag my red triangle (end of animation marker) to the 10 second mark, then drag your current time slider to the end of the animation using the black bar. Then I am going to rotate my object 180 degree and set a key-frame for the movement track. (I would like to rotate it 360 degree but for some reason UDK doesn’t seem to be picking up a difference in rotation between a 0 and 360 degree value.) Drag your time slide to scrub the animation in the time line.
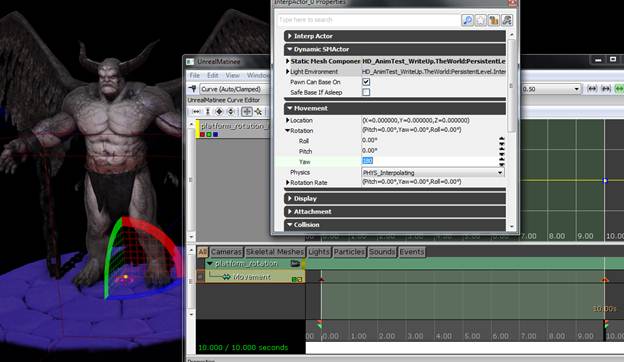
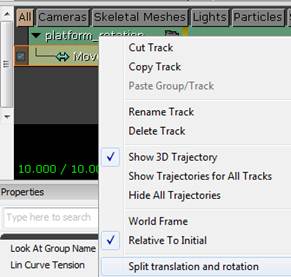
You should see your object animating. Now that I have some animation data on my object I’m going to split the translation and rotation values so I can see their individual key-frame data. Right click on your movement track and use the “Split translation and rotation” option.
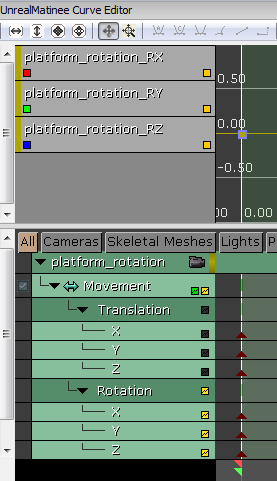
Now that your channels are split you should be able to click on the little squares to the right of the different channels (clicked boxes will be yellow, you can see in the example below I have the Rotation channels visible, because of this I can see them in the graph area in the top area. I can further refine my visible selection by turning off the yellow check boxes in the upper graph area.)
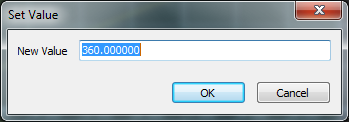
After isolating my rotation of the Z axis I can see the curve and key –frame for the movement track. If I right-click on the key-frame we can type in an exact numerical value for that key-frame.
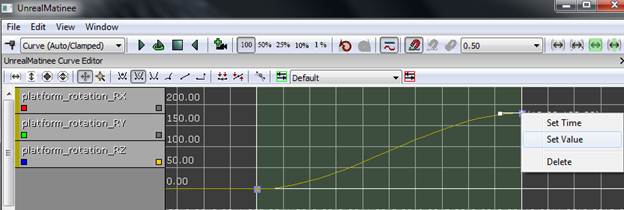
I will give a value of 360 for this key-frame.
![]() The
curve will have ease in and ease out when it is created. I need the object to
rotate at a consistent rate so we need to change the curve to a liner curve.
The
curve will have ease in and ease out when it is created. I need the object to
rotate at a consistent rate so we need to change the curve to a liner curve.
![]()
![]()

___________________________________________________
Step 09 – Animating A Camera In Kismet/Matinee .
Many of the steps for animating a camera in Kismet are very similar to animating a static mesh. Let’s take a look at all the differences there are.
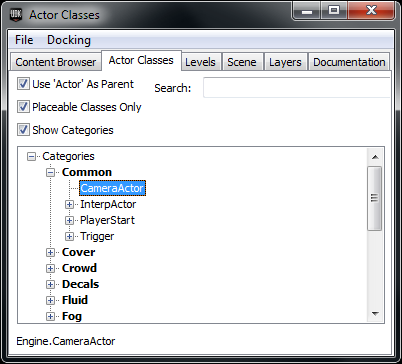
First we will need to make a camera. Open the Content Browser Window (Shift+CTRL+F) and go to the Actor Class Tab and select the CameraActor in Categories>Common>CameraActor.
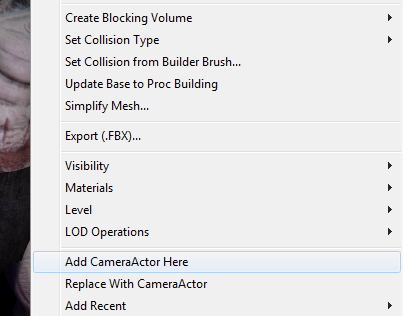
With this selected we can go into our editor window/world and right click. Use the Add CameraActor Here.
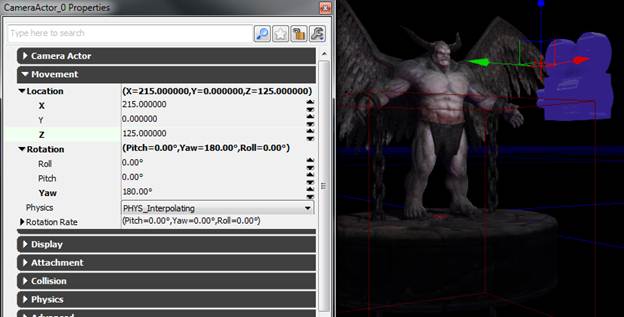
After my camera has been placed in the world I double clicked on the camera to open the actor properties window (or hit F4).
Here are the values that I used for the translation and rotation of my camera.
If you want to look through and move your camera use this icon:
![]()

Click the icon and then click the camera in the world. You should now be looking through the camera and now when you move in the world you are actually moving the camera. (Make sure to deselect the camera to go back to moving in the world without effecting camera information.)
Now that we have our camera created, let’s take a look at how we can animate it in Kismet/Matinee.
Open Kismet ![]() and create a new Matinee. (I’m going to have
my camera selected when I create this.)
and create a new Matinee. (I’m going to have
my camera selected when I create this.)
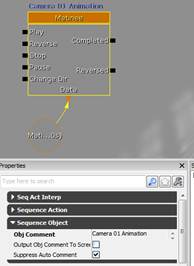
To keep our Matinee sequences easy to identify, we will use the obj Comment tag to give a name to the top of our matinee.
![]()
![]()
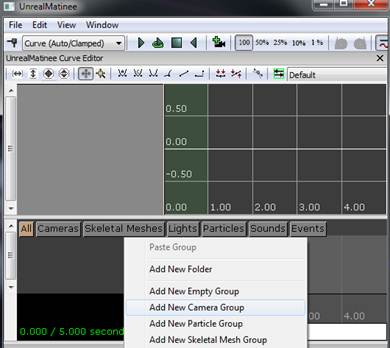
Double click the newly created matinee node to open Matinee. Right click in the lower left grey area next to the time slider area and use the Add New Camera Group. (Make sure your camera is selected when create this.)
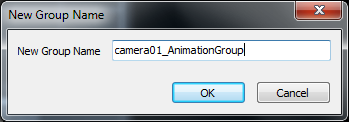
Give this camera group a name.
If you click on the camera icon in the camera group, you can look through your camera as you set key-frames in UnrealMatinee. (While I am here I will change my animation end time and loop time to 10 seconds. I’m also going to select the movement track and hit enter at frame zero to add a key-frame.)
![]()
![]()
![]()
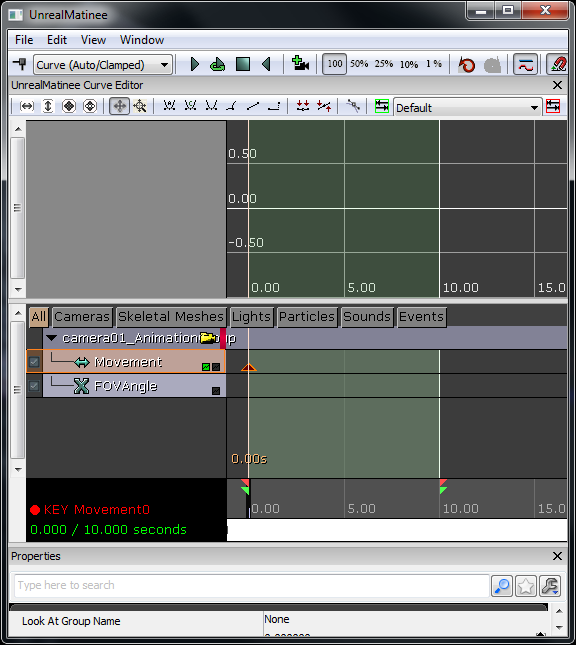
Now I will drag my time slider to the end of the 10 second animation sequence and move my camera and set a new key-frame.
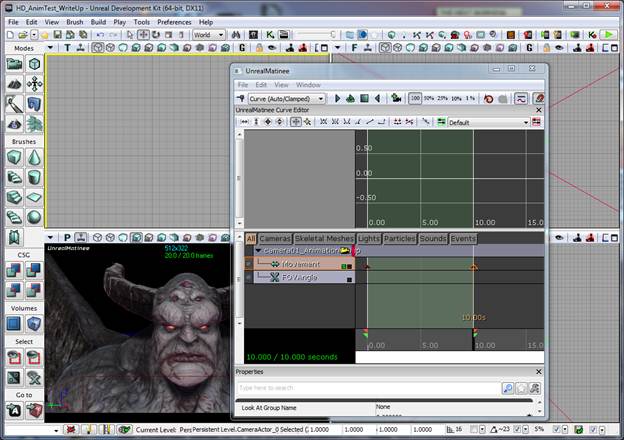
If we switch to a quad view it will make it a little easier for us to see our Matinee camera view and have the ability to see and move our camera and still be able to look through it at the same time. (Use the buttons highlighted in red below to change from a single view to a quad view)
![]()
![]()
![]()
You should be able to scrub through your time slider now and see your camera view animating.
The next thing we need to do is tell UDK what camera to use during our animation. In UDK you can have multiple cameras and camera cuts during a cinematic animation sequence. So we need to specify what camera we will be using for our animation.
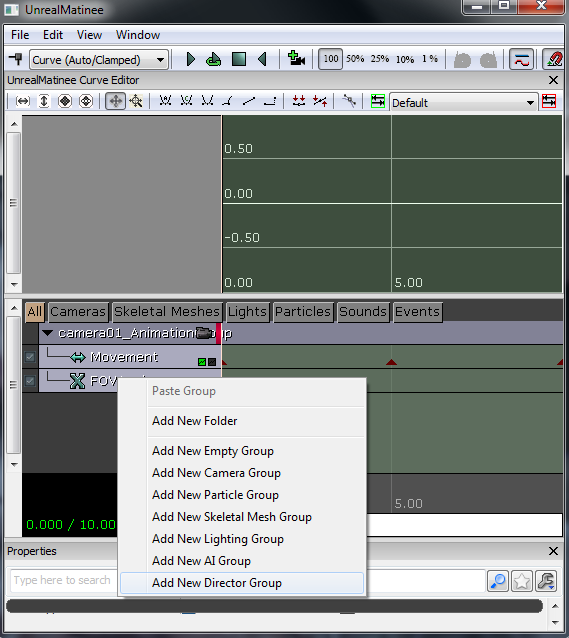
In the UnrealMatinee window right click in the empty grey area in the lower left hand corner and use the Add New Director Group.
Now select your newly created Director group and hit enter. This will bring up the New Cut window. Choose the camera that you would like to set your key for and hit OK.
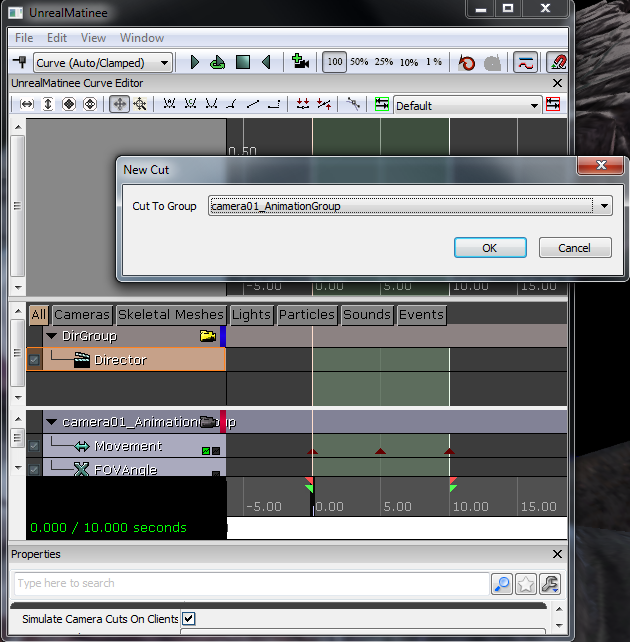
You should now see a large animation key-frame block associated with the director group.
___________________________________________________
Step 10 – Kismet (Playing Matinee Sequence With Level Start Up).
You may have noticed that our little animation pieces are only playing when Matinee is invoked. If we go to play in editor or try to play from here in viewport you will probably fall to your death or the camera that we look through will not be the one that we set up.
We need to give UDK a little more information in order to have things play in the order that we are looking for.
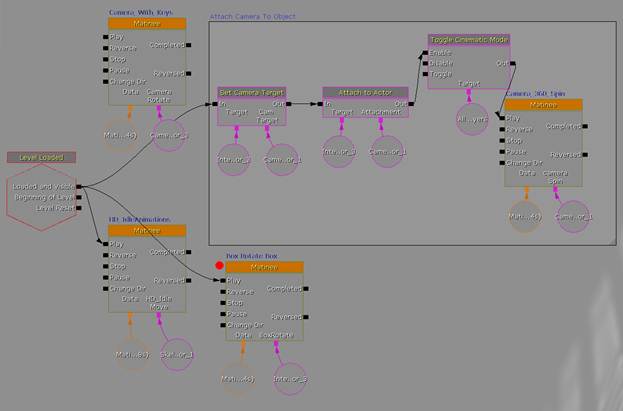
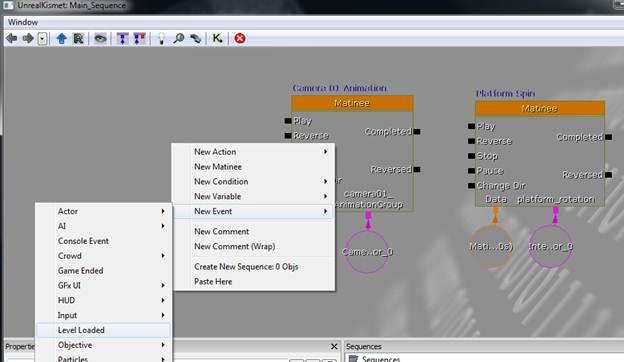
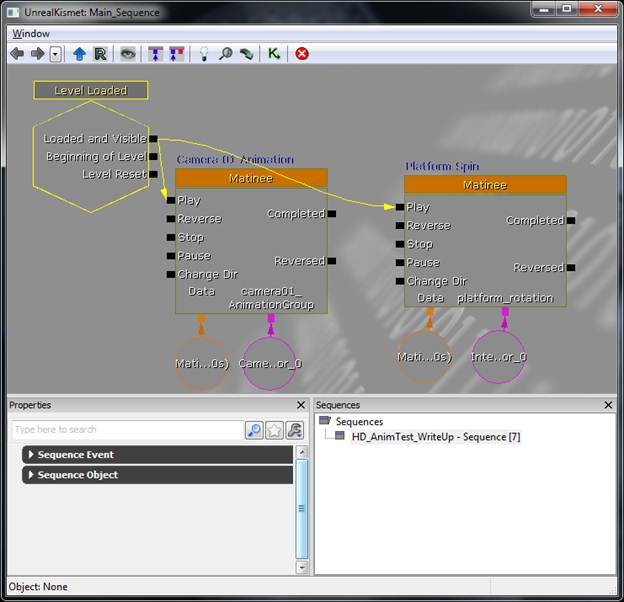
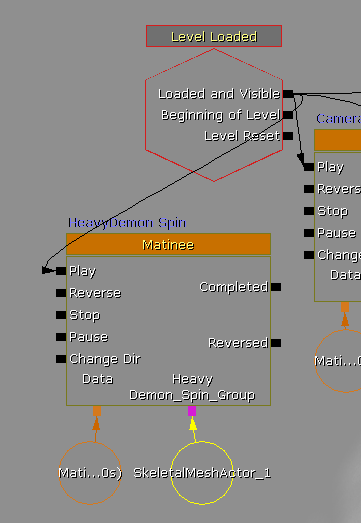
Let’s go back into Kismet and create a Level Loaded node. Right click in an open are of Kismet and go New Event>Level Loaded.
No that our Level Loaded node is created connect the Loaded and Visible out to the Play of the Matinee nodes.
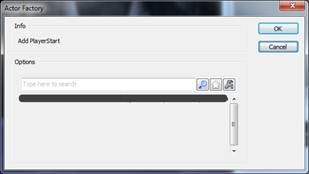
We will also need to add a player start position for our level. Select a piece of geometry (in my case I will use the spinning base.) and right click and go Add Actor>All Templates>AddPlayerStart.
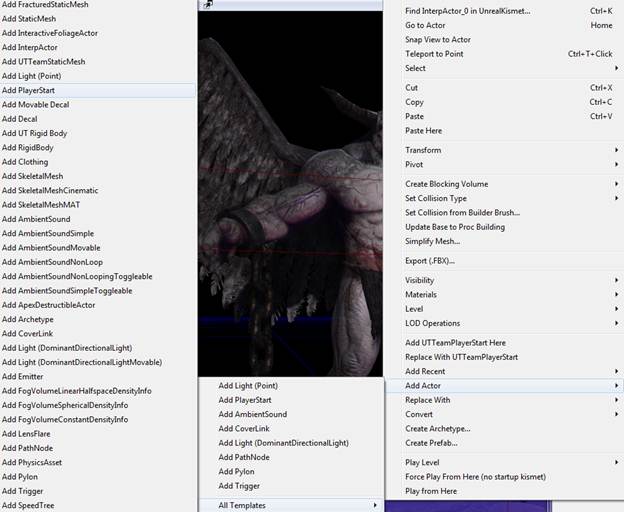
Hit OK at this screen.
Now that your player start position has been created you can position it anywhere you wish in the world.
___________________________________________________
Step 11– Adding Key-Frames To Your Skeletal
Mesh Through Kismet/Matinee .
Now that we have animation playing on our static mesh and our director driven camera, let’s look at how to add animation to our skeletal mesh using Kismet and Matinee.
First select your
skeletal mesh (this can be done in the content browser window or in the world.)
and open up Kismet. ![]()
Once Kismet is open create a new Matinee by right clicking in the open grey area in Kismet and use the New Matinee function.
Let’s give this new matinee node a name by writing a name in the Obj Comment section.
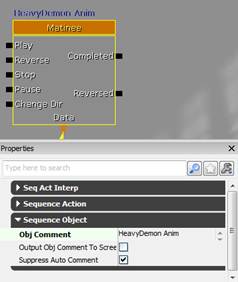
With your skeletal mesh still selected, double click on the matinee node to open kismet.
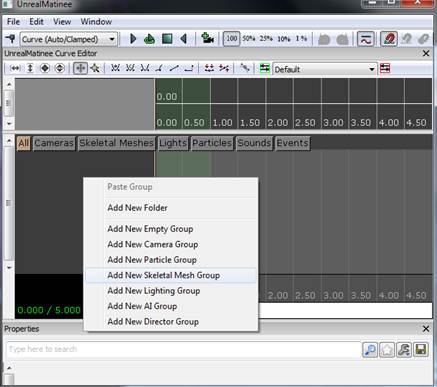
In the open grey area (lower left hand corner) right click and use the Add New Skeletal Mesh Group.
Give it a name:

Let’s make sure we have our AnimSet plugged into our mesh before we try to add an animation key-frame. Open the SkeletalMeshActor Properties window (F4 with skeletal mesh selected.) and then select your AnimSet node in the content browser window and plug it into the Skeletal Mesh Actor>Skeletal Mesh Component>Anim Sets slot.
![]()
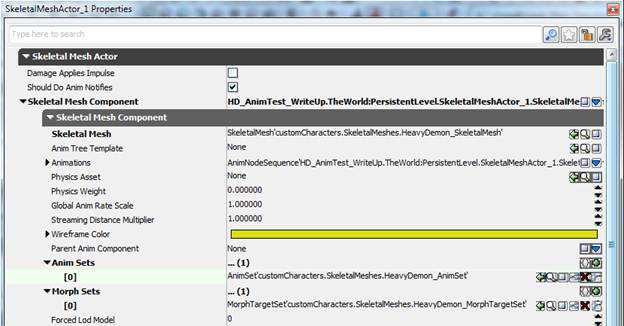
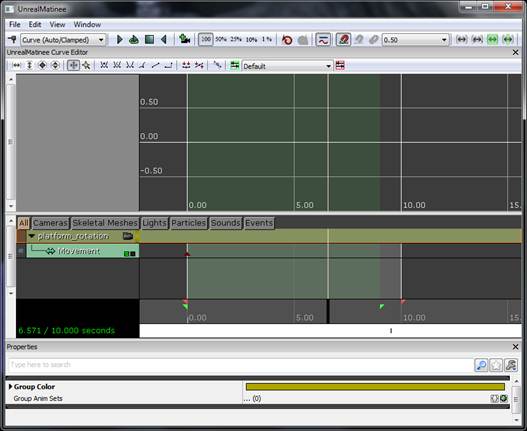
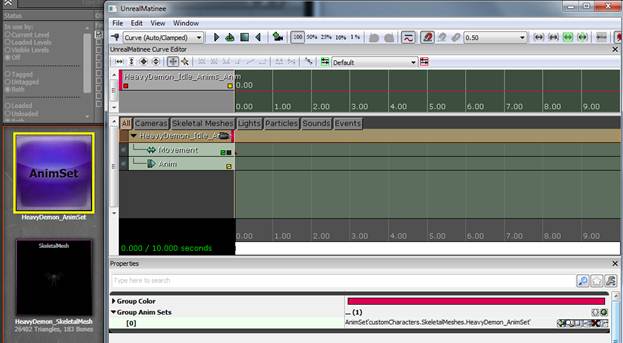
We also need to select our animation group node in Matinee and plug in the AnimSet node in the Group Anim Sets slot as well.

![]()
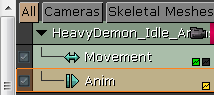
Once this is all set up we can select the Anim track in Matinee and hit enter to add a new key-frame (sequence).
After you hit enter you should see a dialogue box like this that will allow you to choose from the animations in your AnimSet. Select an animation and hit OK.
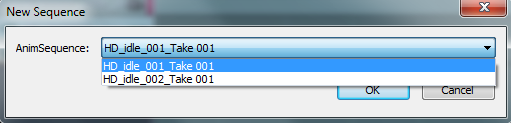
This should build a key-frame sequence in Matinee.
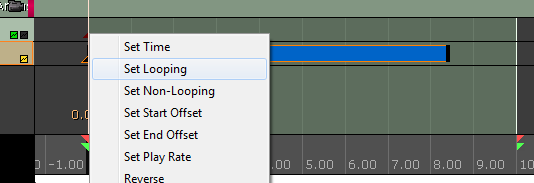
If you want this animation sequence to be looping you can select the triangle key-frame at the beginning of the sequence and right click on in and use “Set Looping.)
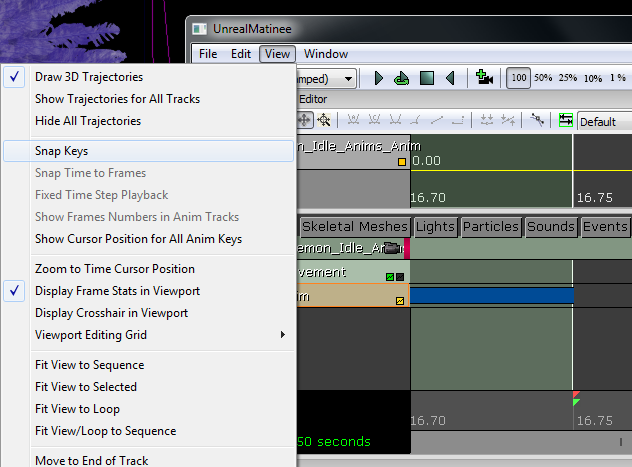
You may need to turn snapping off and set your animation end point and animation loop point to match the length of your animation sequence in order for your animation to loop correctly.
![]()
![]()
![]()
You should be able to loop play your animation sequence in Matinee to check and make sure everything is working correctly.
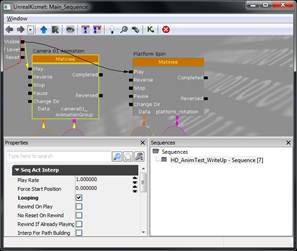
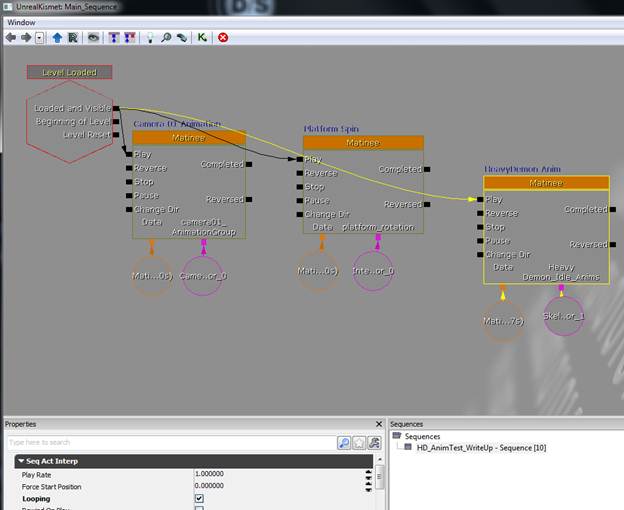
In Kismet I’m going to select my new matinee animation node and plug the Level Loaded Loaded and Visible out to the Play of my new node. I’m also going to set my node to Looping for the Seq Act Interp of the node.
While we are in Kismet and Matinee we can also put rotation on our skeletal meshes movement track (same node as the one we just created for the skeletal animation.) I’m going to rotate my character 360 degree at the same rate as my platform to make it appear that they are both spinning together.
This can all be done with the same animation node but in my case some of the timing was a little tricky to get everything to play exactly the way I wanted time wise. So I just ended up creating a new matinee just for the rotation of my character.
Here is example of what I created. (The motion for this was done exactly in the same way we created motion for the static mesh earlier in this doc.) I also set this node to loop as well.
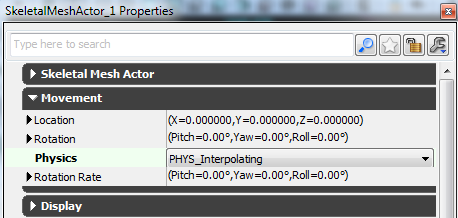
Side note -after I plugged this in and double clicked on my matinee node I received this warning:
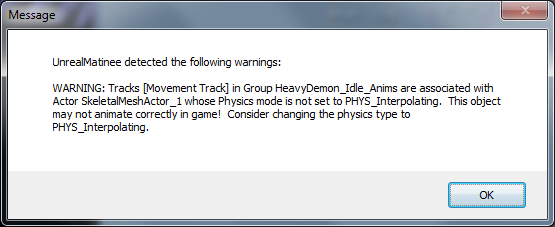
This can be fixed by opening the SkeletalMeshActor Properties window (select your mesh and hit F4) and changing the Physics type to PHYS_Interpolating.
You may also get a warning that you need to rebuild your lighting when you play this level in editor window.
This is pretty easy to fix as well. Just go Build>Lighting
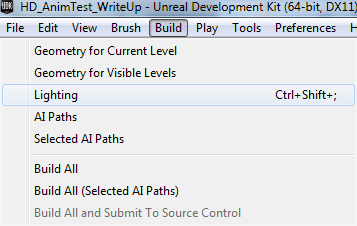
I will just use the default options:
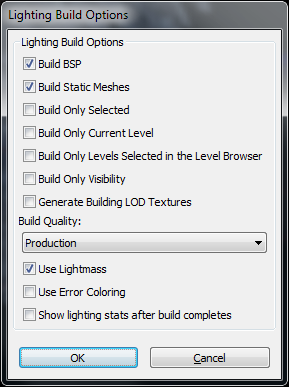
Build Quality at Production is obviously the best setting and takes the longest to bake but we don’t have may objects in our scene so I will go ahead and take the small time hit.
You may also need to rebuild paths as well. We might as well use the “Build All” option to remove all warnings on screen.
![]()
___________________________________________________
Step
12-Capture Your Animation As Single Frame BMP Files .
If we want to capture our animated turntable, we will have to use UDK’s method of dumping screen grab files as BMP’s to a designated directory.
There is a complete write up for this on the UDN website:
http://udn.epicgames.com/Three/CapturingCinematicsAndGameplay.html
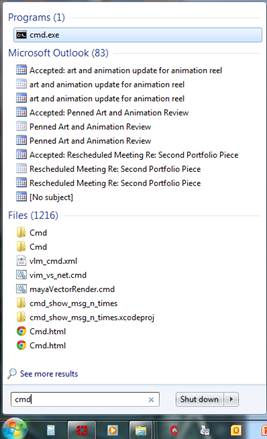
The quick version is this, Open the Command Window. Go to the windows start menu and type in CMD. Then use the cmd.exe.
In the Command Prompt window you will need to navigate to C:\UDK\Currnet Build Number\Binaries\Win64 (In my case I will use C:\UDK\UDK-2012-03\Binaries\Win64)
I need to go to the Win64 directory because I am using a 64 bit machine running UDK in DX11 mode.
Once you have navigated to this area you will have to use these commands in the Command Prompt window.
UDK.exe replaceYourMapFileNameHere -BENCHMARK -MAXQUALITYMODE -NOTEXTURESTREAMING -DUMPMOVIE -FPS=30 -ResX=1280 -ResY=720
In my case I will be using:
UDK.exe HD_AnimTest_WriteUp.udk -BENCHMARK -MAXQUALITYMODE -NOTEXTURESTREAMING -DUMPMOVIE -FPS=30 -ResX=1280 -ResY=720

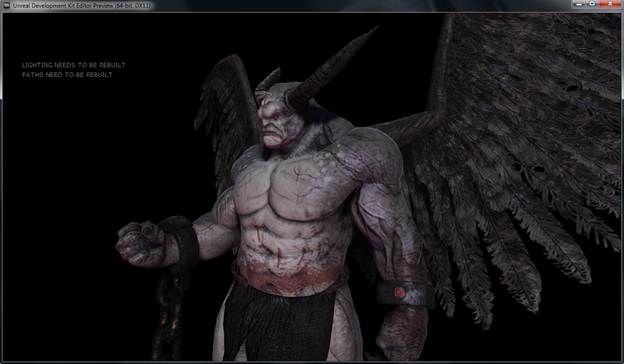
Once you hit enter after putting these inputs in, UDK should load in game mode and play your animation. It will start capturing frames as soon as UDK loads.
You should find your screen grabs in an area like this:
C:\UDK\UDK-2012-03\UDKGame\Screenshots\Win64
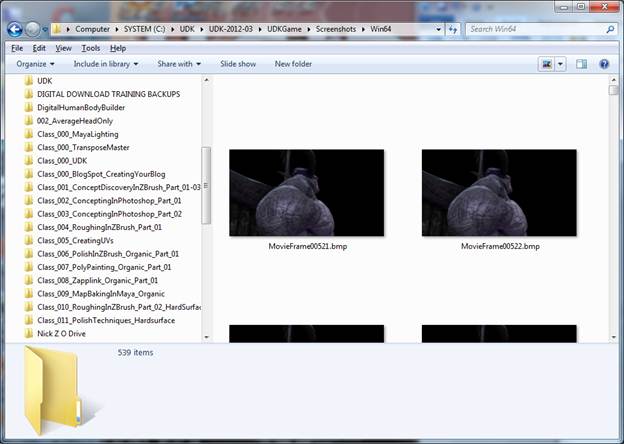
Just be warned, this process will take a lot of hard drive space to write out all the individual BMP files.
I hope this write up helps!