Enabling Long-term Retention for the VPGs
Follow this procedure to enable Long-term Retention for a VPG.
Long-term Retention can be enabled at the same time when you first create the VPG to protect virtual machines.
You can also enable Long-term Retention by editing an existing VPG.
| Note: |
Long-term Retention is not available when the VPG is recovered to a Public Cloud.
Before you begin
| • | Verify that a Repository was created where the Retention sets will be saved. Repositories are created and configured via the SETUP tab. For more information, see Creating a New Repository for Retention. |
To enable Long-term Retention for a VPG:
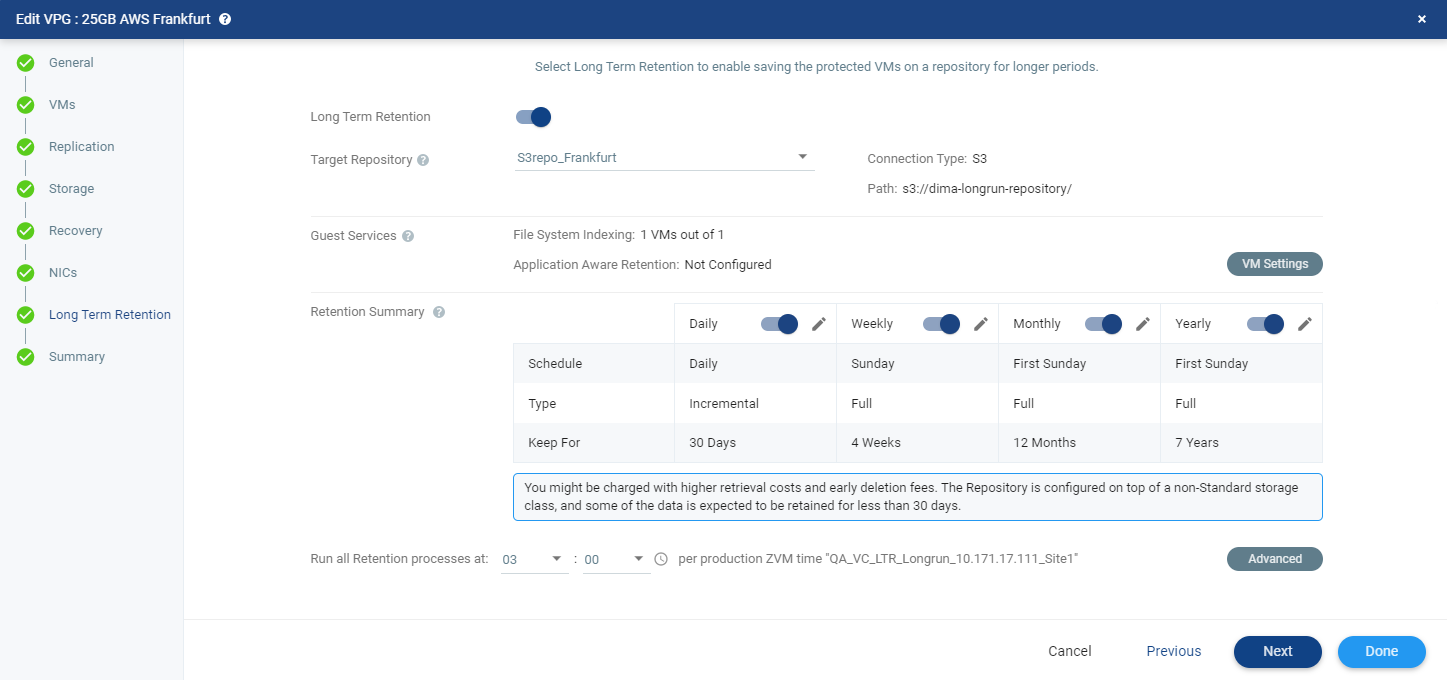
| 1. | Toggle Long-term Retention from OFF to ON. |
The options on the screen become available.
| Note: | When a VPG is recovered to a Public Cloud, Long-term Retention is not available. |
| 2. | Select the Target Repository from the drop-down list. This is the name of the Repository where the Retention sets are written. The Connection Type and Path of that Repository appear after selecting the Target Repository. |
| 3. | (Optional) In the Guest Services area, click the button VM Settings to enable File System Indexing and Application-aware Retention for the virtual machines. |
The Guest Services Settings window is displayed.
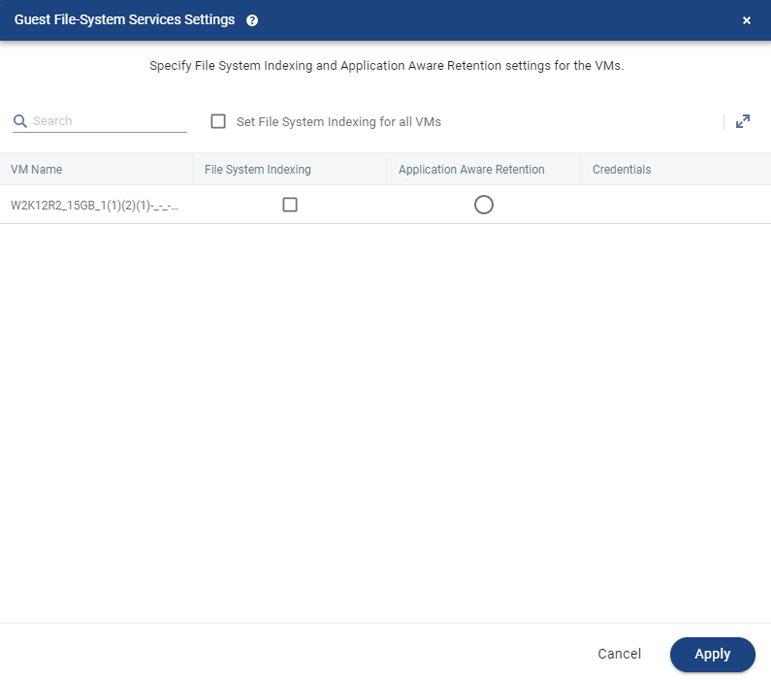
Specify the File System Indexing and Application-aware Retention settings for the VMs:
| Set File System Indexing for all VMs |
Select this checkbox to enable File System Indexing for all the VMs in the selected VPG. |
| VM Name |
This column lists the name of the available VMs. |
| File System Indexing |
Select this in order to select the virtual machines where File System Indexing will be performed. |
|
(VMware vSphere only) Application Aware Retention |
Select this in order to select the virtual machine where you will enable Application-aware Retention. Only one virtual machine can be selected. . |
|
(VMware vSphere only) Credentials |
Click to select the Alias that matches the Credentials for the selected virtual machine. The Credentials are used by Application-aware Retention to access the VM and trigger the VSS mechanism, according to the scheduled Retention process time. |
| 4. | In Retention Summary, define the scheduling. Set the time to start the Retention process in the area Run all Retention processes at. |
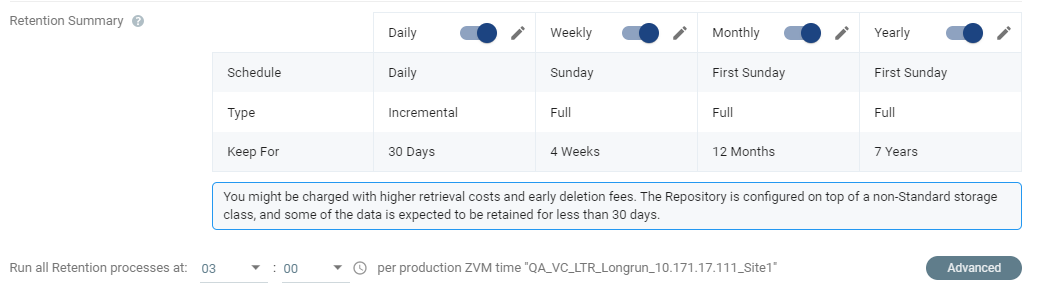
| Note: | For Amazon S3 and Microsoft Azure Storage Repositories, you might be charged with higher retrieval costs and early deletion fees when the repository is configured on top of a non-Standard storage class, and some of the data is expected to be retained for less than 30 days. |
| • | The time is shown in UTC and is according to the Zerto Virtual Manager clock in the production site. All Daily, Weekly, Monthly or Yearly retentions will run at this time. |
| Note: | Retention process can be triggered within 12 hours from the scheduled run time. |
| • | Daily and Monthly retentions are toggled ON by default, and their default Retention scheduling settings appear in the rows Schedule, Type and Keep For. |
| • | By default, all Retention processes are scheduled to run on the same day. |
Tip: When needed, you can manually run the Retention process ad-hoc. For more information, see Manually Running the Retention Process.
| 5. | (Optional) Toggle the Daily, Weekly, Monthly or Yearly retentions from OFF to ON. Their default Retention scheduling settings appear in the rows Schedule, Type and Keep For. |
| • | The Retention setting Keep For is the length of time to keep the Retention sets. For details of how this affects the number of Retention sets saved, see Storing Retention Sets. |
| 6. | To change the default settings, click the edit icon next to each Retention setting and configure the following: |
| Setting & Description | Select... | ||||||||
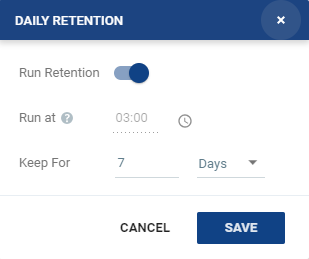
| Daily | |||||||||
|
Click the edit icon. The Daily Retention window is displayed.
|
|
||||||||
|
|||||||||
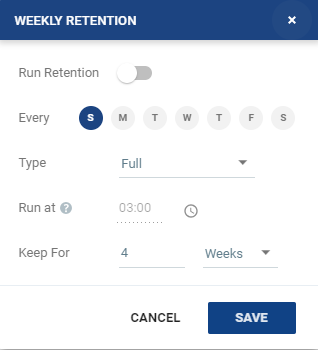
| Weekly | |||||||||
|
Click the edit icon. The Weekly Retention window is displayed.
|
|
||||||||
|
|||||||||
|
|||||||||
|
|||||||||
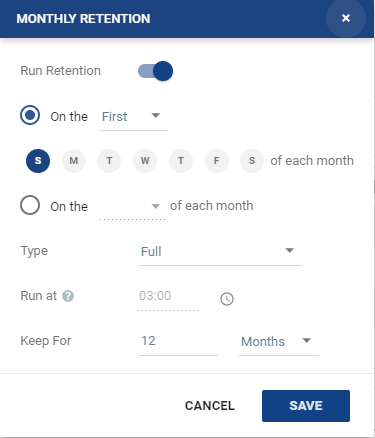
| Monthly | |||||||||
|
Click the edit icon. The Monthly Retention window is displayed.
|
|
||||||||
|
|||||||||
|
|||||||||
|
|||||||||
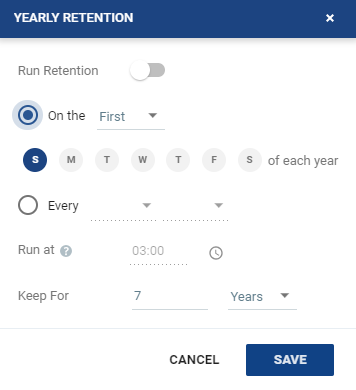
| Yearly | |||||||||
|
Click the edit icon. The Yearly Retention window is displayed.
|
|
||||||||
|
|||||||||
|
|||||||||
| 7. | For advanced settings, click Advanced. See |
See also:
| • | Long-term Retention - Overview |
| • | Workflow: Using Zerto’s Long-term Retention |
| • | Creating a New Repository for Retention |
| • | Manually Running the Retention Process |
| • | Monitoring and Managing Long-term Retention on page 1 |