Configure and Install VRA Dialog
To install a Zerto Virtual Replication Appliance (VRA) on a host:
1. In the Zerto User Interface, click SETUP > VRAs.
2. Select a host which requires a VRA and click NEW VRA.
The Configure and Install VRA dialog is displayed.
■ If you selected a cluster or multiple hosts, the VRA is installed on the first host in the displayed list.
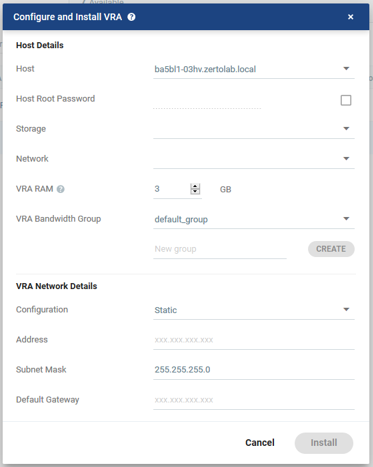
3. Specify the following Host Details:
■ Host: The host under which the VRA is installed. The drop-down displays the hosts which do not have a VRA installed, with the selected host displayed by default.
■ Host Root Password: For future use.
■ Storage: The storage that contains the OS disks of the VRA VM. You can install more than one VRA on the same storage.
■ Network: The network used to access the VRA.
■ VRA RAM: The amount of memory to allocate to the VRA. The amount determines the maximum buffer size for the VRA for buffering IOs written by the protected virtual machines, before the writes are sent over the network to the recovery VRA. The recovery VRA also buffers the incoming IOs until they are written to the journal. If a buffer becomes full, a Bitmap Sync is performed after space is freed up in the buffer. For details, refer to
Zerto Scale and Benchmarking Guidelines.
■ VRA Bandwidth Group: Choose the VRA Bandwidth Group from the dropdown list. If you want to create a new VRA group, type in the name of the new group and click CREATE. You can then choose the new group from the dropdown list.
You group VRAs together when VRAs use different networks so they can be grouped by network, for example when the protected and recovery sites are managed by the same SCVMM and you want to replicate from the branch site to the main site. Within a group the priority assigned to a VPG dictates the bandwidth used and is applicable within a group and not between groups. Thus, a VPG with a high priority is allocated bandwidth before VPGs with lower priorities. VPGs that are on VRAs with different VRA groups, for example, VPG1 on VRA1 in group1 and VPG2 on VRA2 in group2, do not affect each other, as the priority is relevant only within each group.
4. Specify the following VRA Network Details:
■ Configuration: Either have the IP address allocated via a static IP address or a DHCP server. If you select the Static option, which is the recommended option, enter the following:
■ Address: The IP address for the VRA.
■ Subnet Mask: The subnet mask for the network. The default value is 255.255.255.0.
■ Default Gateway: The default gateway for the network.
5. Click INSTALL.
The VRA installation starts and the status is displayed in the TASKS popup dialog in the status bar and under MONITORING > TASKS.
The VRA displayed name, and DNS name, is Z-VRA-hostname. If a virtual machine with this name exists, for example when a previous VRA was not deleted, the VRA name has a number appended to it.
6.