Initiating Failover Live
You can initiate a failover, whereby the virtual machines in the virtual protection group (VPG) or specific virtual machines in a virtual protection group (VPG) are replicated to a set checkpoint in AWS.
You can initiate a failover to the last checkpoint recorded in the journal, even if the protected site is no longer up. You can initiate a failover during a test, as described in
Initiating Failover Live During a Test.
If you have time to initiate the failover from the protected site you can. However, if the protected site is down, you initiate the failover from AWS.
Note: Any VPGs that are in the process of being synchronized, cannot be recovered, unless the synchronization is a bitmap synchronization.
To initiate a failover:
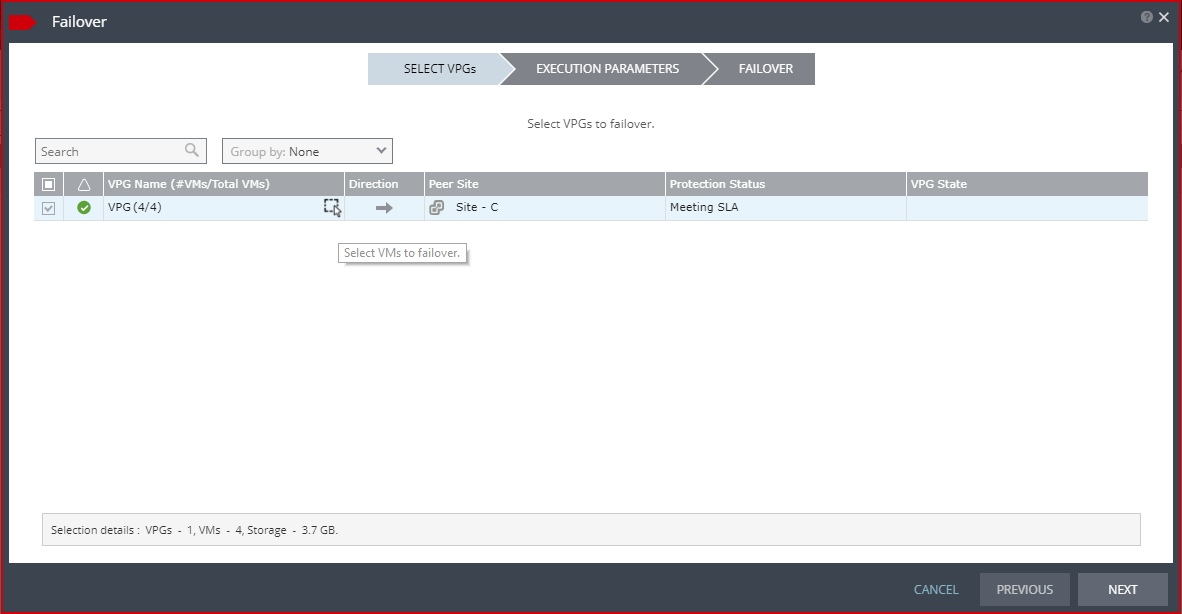
1. In the Zerto User Interface set the operation to LIVE and click FAILOVER.
The Failover wizard is displayed.
2. Select the VPGs to failover. By default, all VPGs are listed.
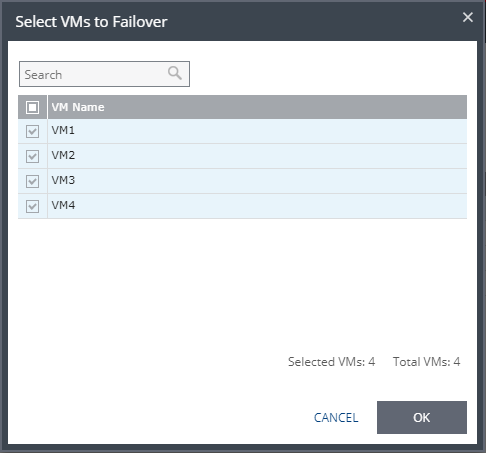
a) To select specific VMs in a VPG, click the icon next to each VPG to get a list of VMs. The Select VMs to Failover dialog is displayed. By default, all VMs are selected.
b) Select the VMs to failover.
Note: Selecting specific VMs in a VPG to failover is not supported when replicating from a vCD site.
At the bottom, the selection details show the amount of data and the total number of virtual machines selected.
The Direction arrow shows the direction of the process: From the protected site To the peer, recovery, site.
3. Click NEXT.
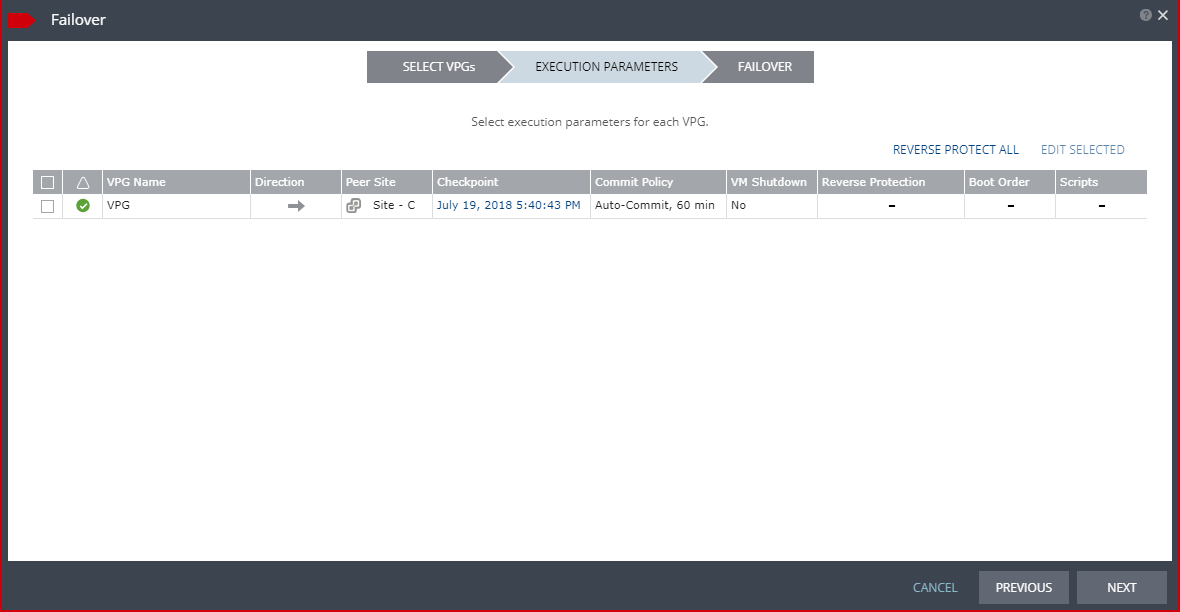
The EXECUTION PARAMETERS step is displayed.
You can change the following values to use for the recovery:
■ The commit policy
■ The checkpoint to use
■ The shutdown policy
■ Reverse protection settings
You can also see if a boot order and scripts are defined for the VPG.
4. By default, the last checkpoint added to the journal is displayed. If you want to use this checkpoint, go to the next step. If you want to change the checkpoint, click the checkpoint.
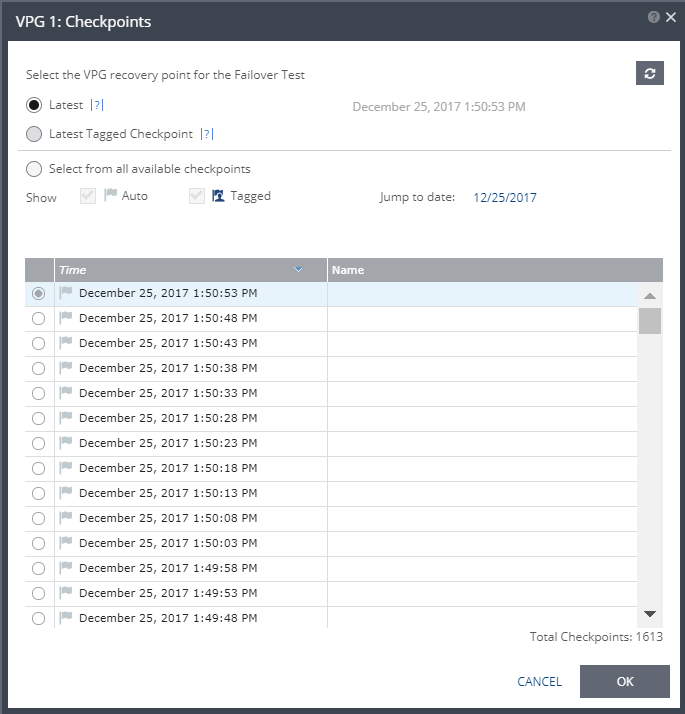
The {VPG-Name}: Checkpoints dialog is displayed.
5. Select the checkpoint to use. Click the refresh button to refresh the list. You can choose from one of the following checkpoints:
6. By default, the last checkpoint added to the journal is displayed in the Checkpoint column
■ To use this checkpoint, proceed to the next step.
■ To change the checkpoint, click the link that appears as the checkpoint.
A window appears, displaying a list of the VPGs’ checkpoints.
Latest: Recovery is to the latest checkpoint. This ensures that the data is crash-consistent for the recovery.
When selecting the latest checkpoint, the checkpoint used is the latest at this point.
If a checkpoint is added between this point and starting the failover, this later checkpoint is not used.
Latest Tagged Checkpoint: The recovery operation is to the latest checkpoint added in one of the following situations:
■ By a user.
■ When a failover test was previously performed on the VPG that includes the virtual machine.
■ When the virtual machine was added to an existing VPG after the added virtual machine was synchronized.
7. To use a checkpoint which is not the latest checkpoint, or the latest tagged checkpoint, choose Select from all available checkpoints. By default, this option displays all checkpoints in the system. You can choose to display only automatic, or tagged checkpoints, or any combination of these types.
8. Click OK. A warning appears informing the user if the selected VMs were not protected with the selected checkpoint.
9. To change the commit policy, click on the field or select the VPG and click EDIT SELECTED.
a) To commit the recovery operation automatically, with no testing, select Auto-Commit and 0 minutes.
b) Select None if you do not want an automatic commit or rollback. You must manually commit or roll back.
c) To test before committing or rolling back, specify an amount of time to test the recovered machines, in minutes.
This is the amount of time that the commit or rollback operation is delayed, before the automatic commit or rollback action is performed.
During this time period, check that the new virtual machines are OK and then commit the operation or roll it back.
The maximum amount of time you can delay the commit or rollback operation is 1440 minutes, which is 24 hours.
10. To specify the shutdown policy, double-click the VM Shutdown field and select the shutdown policy:
No (default): The protected virtual machines are not touched before starting the failover. This assumes that you do not know the state of the protected machines, or you know that they are not serviceable.
Yes: If the protected virtual machines have a utility such as VMware Tools or Microsoft Integration Services available, the virtual machines are gracefully shut down, otherwise the Failover operation fails. This is similar to performing a Move operation to a specified checkpoint.
Force Shutdown: The protected virtual machines are forcibly shut down before starting the failover. This is similar to performing a Move operation to a specified checkpoint. If the protected virtual machines have Microsoft Integration Services available, the procedure waits five minutes for the virtual machines to be gracefully shut down before forcibly powering them off.
11. To specify reverse protection, whereby the virtual machines in the VPG are failed over to the recovery site and then protected in the recovery site, back to the original site, either:
■ Click REVERSE PROTECT ALL. This activates reverse protection on all the VPGs and/or VMs that you plan to Failback. The system default values for this procedure will be assigned to all the VPGs.
-or-
■ Click the Reverse Protection field.
If you want to configure the VPG for reverse protection, click the REVERSE link.
12. The Edit Reverse VPG window is displayed and you can edit the reverse protection configuration. The parameters are the same as described when you create a VPG, with the following differences:
■ You cannot add or remove virtual machines in the reverse protected VPG.
■
■ If VMware Tools or Microsoft Integration Services are available for vSphere or Hyper-V respectively, for each virtual machine in the VPG, the IP address of the originally protected virtual machine is used. Thus, during failback the original IP address of the virtual machine on the site where the machine was originally protected is reused. However, if the machine does not contain the utility, DHCP is used. The host version must be 4.1 or higher for re-IP to be enabled.
■ The Failover Test field is empty and does not display a default. Note that although this field is empty, the Failover Test will succeed. The settings can be changed on the recovered VMs.
14. Click NEXT.
15. Click OK. If a virtual machine is deleted from other VPGs, the journals of these VPGs are reset.
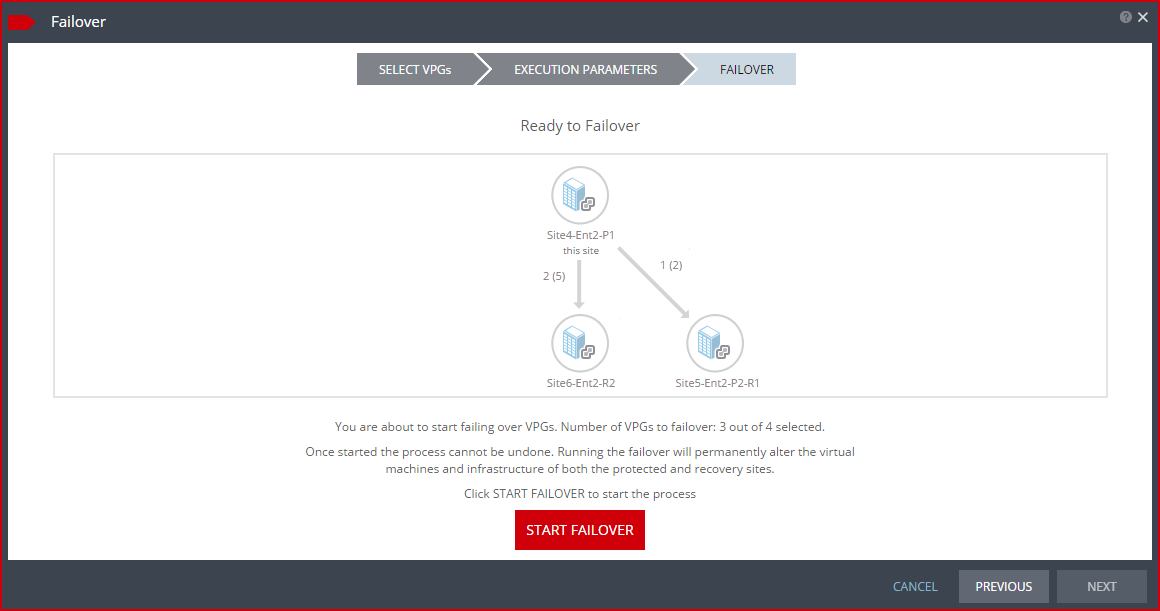
The FAILOVER step is displayed. The topology shows the number of VPGs and virtual machines being failed over to each recovery site. In the following example, 2 VPGs will be failed over to Site6-Ent2-R2, and they contain 5 virtual machines; and 1 VPG will be failed over to Site5-Ent2-P2-R2 and it contains 2 virtual machines.
16. Click START FAILOVER.
A warning message appears, presenting a summary of your Commit Policy.
17. Review the Commit Policy summary, and either click Change Settings, or click START FAILOVER to start the failover.
If a commit policy was set with a timeout greater than zero, you can check the new instances on AWS before committing the failover operation.
The failover starts by creating the new instances on AWS to the point-in-time specified: either the last data transferred from the protected site or to one of the checkpoints written in the journal.
Note: If a virtual machine exists on AWS with the same name as a virtual machine being failed over, the machine is created and named in the peer site with a number added as a suffix to the name, starting with the number 1.
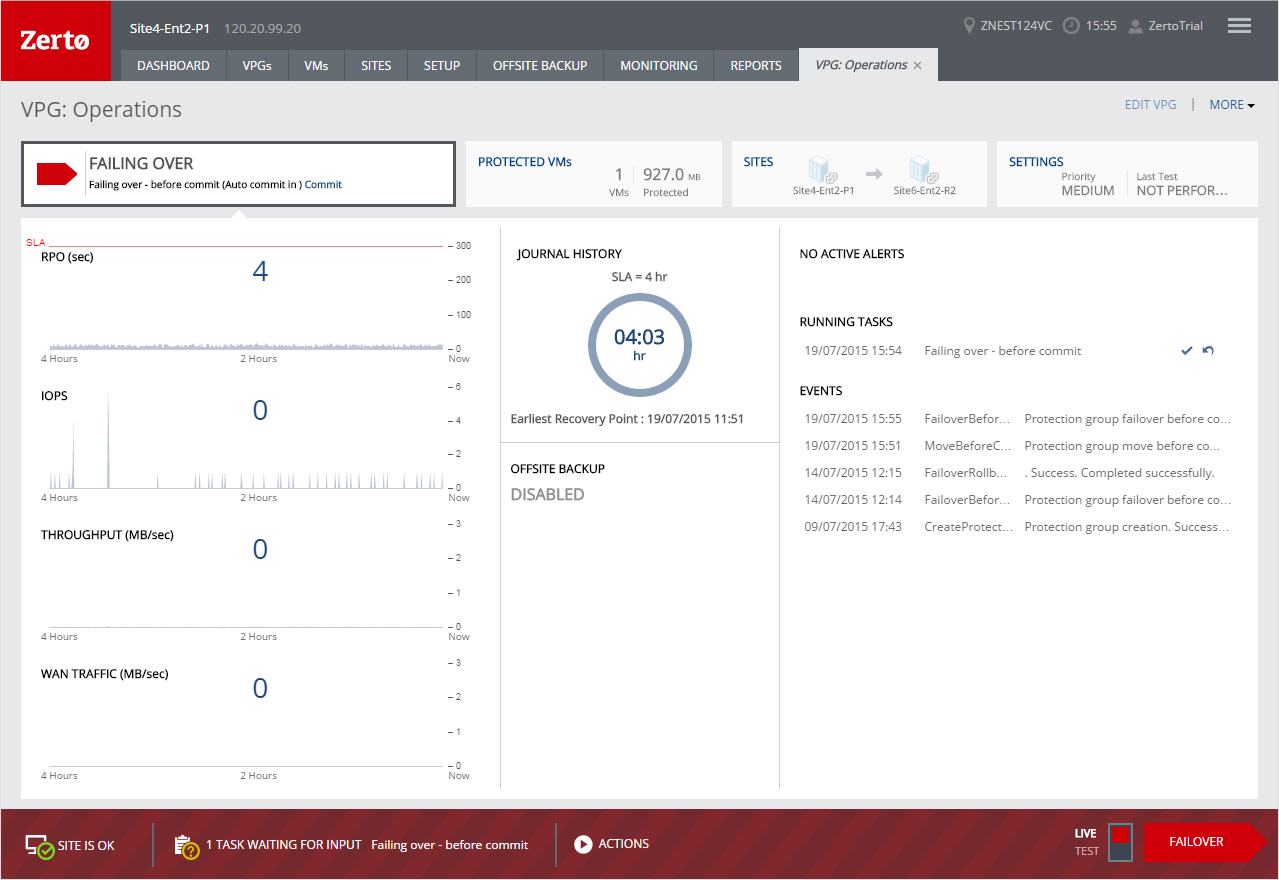
The status icon changes to orange and an alert is issued, to warn you that the procedure is waiting for either a commit or rollback.
All testing done during this period, before committing or rolling back the failover operation, is written to EBS virtual disks. These virtual disks are automatically defined when the instances are created on AWS for testing.
Note: You cannot take a snapshot of a virtual machine before the failover operation is committed and the data from the journal promoted to the moved virtual machine disks, since the virtual machine volumes are still managed by the VRA and not directly by the virtual machine. Using a snapshot of a recovered machine before the failover operation has completed will result in a corrupted virtual machine being created.
18. After checking the virtual machine instances in AWS, choose one of the following:
■ Wait for the specified Commit Policy time to elapse, and the specified operation, either Commit or Rollback, is performed automatically.
■ Click the
Commit or
Rollback icon (

) in the specific VPG tab.
Click Commit. The Commit dialog is displayed to confirm the commit. When committing failover, if specific VMs in a VPG are selected, a new VPG will be created in addition to the original VPG. The additional VPG includes only the VMs selected for recovery. The new VPG name is displayed as {Original-VPG-Name-Partial}. The original VPG will remain intact with its history.
Click Rollback to roll back the operation, removing the virtual machines that were created on the recovery site and rebooting the machines on the protected site. The Rollback dialog is displayed to confirm the rollback.
You can also commit or roll back the operation via the TASKS popup dialog in the status bar, or by selecting MONITORING > TASKS.
The protected virtual machines are created as new instances in EC2. The default value for new instances in Zerto Virtual Replication is m3.xlarge except in the Asia Pacific (Seoul) region where they are defined as m4.xlarge instances. If these instances do not meet your needs, you can change this value in the Policies tab of the Site Settings dialog, see
“Configuring Disaster Recovery Policies”, on page 133. You can also change the instance type of new instances when you create or edit a VPG.
If you did not define a private IP for a virtual machine in the VPG definition, during recovery AWS sets the private IP from the defined subnet range.
Note: If the new instances do not power on, the process continues and the instances must be manually powered on.