
1. Set up a new SAML connection in HMH Systems:
a. Log in to HMH as a district administrator, and do the following:
○ For Ed users, open the My Schools page, on the left panel, click Roster.
○ For ThinkCentral or Holt McDougal Online users, click Import. The Roster Overview page appears.

b. If you are an advanced roster/automated user, set usernames on the Define Login Options page, using the Step-by-step Instructions for SAML. If usernames are correct, then proceed to next step.
Important: The usernames in HMH systems must be identical matches to your SSO Principal usernames.
c. Do either of the following:
○ On the Rostering Overview page, click the SSO Configuration button.
○ Open the Advanced Roster option, and then go to the Define Login Options page.
d. Click the Add SAML button.
e. Enter
the path for your metadata URL from AD FS. All AD FS connections will
use this URL:
https://{serverUrl}/FederationMetadata/2007-06/FederationMetadata.xml
Be sure to update your {serverUrl} value that is unique to your site.
Example: https://mydistrict.com/FederationMetadata/2007-06/FederationMetadata.xml
f. Type a Connection Name, which can be any name you want to use to identify your connection and click Connect.
g. If you want to force your users to only log in using only SSO, make sure your Global SSO Settings check boxes are selected (turned on).

2. Store critical connection information:
a. Copy and store all the HMH Platform SSO Endpoint URLs (URLs for Ed, Flight, ThinkCentral, Holt McDougal Online, and SAM) to a secure location (to be used in step 4).

b. Copy the HMH metadata URL as this will need to go back into your AD FS setup to complete the trust relationship. (to be used in step 3c).

3. Login to AD FS and create a new SAML SSO Connection:
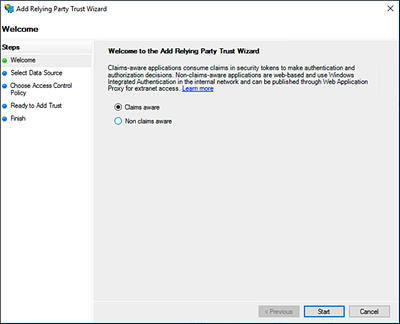
a. Click Add Relying Party Trust.

The Add Relying Party Trust Wizard appears.
b. Select the Claims aware option, and then click the Start button.
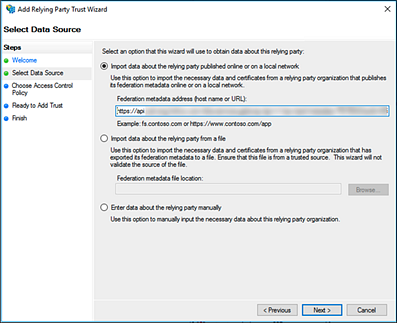
c. Select the Import Data about the relying party published online or on a local network option; in the field provided, type the HMH Metadata URL (from step 2b); and then click Next.
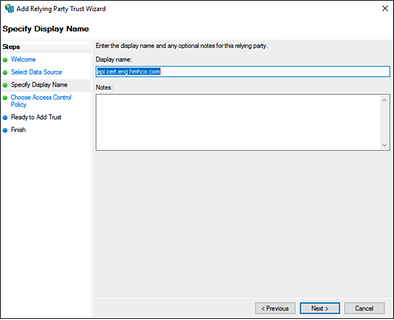
d. In the Display name field, enter a SAML connection display name such as HMH AD FS SAML SSO, and then click Next.
e. On the Choose Access Control Policy page, select Permit everyone, and then click Next.

f. On the Ready to Add Trust page, review the information, and then click Next.

g. On the Finish page, select the Configure claims issuance policy for this application check box, and then click Close.

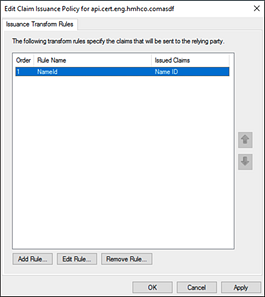
h. On the Edit Claim Issuance Policy page, click Add Rule.
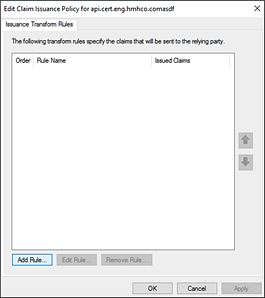
The Add Transform Claim Rule Wizard appears.
i. In the Claim rule template list, select Send LDAP Attributes as Claims, and then click Next.

The Configure Rule page appears.
j. In the Attribute store list, select Active Directory; in the mapping table, set SAM Account name to name ID; then, click Finish.

k. Click Apply, and then click OK.
4. Test the new connection URLs by logging in to Ed, ThinkCentral, Holt McDougal Online, and SAM as a student, teacher, and administrator to confirm all is working as expected. If your test is successful, you can update your SSO Portal page or shortcut URLs on your client machines.
Troubleshooting Tips:
– If you get an OKTA 400 error, then something in the SSO setup is not correct. Update your certificate.

– If you get a 2001 error, then the value you are sending from AD FS to HMH systems is a username that HMH does not have stored in that system. You might need to change your username formula in “Define Your Login” page.
– If you get an error such as the one shown below, then it could be a certificate issue, an algorithm setting issue (SHA-256), or the use of the incorrect SSO endpoints for HMH systems. Do either of the following:
○ Check your Windows log for exact error messaging.
○ Delete your connections and create new connections, paying close attention to your certificate and algorithm settings and using the newly created SSO URLs from the HMH System.
