Custom Reports
The data used in reports resides in the project database. Every Clarity project has a designated database. You can see the database name, or purge the data and start over on the Edit Project pane. The data is generated by the Revit DB Export task, which runs against Revit models and populates the project database. Each report of the project data is defined by an XML file, which determines what information displays, how it is presented, and what options a user of the report has.
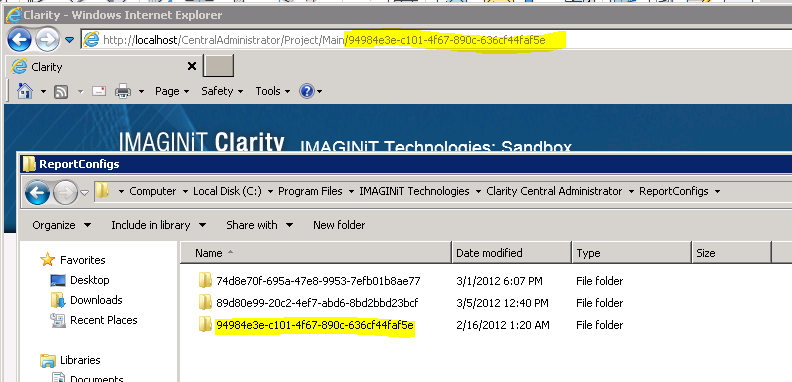
Report Files Location
By default, Clarity provides 9 template reports in every project. The templates are stored in the C:\Inetpub\wwwroot\CentralAdministrator\ReportTemplates folder. When creating a project, Clarity assigns it a GUID (globally unqiue identifier) that looks like 74d8e70f-695a-47e8-9953-7efb01b8ae77. Then, Clarity creates a subfolder under the C:\Program Files\IMAGINiT Technologies\Clarity Central Administrator\ReportConfigs folder and copies all of the report templates to it. If you browse to your project in Clarity, you can see the GUID for the project in the URL (address) for each page.
For example: http://(myServerName)/CentralAdministrator/Project/Main/94984e3e-c101-4f67-890c-636cf44faf5e
Report XML File Structure
The file has a variety of sections:
-
Name: Set the name of the report, as it displays to the user.
-
Description: Set the header of the report.
-
SelectColumns: Set the columns (or fields) of data that you want to display.
-
SourceTable: Set the name of the database table or view to query.
-
Optional drop-down filter options:
-
Dropdown: A drop-down field that enables user to filter the report.
-
WhereCondition: A description of how a drop-down value affects the table query.
-
GridSettings: Set the basic look-and-feel for the grid itself.
The Select Columns SectionThe Select Columns Section
Sample Section:
<SelectColumns>
<Column groupIndex="1">FamilyName</Column>
<Column groupIndex="2">TypeName</Column>
<Column>Level</Column>
<Column>Manufacturer</Column>
<Column>Model</Column><Column summary="Count">Mark</Column>
<Column>WallName</Column>
<Column visibleOnGridLoad="false">URL</Column>
<Column visibleOnGridLoad="false">FireRating</Column>
</SelectColumns>
In the SelectColumns section, there is one column entry for each field that you would like to show in the report. Primarily, the value of the Column entry will be the name of the field (as it exists in the source table or view). Typically, the field name matches the name of the Revit parameter in question (with a few obscure exceptions). There are additional optional attributes that you can specify for any column:
- VisibleOnGridLoad (True/False, with True as the default). If this value is set to false, the column does not display in the grid initially, but if the field chooser button is available, the end user will be able to choose it.
- DisplayFormatString (number, often 0.00): Used specifically on numeric values to control how many decimal places to show.
- Summary (Sum or Count): Controls whether this field is summarized if the data is grouped.
- For example, if you summarized the SUM of Room Area, and then grouped by Department, you can see the sum of room areas next to each department. Alternately, if you use Count, it would show the number of rooms associated with each department.
- groupIndex (number): Groups the column when the report is first open, and it shows the order of the grouping.
- For example:
<Column groupIndex="1">FamilyName</Column>
<Column groupIndex="2">TypeName</Column>
This indicates that the column FamilyName is to be grouped first, and the TypeName second.
The SourceTable sectionThe SourceTable section
The SourceTable could be straightforward or tricky, depending on the data you want to display. Tables in the database are mostly organized by category, type, or instance.
- For example: Walls and WallTypes are two different tables in the database. If you only need information from one table, you can just reference the required table name.
- To mix information between tables (i.e. tying walls and wall type information together) you must create a View for your database. A view is a database concept where you can create a virtual table by linking together a number of tables or conditions. Once created, it can be treated just like a regular table. Many of the sample reports use views because they want to provide filters by level or by phase.
To help with this process, and to see the tables that exist, and their field names, use the Microsoft SQL Server Management Studio application installed with Clarity.
The DropDown sectionThe DropDown section
Drop-down filters enables you to easily control which parts of the data displays.
Sample section:
<DropDowns>
<DropDown name="Phase" default="Select" displayField="Name"
valueField="Name">Select * From PhasesWithRooms Order By SequenceNumber</DropDown>
<DropDown name="Level" default="Select" displayField="Name"
valueField="Name">Select * From Levels Order By Elevation</DropDown>
</DropDowns>
Each DropDown corresponds to a form element shown to the user at the top of the report. They each have the following required elements:
- name: The name that is used to refer to this drop-down field and the text that displays in front of it.
- default (Select or First): Controls whether the drop-down is set to the first item in the list or the selected one, when the report initially loads.
- displayField: The name of the field to be shown on the user interface as drop-down values.
- valueField: The name of the value field to be used to filter the main table.
The main value of the DropDown element is an SQL query against the project database (i.e. Select * from Level - for all the level names, select against a view, control the order, etc.)
The WhereCondition sectionThe WhereCondition section
The WhereCondition entry defines how a given dropdown will affect the main query of the report.
Sample section:
<WhereConditions>
<WhereCondition type="AND" sourceDropDown="Phase">Phase</WhereCondition>
<WhereCondition type="AND" sourceDropDown="Level">Level</WhereCondition>
</WhereConditions>
Each WhereCondition contains several required attributes:
- sourceDropDown: The name of the DropDown element to reference.
- type (AND, OR, or any other SQL operator): Used to control how multiple dropdowns are put together.
The main value of the WhereCondition is the name of the field in the SourceTable that will be filtered by this DropDown.
The purpose of using WhereConditions and DropDowns is to build a SQL query against the table or view selected. In the above example, if the user selected New Construction and Level 1, the resulting query of the database would be:
SELECT * FROM RoomFinishes WHERE Phase=’New Construction’ AND Level=’Level 1”
This filters the rooms to just those that matched the criteria.
The GridSettings SectionThe GridSettings Section
The GridSettings section enables you to control the look, feel, and a few behaviors of the report.
The following elements control the GridSettings:
- WidthPercent: 1-100: Percentage of available width that the grid takes up.
- ShowTitlePanel (True/False): Controls whether the title panel displays.
- AllButtonText: The text used for the All button.
- ShowGroupPanel (True/False): Controls whether the group panel (i.e. drag column here to group) displays.
- ShowHeaderFilterButton (True/False): Controls whether the end-user can filter by clicking on the corner of the header column.
- ShowFooter (True/False): Controls whether the footer displays.
- PageSize (number): The amount of rows that display for the table on one page (before offering a Next button).
- ShowCustomizationWindow (True/False): Displays a field chooser window where the end users can choose the fields they want to display.
Other Notes
The parameter values in the database are typically stored in Revit internal units. For example, for length parameters, the values will be in decimal feet. In order to present other units, it may be necessary to build a conversion into a view.