System Settings
The System Settings pane defined settings that affect the overall behavior of Clarity:
General InformationGeneral Information
- Company Name: Displays at the top of the screen.
- Main Server Location: Set as the localhost if this server is the "Main" server (a Clarity host which maintains the synchronized list of projects for the firm), otherwise use this to indicate where to send the project information to.
- Use SSL: This web application should use SSL when accessing it.
- Server Public Name: This should default to the name of the web server - but if you have an alternate name (such as a fully-qualified-domain name for an SSL certificate) that should be used instead, please fill it in here.
- Use Additional Project Databases: An option to create a customizable second database for each Project, which can store non-CAD information.
- Coordinator Can Create Projects: Is a Global Project Coordinator allowed to create projects? Or only Administrator roles?
- Monthly Summary Email: Clarity sends anonymous task usage information to IMAGINiT for each server. However, if you would like to identify an email address for this server, we will collate a monthly report of usage and send it back to you.
- Share Metric Data: Opting into this option will periodically send a summary of anonymized model metric data to IMAGINiT. All server, firm, Project and model data will be hashed so that neither IMAGINiT nor anyone else can identify the data. In the future, you'll be able to compare your firm's data against comparable models from other firms. If you have additional questions on this, please reach out to spg@rand.com.
- Backup System Database: Intended for usage where there is limited infrastructure for backup/disaster recovery on a machine with SQL Server on the same machine as the Clarity host. If TRUE, the system will attempt, once per week, to make a backup of the RandRevit centralized database to the Backups folder.
- Firm Type: For analytics reporting, this tells us what kind of AEC firm you are, so that we can better segment how different firms use our product, as well as segment your community metrics results.
- Maximum Login Attempts: The system will automatically disable any user who has this many consecutive failed login attempts, for security purposes. These logins include web sign in, Web Services sign in (including sign ins from the task server or Clarity AD Sync), as well as the Clarity Client addin.
- Technical Contacts: Please list email addresses that should be notified about any important technical notices for Clarity.
File LocationsFile Locations
The locations must be set as folders that accessible by the UserId running the Clarity Application pool (shown on the main server page). Verify that the required read/write or both permissions exist.
- Project Artifact Path: Location where Clarity stores file-based artifacts created by the tasks.
- Project Database Location: Location where the Project databases are created/stored. Note: If the SQL Server is installed on a separate server than the Clarity host, this setting should be left blank.
- Backups Location: Location where Clarity stores backups created by the backup task. Note: It is recommended to set this location as a UNC folder, to facilitate the transfer of large zip files from the task servers the folder.
- Templates Location: Location of template files.
- Datasheet Template Location: Location of datasheet templates.
- Datasheet Base Template Location: Base location of where datasheets are stored.
- Email Template Folder: Location of where e-mail template messages are stored.
- Certificate Temporary Path: A temporary location where certificates can be created during the certificate generation process.
- Report Template Location: Location to store the default reports copied for every new Project.
- Report Query Location: Location to find/store reports for all Projects.
- Project Query Location: Location to find/store cross project reports from the Project Query page.
- OpenVPN Path: Location of the OpenVPN installation.
- Task Action Plugins: Location where post-task action DLLs are stored.
- Project Archive Location: Location for Project Archive files to be copied by default.
Task ProcessingTask Processing
- File System Buffer Multiple: Operating system option that enables you to set the amount of memory allocated to watching file-based projects to immediately detect changes. It is recommended to use multiples of 4 (4-16).
- Task Schedule Only On Change Default: Enables you to set whether the Only On Change option is selected by default.
- Task Target Count Warning: Enables you to set the required number of files that a task, targeted at files and set to the * wildcard, will ask to confirm the user's intention to run this task on all of the files.
- Task Not Started Timeout: Error showing the amount of time that task has been unable to go from Created to In Progress.
- Task In Progress Timeout: Error showing the amount of time the task has been unable to successfully complete.
- Notify Admins/Coordinators of Error Tasks: Enables you to set whether or not to send global coordinators and administrators e-mail notifications of the tasks errors.
- Claim All Tasks For Each Model: Option that displays when the task server sees multiple tasks in the queue for the same model.
- True: Indicates that the task server should claim all of the tasks (in order to minimize the overhead of loading time). If the tasks take too long, it is recommended to distribute one model's tasks across multiple server, if multiple task servers exist
- File System Buffer Multiple: This option controls how much memory that used to watch for changes to models in file-based projects. (zero to 20 - and it should be auto-increased if there is a problem)
- Task Schedule Only-on-Change Default: Should scheduled tasks to the "only-on-change" option for scheduled tasks.
- Task Target Count Warning: If the user configuring a task has left the task target as "*", warn the user if there are more than this number of models targeted.
- Allow Task Creators to Enter Windows Credentials: If Yes, configurers of tasks can enter windows domain credentials that the given task should "run as".
Monitoring ServiceMonitoring Service
- Send New Project User Notifications: Alerts a project coordinator when users or groups are added to a project.
- Metric Summary Time: Sets the time of day when Clarity should recompute all metric summaries.
- Large Support File Scan Frequency: Sets the amount of days between each scan of support file size, in a Revit Server.
- Support File Trigger Size: Sets the total megabyte support file size for any model and sends e-mail notification if it exceeds set number.
- Send Build Change Notifications: Checks the Revit build numbers on models in a Project and sends e-mail notifications the project coordinators if the build number for a model changes.
- Auto Tag Project Type: Apply a project tag automatically based on the type of project.
- Auto Tag Revit Version: Apply a project tag automatically based on the Revit versions of models in the project.
- Auto Tag Office: Apply a project tag automatically based on the project's office.
- Auto Tag New Projects: Apply a "New" tag to projects that were created in Clarity within the past few weeks.
- Dormant Project Alert Days: Send an alert about scheduled tasks running against projects where the models have not changed in this many days.
- Dormant Project Scan Frequency: How often to scan for dormant projects (days).
- Erroring Task Cleanup Alert: Looks periodically for tasks that have errored multiple times in a row over the past number of weeks. If WARNING, sends an alert to the project coordinator for these projects to clean them up. If DISABLE, sends the warning but also disables the tasks.
- Task Server Missing System Alert Timeout: The default number of minutes where a task server has not checked in (typically at least once per minute), after which an alert should be created.
- Task Server Stop Checking For Missing Timeout: The default number of minutes after which a task server should just be considered "gone forever" and no further alerts issued.
Clarity ClientClarity Client
- Minimum Client Version: Ensures that Clients are at least running a minimum version of the Clarity Client.
- Enable Model Activity Tracking: Opt into the collection of model activity (how much time was spent by users on each model).
BIM360
- Default BIM360 Hub: The primary hub for this Clarity server (for example your own firm) that should be used for by default
- Auto-Create Newly Found Projects: If YES, Clarity will watch for new BIM360 projects (only in your default hub, above) and automatically create the Clarity project that matches the BIM360 project - once there is a Revit model in the project to indicate to Clarity what the Revit version should be.
- Auto-Create Project Template: If the Auto-Create option is on, specify here a project that will be copied as a template.
OtherOther
- Days to Keep Legacy Task Data: The number of days to keep the full log data of every task, before it is cleaned up. This attempts to keep the database size under control by periodic cleaning out of old task log data (the basic information for each task will still remain).
- Check Engine Score: The minimum model score to trigger a model quality warning for a model or project.
- Datasheet Edit Comments: When Revit data is edited within a datasheet, should the user be forced to fill in the "comment" field associated with the requested change.
Email Settings
The Email Settings tab enables you to configure the various emails that Clarity sends to users, such as Task Completions and Errors, Revit build change notifications, New User welcome, etc. Note that to set these setting, Clarity must have a valid set of SMTP email credentials.
This includes:
-
The mail server
-
The port number (25 for unencrypted, typically 465 or 587 for SSL encrypted)
-
Whether SSL is required.
-
Whether specific credentials (userId/password) is required to send email.
-
The sender that the email should appear from.
-
The administrator email that the email should go to (limited cases, beyond the test email).
Options set here differ based on the work environment, the mail server used, the options set for the mail server, etc. Some mail servers are configured to be very restrictive (require authorization and might only send email from the same user you provide credentials for).
To try out the settings:
- Select the required options and click Send Test Email to test out the settings.
Note: If your Exchange server is causing issues, opt for a Gmail address or any other mail service just for sending Clarity email.
Project Plugin
The Project Plugins tab enables you to provide credential information for certain integrations, such as the Bentley ProjectWise. For ProjectWise, you can specify:
-
Your ProjectWise Server
-
The default datasource to connect to
-
The user credentials to connect with
-
The password
On the Add Project page, Clarity scans all of the available datasources for this server. The default options configured above is the default datasource available. To use multiple datasources, you must configure a userId/password that exists on all datasources. These credentials are used for querying the files that exist, copying out files for processing, checking in/updating files with the Post Task Action, etc.
Paper Sizes
The Paper Sizes tab enables you configure a list of valid paper sizes to be used for PDF tasks. In this tab, you can Add, Edit or Delete Paper Sizes from the available list.
By using these paper sizes when you configure a paper size, rather than the paper sizes associated with a particular PDF driver (i.e. ClarityPDF, Bluebeam, etc) you have the flexibility to:
-
Run different PDF drivers on different task servers (or in different offices).
-
Run multiple PDF tasks concurrently on a task server with different drivers (using the Vary PDF Drivers option in the task tray).
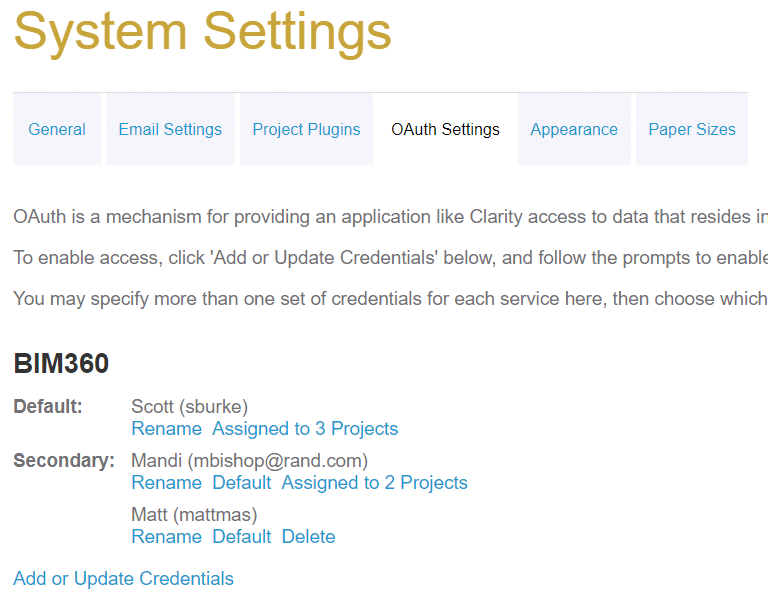
OAuth Settings
OAuth is a technology used to connect two systems together, using a set of credentials. OAuth enables Clarity to access other systems, such as BIM360, Dropbox, Box, etc.
-
On the System Settings page, in the OAuth Settings tab, use the Add or Update Credentials link to open the target system, where you can login (if not already logged in). You are then prompted to confirm the access that Clarity is requesting from the system (i.e. the ability to read files). Once completed, on the System Settings page, confirm that you are authenticated to the other system.
-
Multiple Credentials: It is now possible to add multiple user credentials for each system, so that you can use different user credentials for each project. After adding a credential to a system, you have the ability to:
- Rename: (the credential will be named originally based on the user's name, but you may specify an alternate name visible to choose within Clarity)
- Default: Make this user the default credentials used, unless specified otherwise on a project.
- Delete: Remove these credentials (you may also see which projects have credentials specifically assigned to them).
- Check: Specifically for BIM360, this option will show all BIM360 Accounts/Projects that the given token has access to. For diagnostic purposes.
Per-project OAuth credentials setting can be changed on the project's Tasks / Authorization tab.
For information on BIM360 authentication, see BIM360 Access.